In every business generating PDF files from invoices, bills, articles, reports, etc. is necessary. As a PDF (portable document file), we can keep it offline for later consumption instead of viewing the same detail using the network.
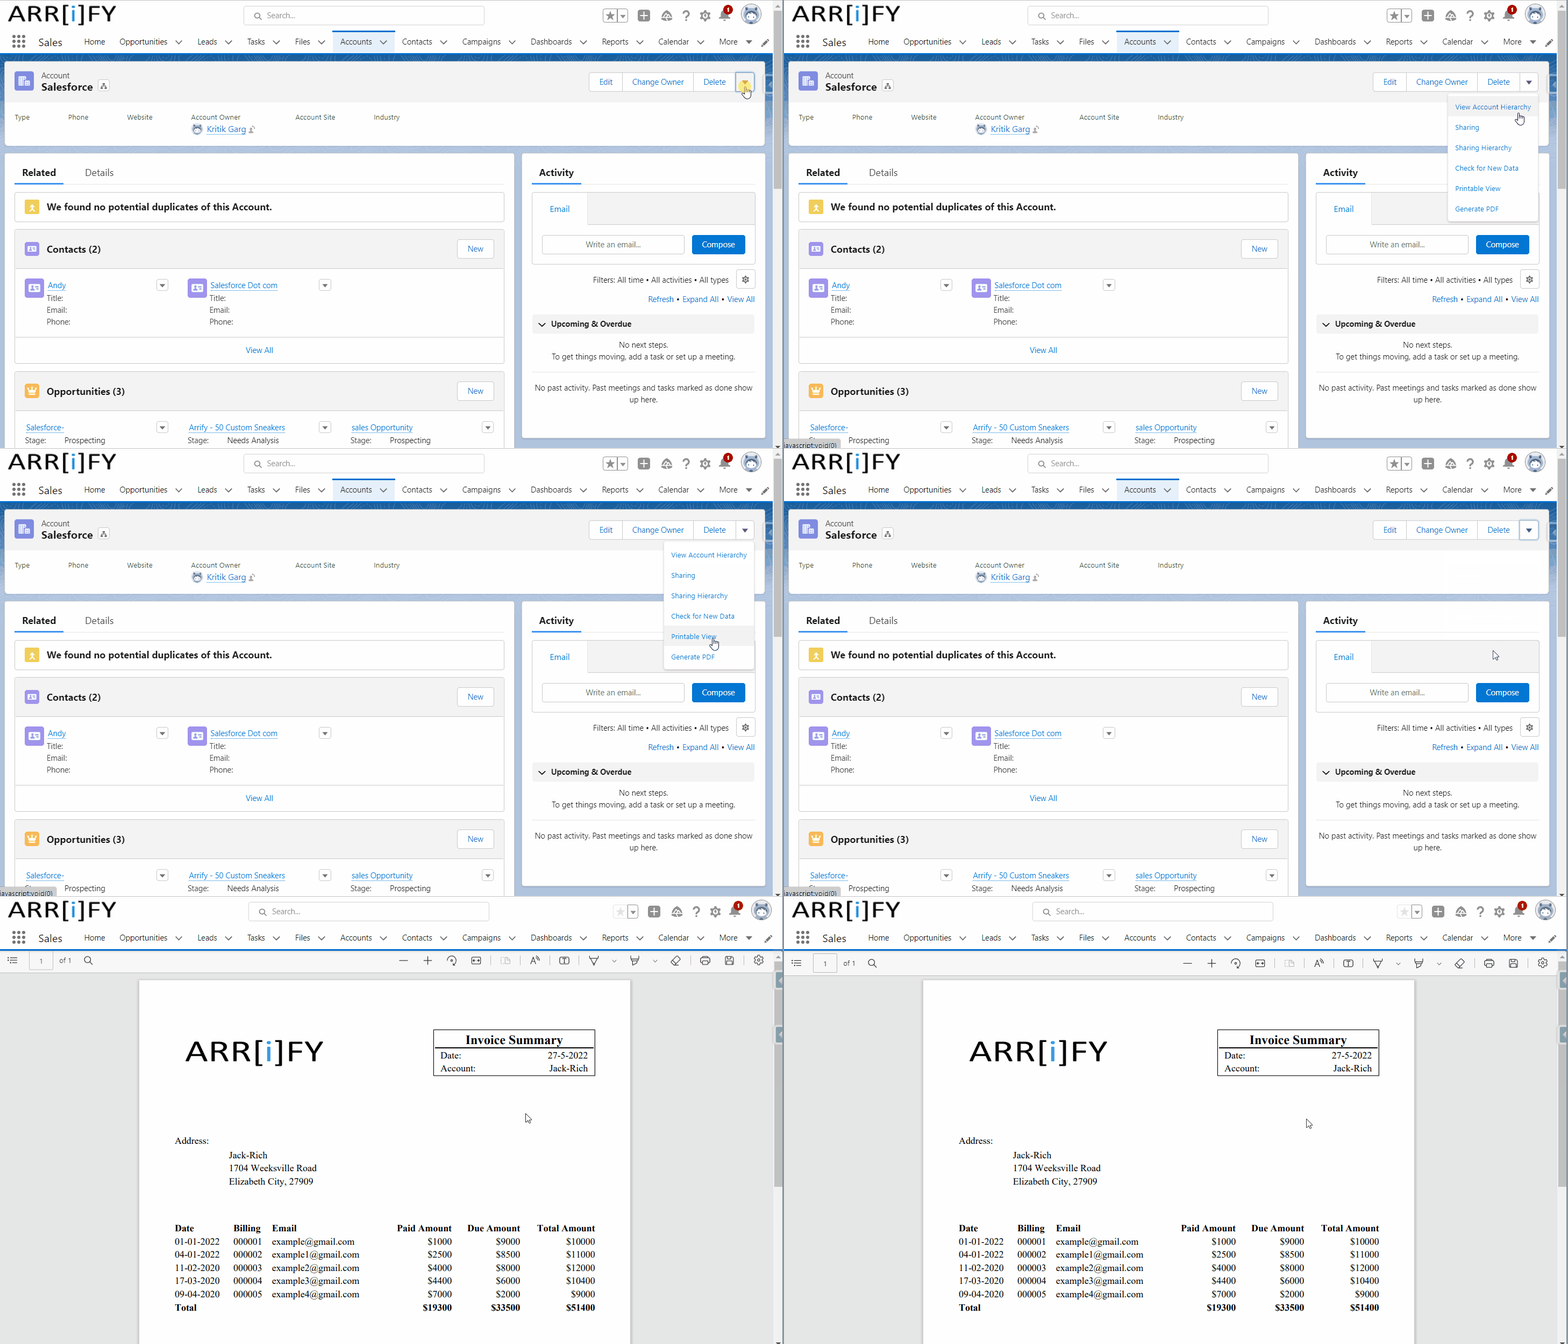
In this post, we will explain how to Generate PDF in Salesforce with a button click. In this implementation, we will show Generate PDF button in Salesforce on the Account details page. After clicking a button, a PDF will be generated.
Salesforce has in-build PDF generation tool, that can generate PDF document dynamically without using any third party app. Later generated PDF can be saved as File on Salesforce Record or can be sent via Email.
Steps to generate pdf in Salesforce
- Create a Static Resource (optional)
- Create a VF page
- Create a button to Generate PDF
What you need before start
- Your Company Logo image (PNG/JPEG) : Logo will appear on top of generated PDF
- Working Salesforce Org
Let’s Start generating pdf in Salesforce
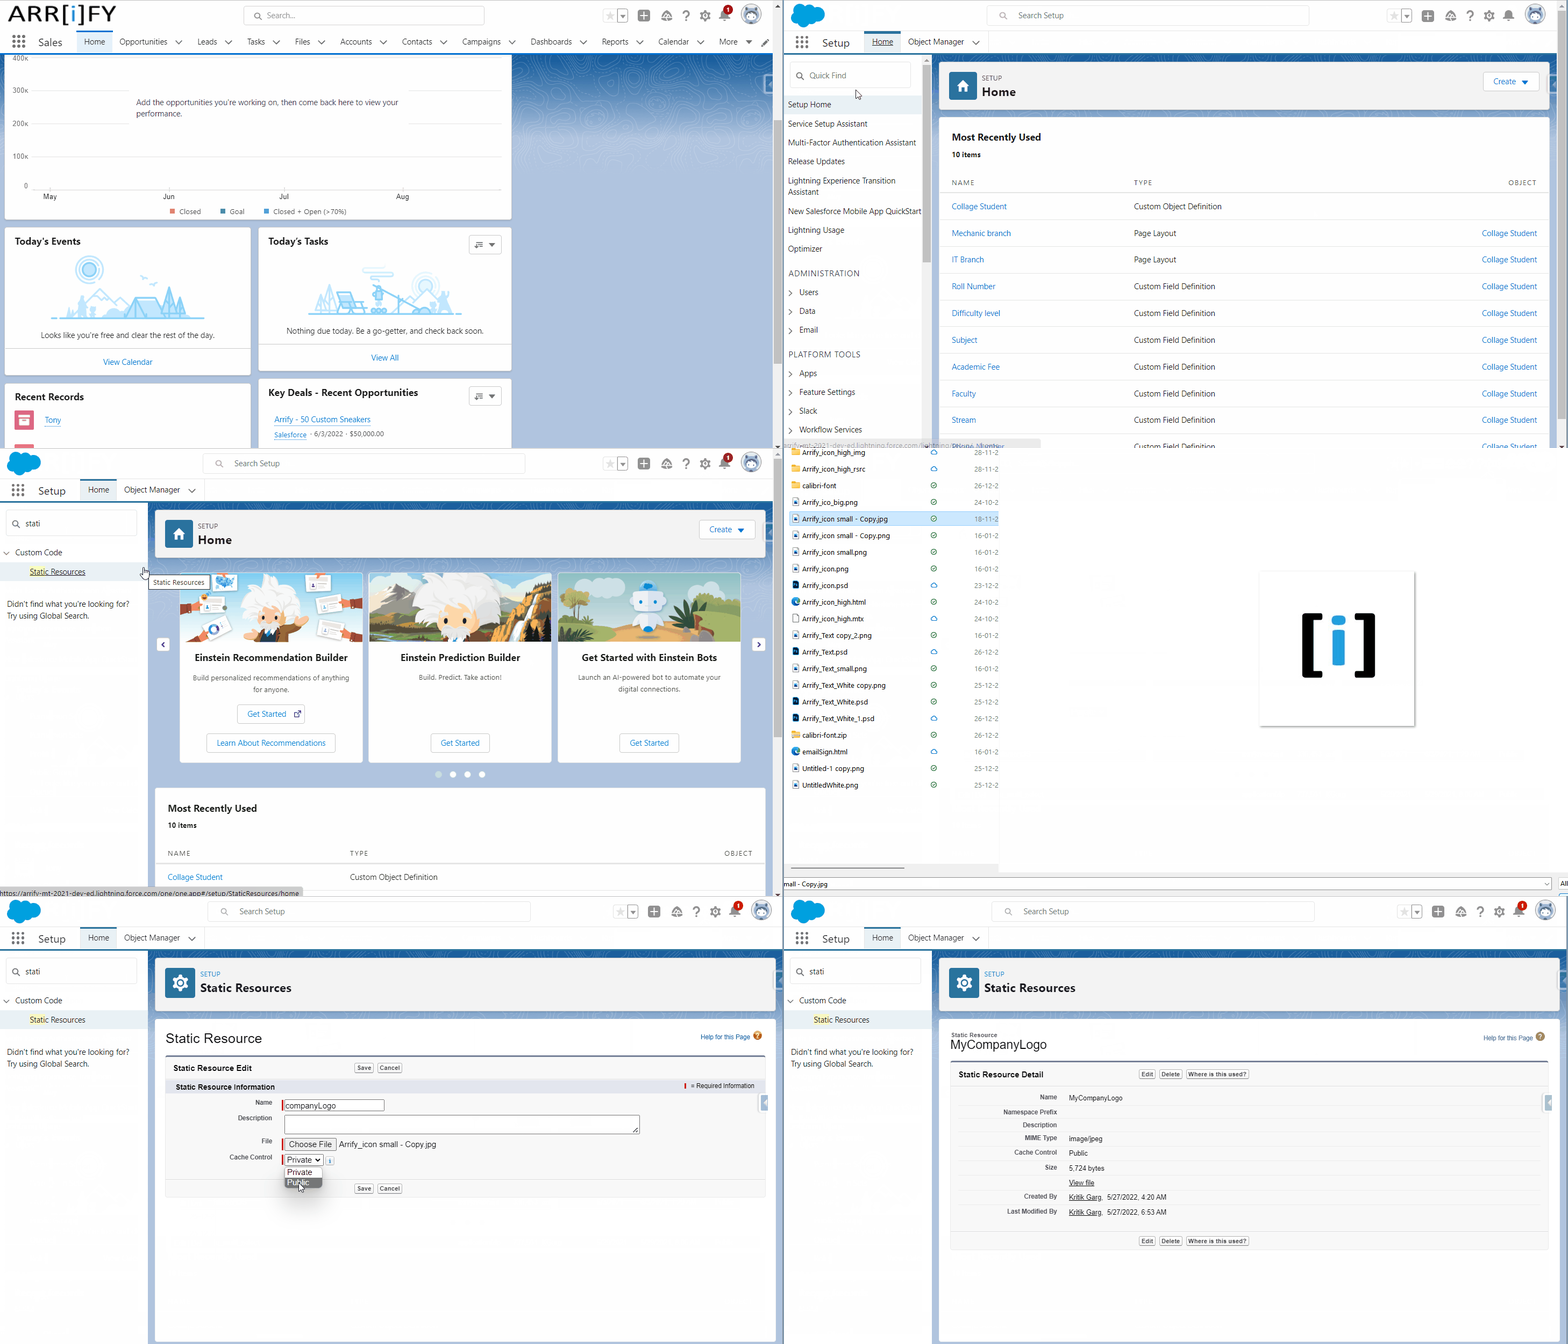
Create a Static Resource for your company logo:
To create a static resource:
- From Setup, enter Static Resources in the Quick Find box, then select Static Resources.
- Click New.
- In the Name text box, enter the text “companyLogo”.
- Next to the File text box, click Browse to navigate to a local copy of your Company Logo.
- Set the Cache Control to public.
- Click Save.
Learn more about static resource in Salesforce

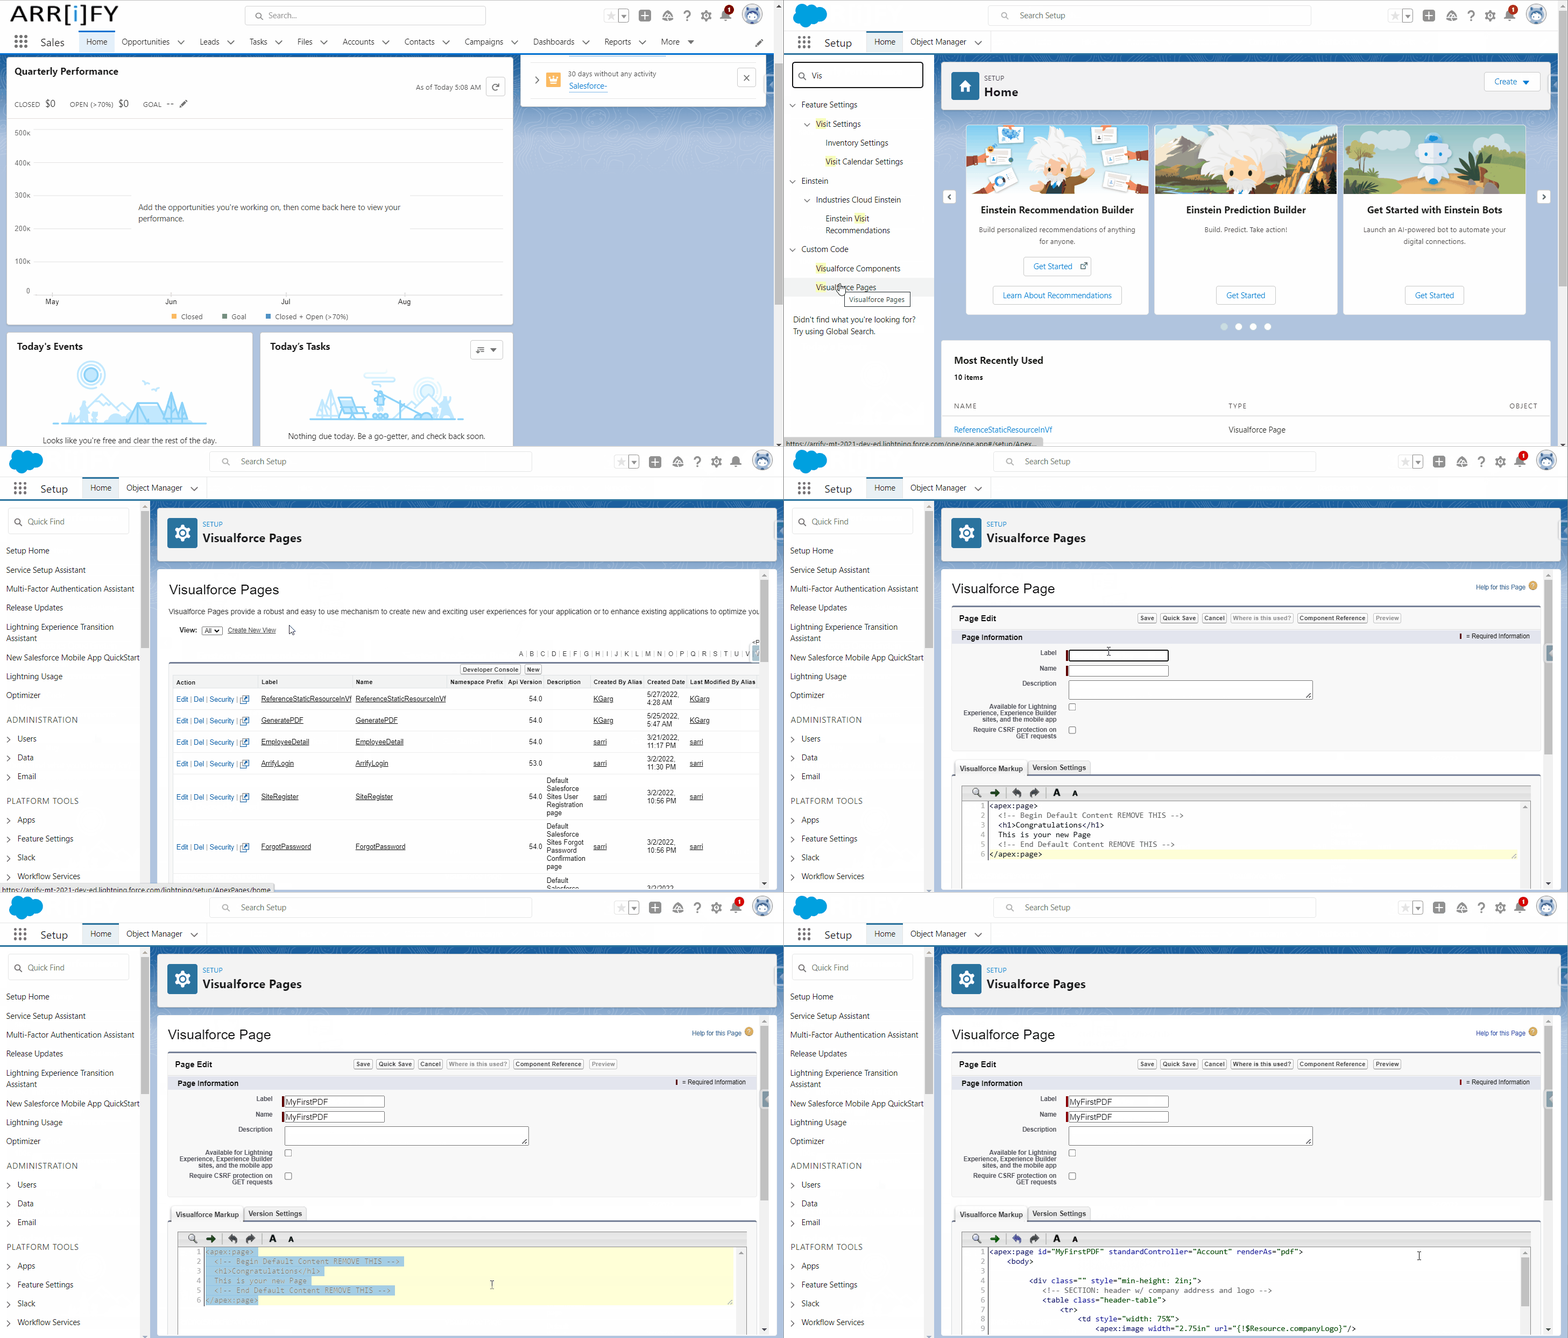
Create a Visualforce Page:

To create Visualforce pages :
- From Setup, enter Visualforce Pages in the Quick Find box, then select Visualforce Pages.
- Click New.
- In the Label text box, enter the text “MyFirstPDF“. (The same name will be entered into the name)
- Copy and paste the below code
- Click Quick Save to save your changes and continue editing your page. Your Visualforce markup must be valid before you can save your page.
<apex:page id="MyFirstPDF" standardController="Account" renderAs="pdf">
<body>
<div class="" style="min-height: 2in;">
<!-- SECTION: header w/ company address and logo -->
<table class="header-table">
<tr>
<td style="width: 75%">
<apex:image width="2.75in" url="{!$Resource.companyLogo}"/>
</td>
<td style="">
<table style="width: 2.8in;border: solid 1px black; border-collapse: separate; ">
<tr>
<td style="text-align: center; font-size: 16pt; font-weight: bold; border-bottom: solid 1px black"
colspan="2">Invoice Summary
</td>
</tr>
<tr>
<td> Date:</td>
<td style="text-align:right;">
{!DAY(TODAY())}-{!MONTH(TODAY())}-{!YEAR(TODAY())}
</td>
</tr>
<tr>
<td> Account:</td>
<td style="text-align:right;">Jack-Rich </td>
</tr>
</table>
</td>
</tr>
</table>
</div>
<table >
<tr>
<td >Address:</td>
<table Style="padding-left: 90px;">
<tr>
<td>
Jack-Rich
</td>
</tr>
<tr>
<td>
1704 Weeksville Road
</td>
</tr>
<tr>
<td>
Elizabeth City, 27909
</td>
</tr>
</table>
</tr>
</table>
<br/>
<br/>
<br/>
<div style="min-height: 5.7in;">
<table style="width: 100%;">
<tr>
<th>Date</th>
<th>Billing</th>
<th>Email</th>
<th style="text-align:right;">Paid Amount</th>
<th style="text-align:right;">Due Amount</th>
<th style="text-align:right;">Total Amount</th>
</tr>
<tr>
<td>01-01-2022</td>
<td>000001</td>
<td>example@gmail.com</td>
<td style="text-align: right;">$1000</td>
<td style="text-align: right;">$9000</td>
<td style="text-align: right;">$10000</td>
</tr>
<tr>
<td>04-01-2022</td>
<td>000002</td>
<td>example1@gmail.com</td>
<td style="text-align: right;">$2500</td>
<td style="text-align: right;">$8500</td>
<td style="text-align: right;">$11000</td>
</tr>
<tr>
<td>11-02-2020</td>
<td>000003</td>
<td>example2@gmail.com</td>
<td style="text-align: right;">$4000</td>
<td style="text-align: right;">$8000</td>
<td style="text-align: right;">$12000</td>
</tr>
<tr>
<td>17-03-2020</td>
<td>000004</td>
<td>example3@gmail.com</td>
<td style="text-align: right;">$4400</td>
<td style="text-align: right;">$6000</td>
<td style="text-align: right;">$10400</td>
</tr>
<tr>
<td>09-04-2020</td>
<td>000005</td>
<td>example4@gmail.com</td>
<td style="text-align: right;">$7000</td>
<td style="text-align: right;">$2000</td>
<td style="text-align: right;">$9000</td>
</tr>
<tr>
<td><b>Total</b></td>
<td></td>
<td></td>
<td style="text-align: right;"><b>$19300</b></td>
<td style="text-align: right;"><b>$33500</b></td>
<td style="text-align: right;"><b>$51400</b></td>
</tr>
</table>
</div>
<div class="footer" style="">
<hr/>
<table align="center" style="width: 100%;">
<tr>
<td colspan="2" style="font-size: 10pt; color: green;">
<table style="width: 100%; border-collapse: collapse; border: 1px solid black; ">
<tr>
<td style="text-align: left;">Arrify</td>
<td style="text-align: right;">www.arrify.com</td>
</tr>
</table>
</td>
</tr>
</table>
</div>
</body>
</apex:page>Create a Detail Page Button on the Account to generate PDF:
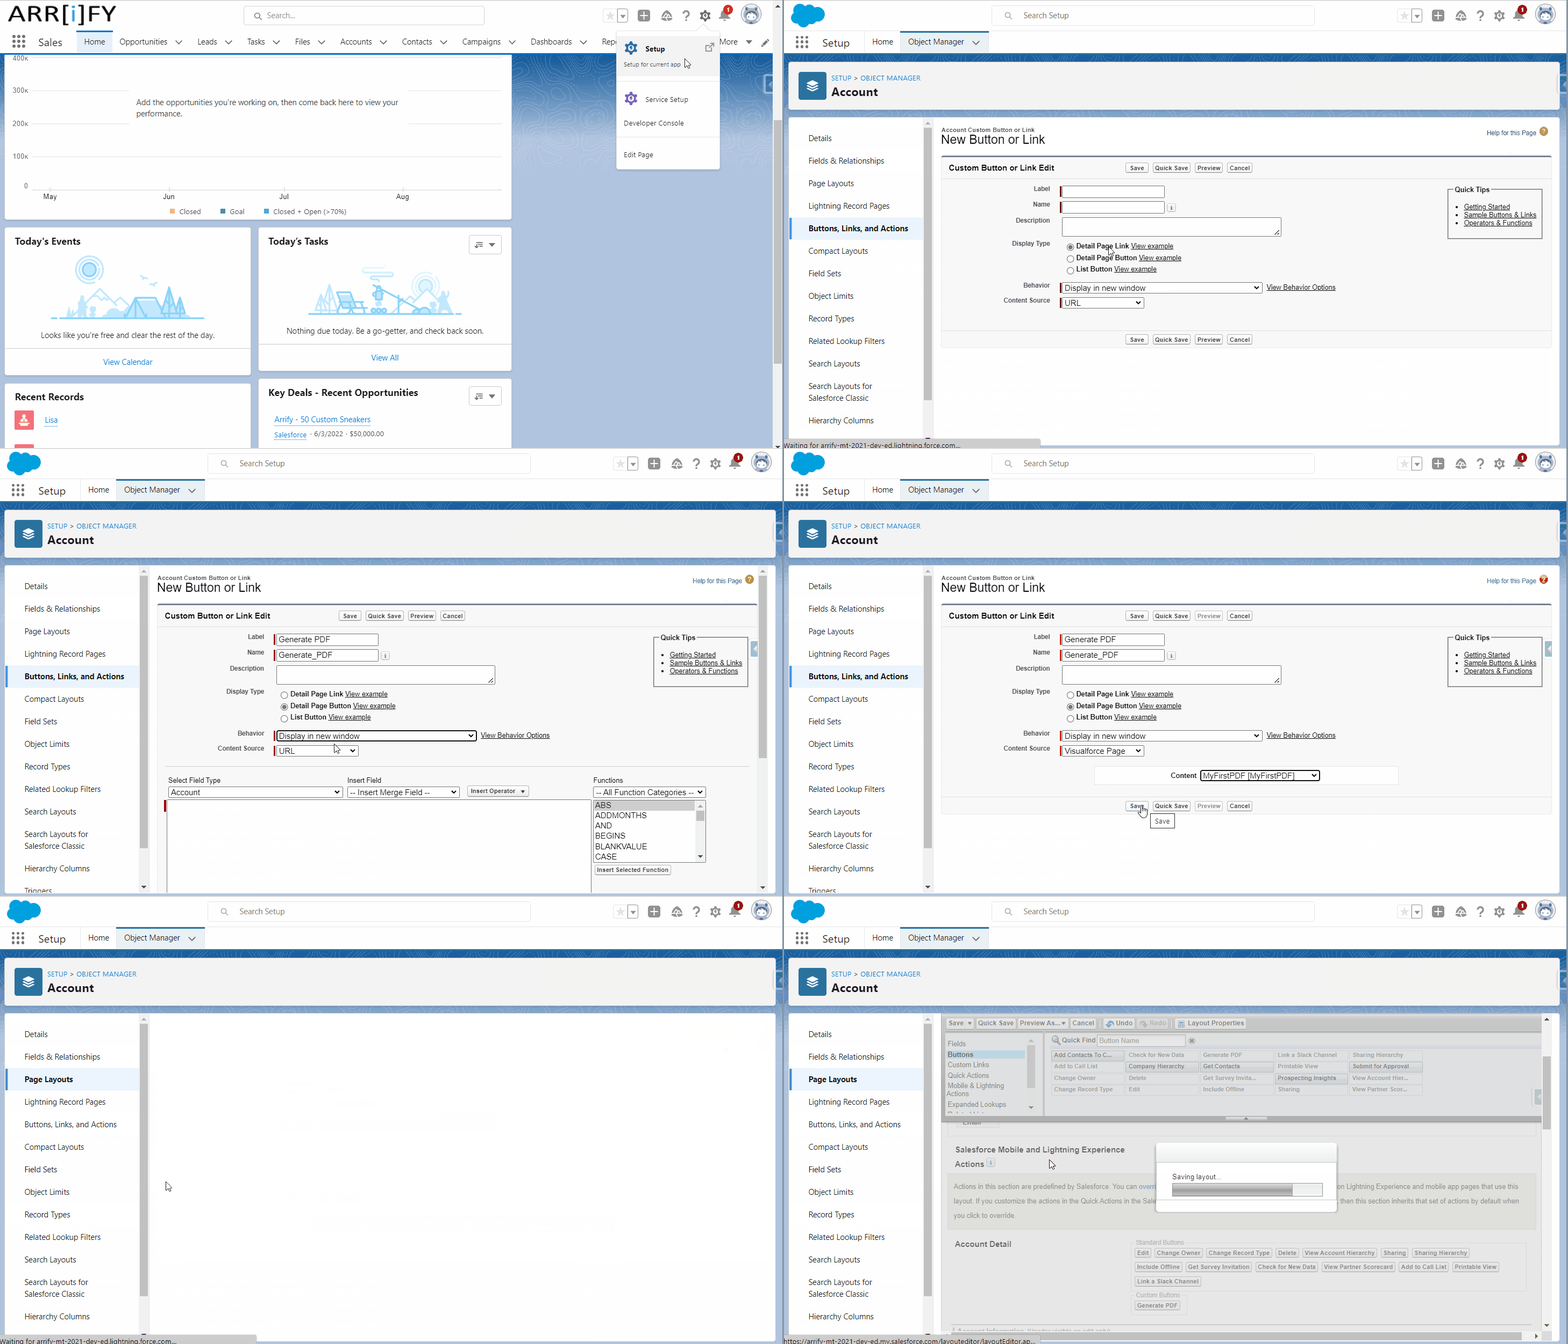
To Create a Button on Account

- From Setup, click Object Manager, then click Account.
- Click Buttons, Links, and Actions, then click New Button or Link.
- Name the button
"Generate PDF". - Select Detail Page Button.
- Set Content Source “Visualforce Page“
- Select content “MyFirstPDF“
- Click Save, then click OK. Now add it to the Account page layout.
- Click Page Layouts, then click Account Layout.
- From the Buttons category in the palette, drag “
Generate PDF“ into the Custom Buttons area on the page layout. - Click Save. OK! Now let’s test it.
- From the App Launcher, find and select Sales, then click the Accounts tab.
- Open an account record.
- In the highlights panel, not only do you see the fields from the object’s compact layout, but you also see an actions menu. The actions menu is a combination of the standard buttons, custom buttons, and actions from the page layout.
- Expand the actions menu, and select Generate PDF. The browser opens a new window or tab that shows you the PDF.
Generate PDF in Salesforce with APEX
Salesforce provides a way to generate PDF documents using Apex, which is a programming language that enables developers to create custom functionality for their Salesforce org. This can be useful for creating documents such as invoices, contracts, and reports.
To generate a PDF with Apex, you can use the PageReference.getContentAsPDF() method. This method allows you to create a new page reference and set the content type to PDF.
Here’s an example of how you might use it:
// Create a new page reference
PageReference MyFirstPDF = new PageReference('/apex/MyFirstPDF');

// Set the account id as a parameter
MyFirstPDF.getParameters().put('accountId', someAccountId);


// Create a new PDF document and add the contents of the page reference to it
ContentVersion cont = new ContentVersion();
cont.Title = 'MyFirstPDF';
cont.PathOnClient = 'MyFirstPDF.pdf';
cont.VersionData = MyFirstPDF.getContentAsPDF();
cont.Origin = 'H';

insert cont;
In this example, MyFirstPDF is a Visualforce page that renders the content of your PDF. You can use the <apex:page> tag and its various attributes and child tags to control the layout and appearance of your PDF. You can also use Apex code in your Visualforce page to retrieve data from your Salesforce org and populate the PDF with dynamic content.
Once you have generated your PDF document, you have a few options:
Generating a PDF on Button Click in Salesforce LWC
In your LWC, add a button that, when clicked, triggers an Apex method to generate the PDF from the Visualforce page.
<!-- LWC button -->
<template>
    <lightning-button label="Generate PDF" onclick={generatePDF}></lightning-button>
</template>


//Controller
generatePDF() {
    generatePDFMethod({ recordId: this.recordId })
    .then(result => {
        // handle success
    })
    .catch(error => {
        // handle error
    });
}
Apex Code to Generate the PDF: Use PageReference.getContentAsPDF() to fetch the content of the Visualforce page as PDF.
@AuraEnabled
public static void generatePDFMethod(String recordId) {
    PageReference pdfPage = new PageReference('/apex/YourVisualforcePageName?id=' + recordId);
    Blob pdfBlob;
    pdfBlob = pdfPage.getContentAsPDF();
    // Save, email or handle the PDF as needed
}
Saving Generated PDF to Salesforce Files
Once you’ve generated the PDF blob, you can save it to Salesforce Files.
ContentVersion cont = new ContentVersion();
cont.Title = 'GeneratedPDF';
cont.PathOnClient = 'GeneratedPDF.pdf';
cont.VersionData = pdfBlob;
cont.Origin = 'H';
insert cont;
Sending PDF as Email Attachment
The PDF blob can also be emailed as an attachment:
Send the PDF via email using the Messaging.SingleEmailMessage class.
//Send the email
Messaging.sendEmail(new Messaging.SingleEmailMessage[] {mail});
Messaging.EmailFileAttachment attach = new Messaging.EmailFileAttachment();
attach.setFileName('GeneratedPDF.pdf');
attach.setBody(pdfBlob);

Messaging.SingleEmailMessage mail = new Messaging.SingleEmailMessage();
mail.setToAddresses(new String[] {'recipient@example.com'});
mail.setSubject('Generated PDF from Salesforce LWC and Apex');
mail.setHtmlBody('Please find attached the generated PDF.');
mail.setFileAttachments(new Messaging.EmailFileAttachment[] {attach});

Messaging.sendEmail(new Messaging.SingleEmailMessage[] {mail});
Integration with External Cloud Services:
For businesses with external cloud storage requirements, the generated PDF can be stored in services like AWS S3. Salesforce offers integration capabilities with AWS, allowing developers to push the generated PDF blob to an S3 bucket.
Learn more about Salesforce to AWS3 Integration
This Apex code can be used in a variety of contexts, including triggers, Apex Batch, or any other place where Apex is supported.
Fonts supported By Salesforce PDF Generation
Visualforce PDF rendering supports a limited set of fonts. To ensure that PDF output renders as you expect, use the supported font names. For each typeface, the first font-family name listed is recommended.
| Typeface | font-family Values |
|---|---|
| Arial Unicode MS | Arial Unicode MS |
| Helvetica | sans-serif, SansSerif, Dialog |
| Times | serif Times |
| Courier | monospace Courier Monospaced DialogInput |
- These rules apply to server-side PDF rendering. Viewing pages in a web browser can have different results.
- Text styled with a value not listed here uses Times. For example, if you use the word “Helvetica,” it renders as Times because that’s not a supported value for the Helvetica font. We recommend using “sans-serif”.
- Arial Unicode MS is the only multibyte font available. It’s the only font that provides support for the extended character sets of languages that don’t use the Latin character set.
- Arial Unicode MS doesn’t support bold or italic.
- Web fonts aren’t supported when the page is rendered as a PDF file. You can use web fonts in your Visualforce pages when they’re rendered normally.
Custom Code vs Third-Party Apps for PDF generation
| Parameter | Custom Code | S-Docs | PDF Butler |
|---|---|---|---|
| Setup Cost | $250 – $400 (Based on document) | $200 | $160 |
| Subscription Cost (For 10 Users) |
$0 | $125/Month* (*Anual Contract) |
$140/Month |
| Speed | Fastest | Moderate | Slow |
| Security | Most Secure (No external service) |
Moderate | Depends on Their Server |
| Updates | Not Needed | Need to install update in every release | |
Visualforce PDF Rendering: Tips and Limitations
Visualforce offers a handy way to generate PDFs from your pages, but there are some quirks and limitations to keep in mind. Here’s a breakdown to help you design PDF-friendly Visualforce pages:
Things to Consider:
- Optimize for Print: Treat your Visualforce page as if it were a document designed for printing. Keep the layout simple, use clear fonts, and avoid elements that don’t translate well to print, like interactive forms or JavaScript-dependent components.
- Font Choice Matters: Not all fonts are supported. Stick to standard fonts and avoid web fonts. If you need to display multibyte characters (like those found in Japanese or accented text), use ‘Arial Unicode MS’.
- Rich Text Limitations: Formatting within rich text area fields might not render perfectly in the PDF. It’s best to keep formatting in these fields minimal.
- Long Lines of Text: Extremely long lines of text (like URLs or registry entries) without any breaks can cause issues. The PDF rendering service might not wrap them correctly, leading to content overflowing off the page.
Limitations:
- PDF Only: Currently, PDF is the only supported rendering service.
- CSS and PDF Versions: The service supports PDF version 1.4 and CSS versions up to 2.1.
- Browser Behavior: How the PDF is displayed (in the browser or downloaded) depends on the user’s browser settings.
- No JavaScript: Content that relies on JavaScript to render won’t appear in the PDF.
- Mobile App Exclusion: PDF rendering isn’t supported in the Salesforce mobile app.
- Image Limits:
- The total size of all images in the PDF cannot exceed 30 MB.
data:URI scheme images, WebP images, and SVG markup are not supported.
- Component Quirks:
<apex:pageBlock>and<apex:sectionHeader>components might not render with double-byte fonts.- If an
<apex:dataTable>or<apex:pageBlockTable>has no rendered<apex:column>components, PDF rendering will fail. Set the table component’srenderedattribute tofalsein this case.
Salesforce PDF Generation Limits:
- Response Size: The maximum size of the Visualforce page response before PDF rendering is 15 MB (this is a standard limit for all Visualforce requests).
- File Size: The generated PDF file cannot exceed 60 MB.
Best Practices:
- Always test: Before deploying your Visualforce page, always test how it renders as a PDF to catch any unexpected formatting issues.
- Keep it simple: Favor straightforward layouts and formatting for optimal PDF rendering.
- Mind your images: Optimize images to keep the total size under the limit.
By keeping these considerations and limitations in mind, you can create Visualforce pages that generate clean, professional PDFs.
Generate PDF Using Third-Party App:
The Salesforce AppExchange hosts a variety of third-party apps designed to simplify PDF generation. Here are some of the options:
Titan Forms
Titan Forms empowers users to create PDFs from any Salesforce object, including both standard and custom objects. Its intuitive drag-and-drop interface simplifies the process of designing forms and templates. Users can also leverage Titan Forms to automate PDF generation, saving time and effort.
Key Features:
- Drag-and-drop interface for easy form and template creation.
- Automation capabilities for streamlined PDF generation.
- Support for multiple formats, including PDFs.
- Bi-directional Salesforce integration for seamless data flow.
PDF Butler
PDF Butler is engineered for speed and efficiency in PDF generation. It offers a rich set of features, including the ability to personalize PDFs with your company’s branding, incorporate dynamic images, and integrate with other Salesforce apps.
Key Features:
- Customization options to tailor PDFs to your brand identity.
- Dynamic image integration for visually engaging documents.
- Cloud integration for scalability and flexibility.
- Lightning-fast document generation for enhanced productivity.
Nintex DocGen
Nintex DocGen enables users to generate PDFs from diverse sources, such as Salesforce objects, Microsoft Word documents, and Excel spreadsheets. Its no-code interface makes it easy for users of all technical levels to create templates and automate PDF generation.
Key Features:
- No-code interface for user-friendly template design.
- Support for various data sources for versatile document creation.
- Pre-built templates to expedite common PDF generation tasks.
- Automation capabilities for efficient document workflows.
Conga Composer
Conga Composer is a widely used document generation tool with a comprehensive suite of features. It allows users to create various document types, including PDFs, Word documents, and PowerPoint presentations. Conga Composer also offers seamless integration with other Salesforce apps, enhancing its versatility.
Key Features:
- Wide range of features for diverse document creation needs.
- Integrations with other Salesforce apps for extended functionality.
- Document automation wizard for streamlined workflows.
- Support for various document formats, including PDFs.
SimplePDF
SimplePDF is a free app that provides a straightforward solution for generating PDFs from any Salesforce object. Its simplicity and ease of use make it an ideal choice for users who require a basic PDF generation tool without complex functionalities.
Key Features:
- Simple and intuitive interface for effortless PDF generation.
- Free to use, making it accessible to all Salesforce users.
- Generates PDFs from any standard or custom Salesforce object.
- Leverages Salesforce Lightning Email templates for document design.
EasyPDF
In addition to the apps mentioned above, Salesforce Labs offers a free app called EasyPDF. This app allows users to generate PDFs from Quote records with a simple click of a button. While it has a more limited scope compared to other apps, it provides a convenient option for users primarily working with quotes.
Reviews and Comparisons
When selecting a third-party app for PDF generation, it’s crucial to consider factors such as features, ease of use, and cost. Online resources offer valuable reviews and comparisons of different PDF generation apps. For instance, Salesforce Ben provides a comparison of Titan Forms and PDF Butler, highlighting their strengths and weaknesses. Crazy Egg offers a review of Nintex DocGen, focusing on its suitability for different business sizes and needs.
| App | Ease of Use | Cost | Reviews |
|---|---|---|---|
| Titan Forms | Easy to use | Starting at $19 per user per month | 4.95 stars on AppExchange with 296 reviews |
| PDF Butler | Easy to use | Starting at $14 per user per month | 5 stars on AppExchange with 100 reviews |
| Nintex DocGen | Easy to use | Starting at $50 per user per year | 4.87 stars on AppExchange with 363 reviews |
| Conga Composer | Can be complex to use | Starting at $6 per user per month | 4.75 stars on AppExchange with 873 reviews |
| SimplePDF | Easy to use | Free | 4.46 stars on AppExchange with 37 reviews |
PDF Generation Cost Estimator
This tool will provide you with an estimate of the costs involved in generating PDFs within Salesforce based on your requirements.
Total Spend Over Time
M = MonthCost Estimation
Using Third-Party App
Estimated Monthly Cost:
Building a Custom Solution
Typical setup costs for a custom Visualforce/Apex based PDF solution:
- $250 for simple requirements
- $400 for complex requirements
Estimated One-time Setup Cost:
No ongoing monthly costs
Conclusion
Generating a PDF within Salesforce can be done with VisualForce and Apex. It is very easy (even for those with very little VisualForce and Apex experience). You are able to generate any Salesforce page as a PDF by adding the renderAs attribute to the component, and specifying “pdf” as the rendering service.
We first need to create a Visualforce page that will have the PDF Content. Below is the simple Visualforce page that will display Account details with the help of the Account Standard Controller.
Frequently Asked Questions (FAQs)
Can Salesforce generate PDF in Lightning?
PDF in salesforce can be generated easily without using any other app. That can work in Salesforce Lightning as well as Salesforce Classic.
What does it cost to generate PDF in Salesforce?
Cost depends on how you generate PDF. By using a third-party app there will be a monthly cost (per user based) along with the initial setup cost. Using visualforce, it’s completely free from monthly cost, it requires initial setup only.
Official document about visualforce
Learn more How to generate PDF for Salesforce Quote (No code)

Leave a Reply