Salesforce Flow is incredibly powerful for automating your business processes such as creating records, updating fields, sending emails, and much more. But here’s the thing: your business doesn’t live in just one system, does it?
Think about your daily work. What happens when your process needs data or actions from outside Salesforce?
Maybe your support team needs to check order details from an external database. Or your sales team wants to automatically send a notification to an external system when a big deal closes. Perhaps you need to verify customer addresses using a third-party validation service.
These are real-world scenarios where Salesforce needs to communicate with other systems.
That’s exactly where Salesforce External Services come in! With External Services, Salesforce makes it possible to connect Flow directly with external systems, securely and without writing any Apex code.
In this guide, we’ll explore what External Services are, why Salesforce introduced them, how they work, and a real-world example of connecting two Salesforce orgs step-by-step, all without writing a single line of code.
Why did Salesforce Introduced External Services
Before Salesforce External Services existed, Connecting Salesforce to another system meant writing custom Apex callouts. You’d need to handle endpoints, authentication, JSON parsing, and error management manually.
This approach was powerful, but not everyone is a developer and code-based integrations can be difficult to maintain or update.
Salesforce recognised this challenge, they saw that many businesses need to automate processes that span systems, and wanted a way to empower admins and low-code users to build those integrations without writing lots of code.
So they introduced External Services. With this capability you can register an external API once, map it inside Salesforce, and then invoke it from Flow just like any other action. In short, External Services = API integration without code.
By adding this capability, Salesforce enabled organisations to democratise integrations where making them accessible to anyone who builds Flows, not just someone who writes Apex. The flexibility of REST-APIs could now be used in Flows.
What Are External Services?
External Services is a powerful, declarative Salesforce feature that allows your org to connect with external REST-based APIs all without writing Apex code.

Think of it as a universal translator between Salesforce Flow and the outside world. It bridges your Salesforce org with any system that exposes a REST API, whether that’s another Salesforce org, a public web service, or an internal business system.
You simply:
- Describe the Schema : You tell Salesforce what the external API looks like by registering its OpenAPI (Swagger).
- Register Actions : Based on that schema, Salesforce automatically generates invocable actions. It turns the API’s endpoints into Flow actions you can drag, drop, and connect in your automation.
- Flow makes the call : When the Flow runs, it uses those actions to send a REST API request to the external system.
The beauty of External Services is that all the technical complexity is handled for you such as authentication, HTTP requests, JSON parsing, and error management happen automatically behind the scenes.
As an admin or Flow builder, you simply focus on what data to send and what to do with the response.
Benefits of External Services
Salesforce designed this feature to help admins, architects, and Flow builders to connect systems faster without needing to write a single line of code. Here’s why it matters:
No Coding Required
You can now build sophisticated integrations using the same point-and-click interface you already know.
If you can build a Flow, you can connect to external APIs. No Apex classes, no custom REST logic, just simple, declarative configuration.
Faster Implementation
What once took developers days or even weeks can now be set up in a matter of hours. Simply register the API, configure it in Flow, and start testing all on the same day.
Easier Maintenance
When an API changes, you don’t have to dig through hundreds of lines of Apex or redeploy anything.
All you do is update the API schema (OpenAPI file), and Salesforce automatically refreshes the available Flow actions. Your existing Flows can start using the updated version right away.
Built-in Security
External Services use Named Credentials to handle authentication and endpoint management securely.
This means sensitive information like usernames, passwords, and API keys are encrypted and stored safely within Salesforce.
You never expose credentials in your Flows or formulas, which keeps your org secure and compliant.
Reusability
Once you register an External Service, it becomes a shared integration resource in your org. That means any Flow can use it and you don’t have to rebuild the same connection multiple times.
5 Core Components of External Services
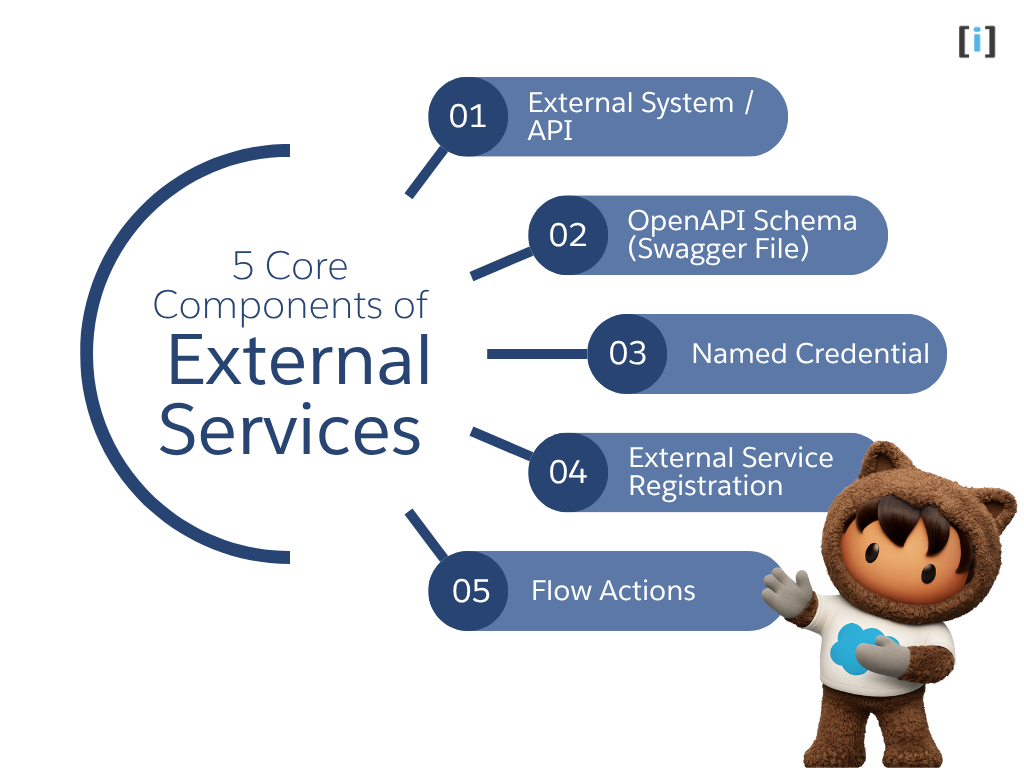
Before we dive into setup, it’s important to understand how External Services are structured.
Each component plays a key role in helping Salesforce communicate with other systems securely and efficiently. Let’s break down :
External System / API
This is the external application or web service you want to connect with (like another Salesforce org or a third-party service).
The API exposes endpoints, URLs that receive requests and return data in formats like JSON or XML. These endpoints are what your Flow will ultimately call.
OpenAPI Schema (Swagger File)
This is a standardized JSON or YAML file that describes the external API that including its endpoints, request parameters, authentication type, and response structure.
You can think of it as the instruction manual for the API. It tells Salesforce exactly how to talk to the external system. For Example :
- Which endpoint to call (
/accounts/{id}) - What input it needs (like an Account ID)
- What output it returns (like Name, Phone, Industry)
Named Credential
Named Credentials handle the secure storage of connection details that including the API’s base URL, authentication method, and credentials.
Salesforce encrypts all sensitive data and handles token refresh automatically, so you don’t need to manage authentication manually.
This makes your integrations both secure and maintenance-free.
Take a deeper look into “Named Credentials” by exploring our detailed guide on Connected Apps and Named Credentials in Salesforce.
External Service Registration
This is the process of linking your OpenAPI schema with your Named Credential inside Salesforce.
When you register the service, Salesforce reads your schema, verifies the connection, and automatically generates invocable actions (the Flow building blocks) for each API operation.
It’s the step where your external API officially becomes “Flow-ready.”
Flow Actions
These are the tangible results of your registration process where the auto-generated actions that appear in Flow Builder.
Each Flow Action represents a single API operation, such as:
- Create Customer
- Get Order Status
- Update Subscription
They have input fields (what data you send) and output fields (what data comes back), allowing your Flow to interact with external systems in real time.
All these components work together seamlessly :
The Named Credential secures the connection → the OpenAPI schema describes how to communicate → and Salesforce turns everything into Flow Actions that you can drag, drop, and configure — just like any other Flow element.
Explore our guide to understand Salesforce Flow in detail.
Real-World Example: Blocking Cross-Org Duplicate Accounts (Org A → Org B) Using External Services
Let’s walk through a practical scenario to understand how Salesforce External Services in Flow can be used to prevent duplicate Account creation across two Salesforce orgs.
Scenario
- Org A (Sales): Used by the Sales team to create and manage customer Accounts.
- Org B (Support): Used by the Support team, and serves as the source of truth for all customer Accounts.
Both orgs belong to the same company, but operate independently. The problem is that users in Org A often create Accounts that already exist in Org B, leading to duplicate customer records, inconsistent data, and confusion between teams.
Goal
Whenever a sales user tries to create a new Account in Org A, Salesforce should automatically check Org B to see if an Account with the same or similar Name already exists.
- If found → prevent the insert in Org A and show a clear message.
- If not found → allow creation.
The solution must be completely declarative no Apex, no middleware, using only External Services + Flow.
ORG Overview
We create two testing org to demonstrate this integration process which is :
Org A (source / Sales): arrify-mt

Org B (target / Service): puneet21

Prepare Service Schema (OpenAPI JSON File)
A Service Schema is the definition file that tells Salesforce how to communicate with an external API.
When you connect to an external system, Salesforce needs to know:
- What the API endpoints are
- What inputs they expect (parameters)
- What outputs they return (data)
That description written in a standard format(jSON) called OpenAPI (previously known as Swagger) is called the Service Schema.
{
  "openapi": "3.0.0",
  "info": {
    "title": "Salesforce Account API - Get by Name",
    "version": "1.0.1",
    "description": "Queries Account details by Name using the standard REST /query endpoint. Returns totalSize/done/records[]."
  },
  "servers": [
    { "url": "/services/data/v59.0" }
  ],
  "paths": {
    "/query": {
      "get": {
        "summary": "Fetch Account(s) by Name",
        "operationId": "getAccountByName",
        "parameters": [
          {
            "name": "q",
            "in": "query",
            "required": true,
            "description": "Complete SOQL string. Example: SELECT Id,Name,Phone FROM Account WHERE Name LIKE '%Acme%' LIMIT 5",
            "schema": { "type": "string" }
          }
        ],
        "responses": {
          "200": {
            "description": "Query executed successfully",
            "content": {
              "application/json": {
                "schema": {
                  "type": "object",
                  "properties": {
                    "totalSize": { "type": "integer", "example": 1 },
                    "done": { "type": "boolean", "example": true },
                    "records": {
                      "type": "array",
                      "items": {
                        "type": "object",
                        "additionalProperties": true,
                        "properties": {
                          "attributes": {
                            "type": "object",
                            "properties": {
                              "type": { "type": "string", "example": "Account" },
                              "url": { "type": "string" }
                            }
                          },
                          "Id": { "type": "string", "example": "001XXXXXXXXXXXX" },
                          "Name": { "type": "string", "example": "Acme Corporation" },
                          "Phone": { "type": "string", "example": "123-456-7890" }
                        }
                      }
                    }
                  },
                  "required": ["totalSize", "records"]
                }
              }
            }
          },
          "400": { "description": "Bad request - SOQL malformed" },
          "401": { "description": "Unauthorized - check Named Credential" }
        }
      }
    }
  }
}- Open a text editor (such as Notepad, VS Code, or Sublime Text). Copy and paste the complete OpenAPI specification into a new file, then save it with a “.json” extension.
- This specification is generated for querying an account by name using the Salesforce standard REST API for testing purposes.
- The Service Schema should be generated accordingly.
- Next, use an online OpenAPI validator to confirm there are no syntax errors.
- If validation passes, you’re ready to upload this file in Salesforce as your Service Schema (in the External Service registration step).
Learn more about Salesforce Standard REST API features and endpoints in our in-depth guide.
Step-by-Step Example
Step-by-step guide for connecting Org A and Org B through Salesforce REST API, Connected App, and Named Credentials using External Services in Flow, all without writing any Apex code
Total Time: 30 minutes
In Org B (puneet21)-> Turn on “Allow creation of connected apps“.
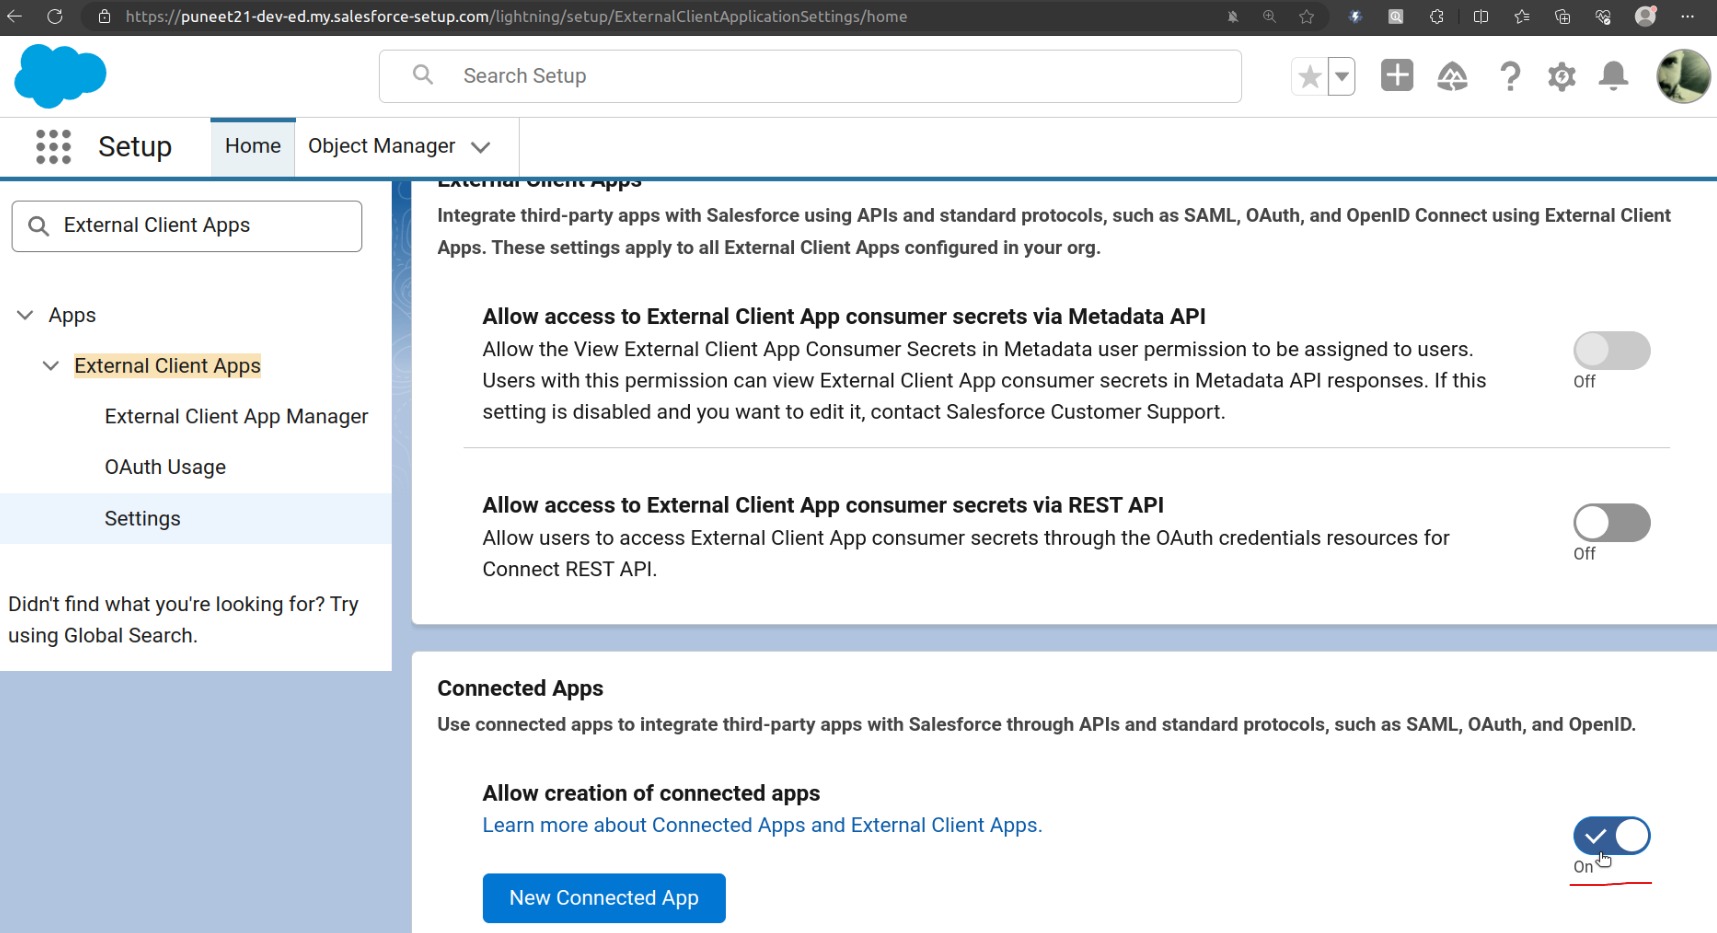
From Setup, enter “External Client Apps” in the Quick Find box, and then select External Client App Settings.
To create a connected app, Click on “New Connected App“.
In Org B (puneet21): Create a Connected App
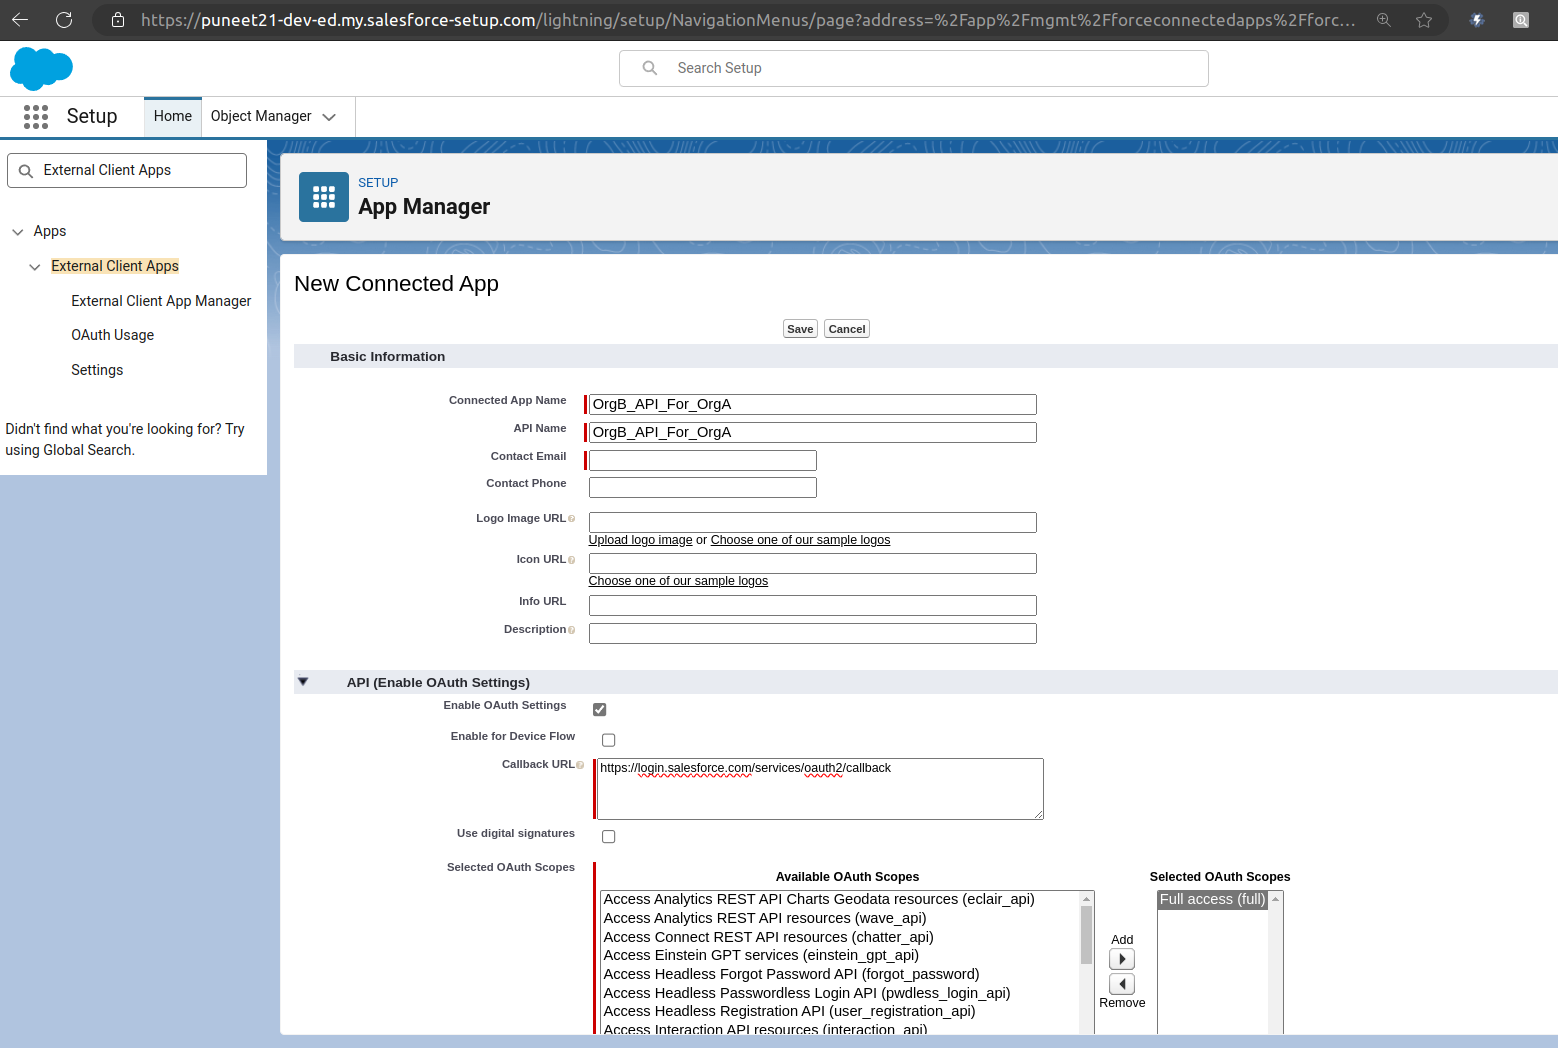
Fill Basic info.
Enable OAuth Settings.
Callback URL-> Enter callback url.
In the Callback URL field, enter any temporary URL for now. You can update this later after creating the Auth Provider in Org A (Sales Org).
Selected OAuth Scopes -> Full access (full) during testing.
Click on Save.
Manage Consumer Details
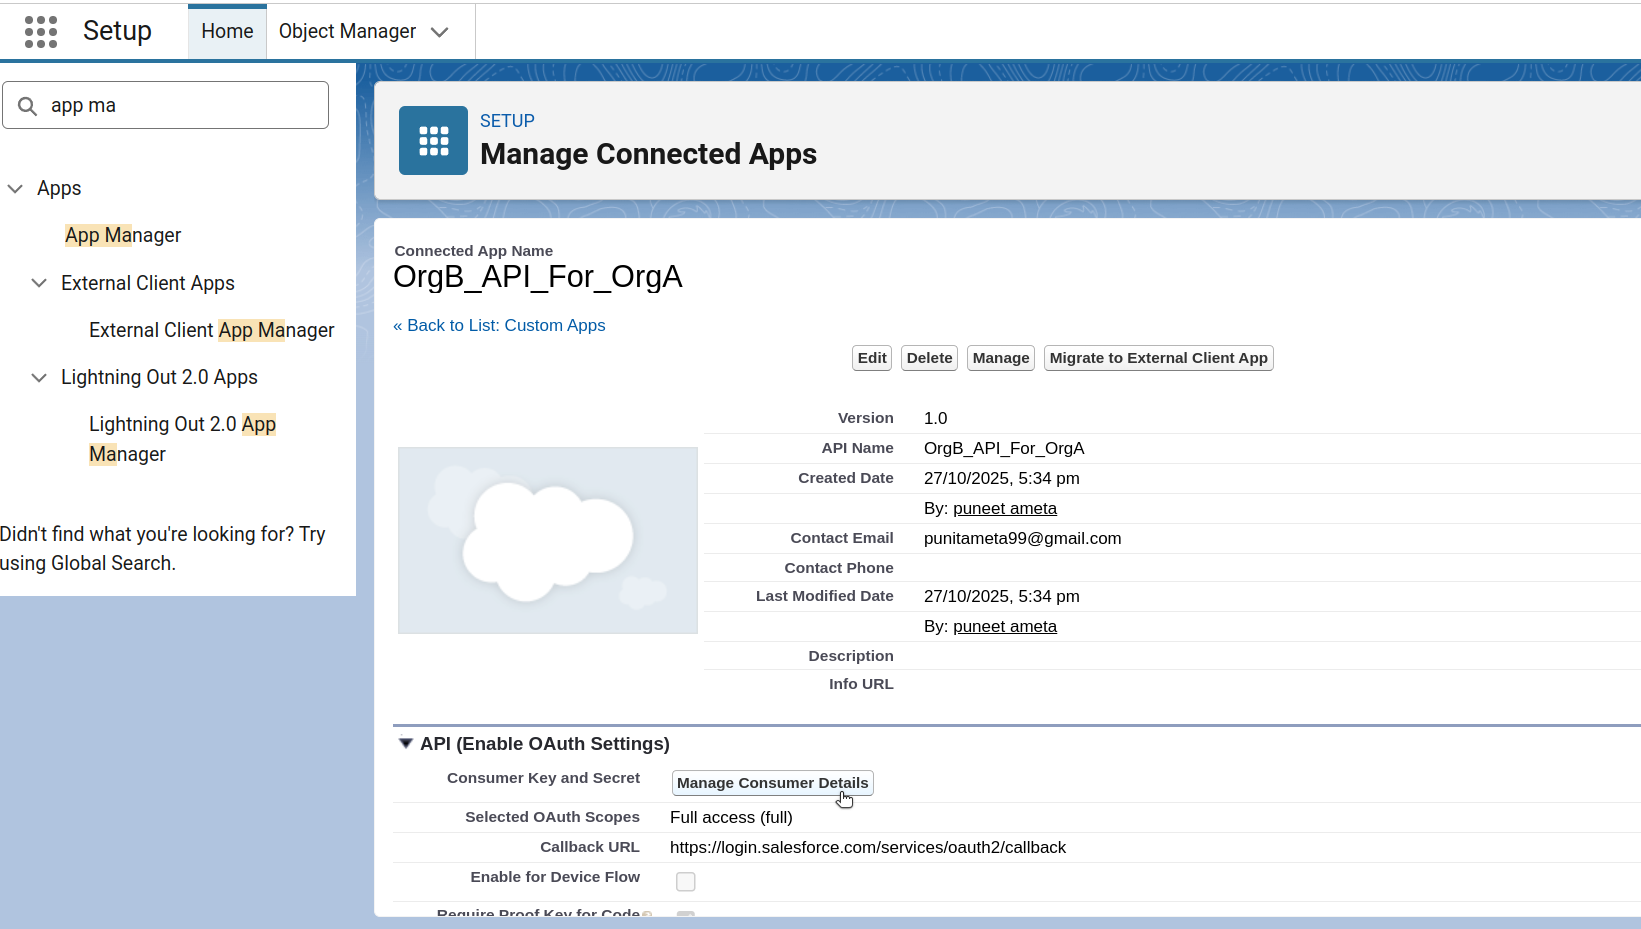
Once you save the Connected App, you’ll need to grab two important values: Consumer Key and Consumer Secret.
Click Manage on the Connected App, then click Manage Consumer Details to view them.
Salesforce will send a verification code to the email address you provided. Enter that code when prompted. After verification, you’ll be taken to the Consumer Details page where you can copy the Consumer Key and Consumer Secret.
Save these Consumer Key and Consumer Secret securely, you’ll need them later! (you’ll paste these into Org A’s Auth Provider).
In Org A (arrify-mt): Create Auth Provider
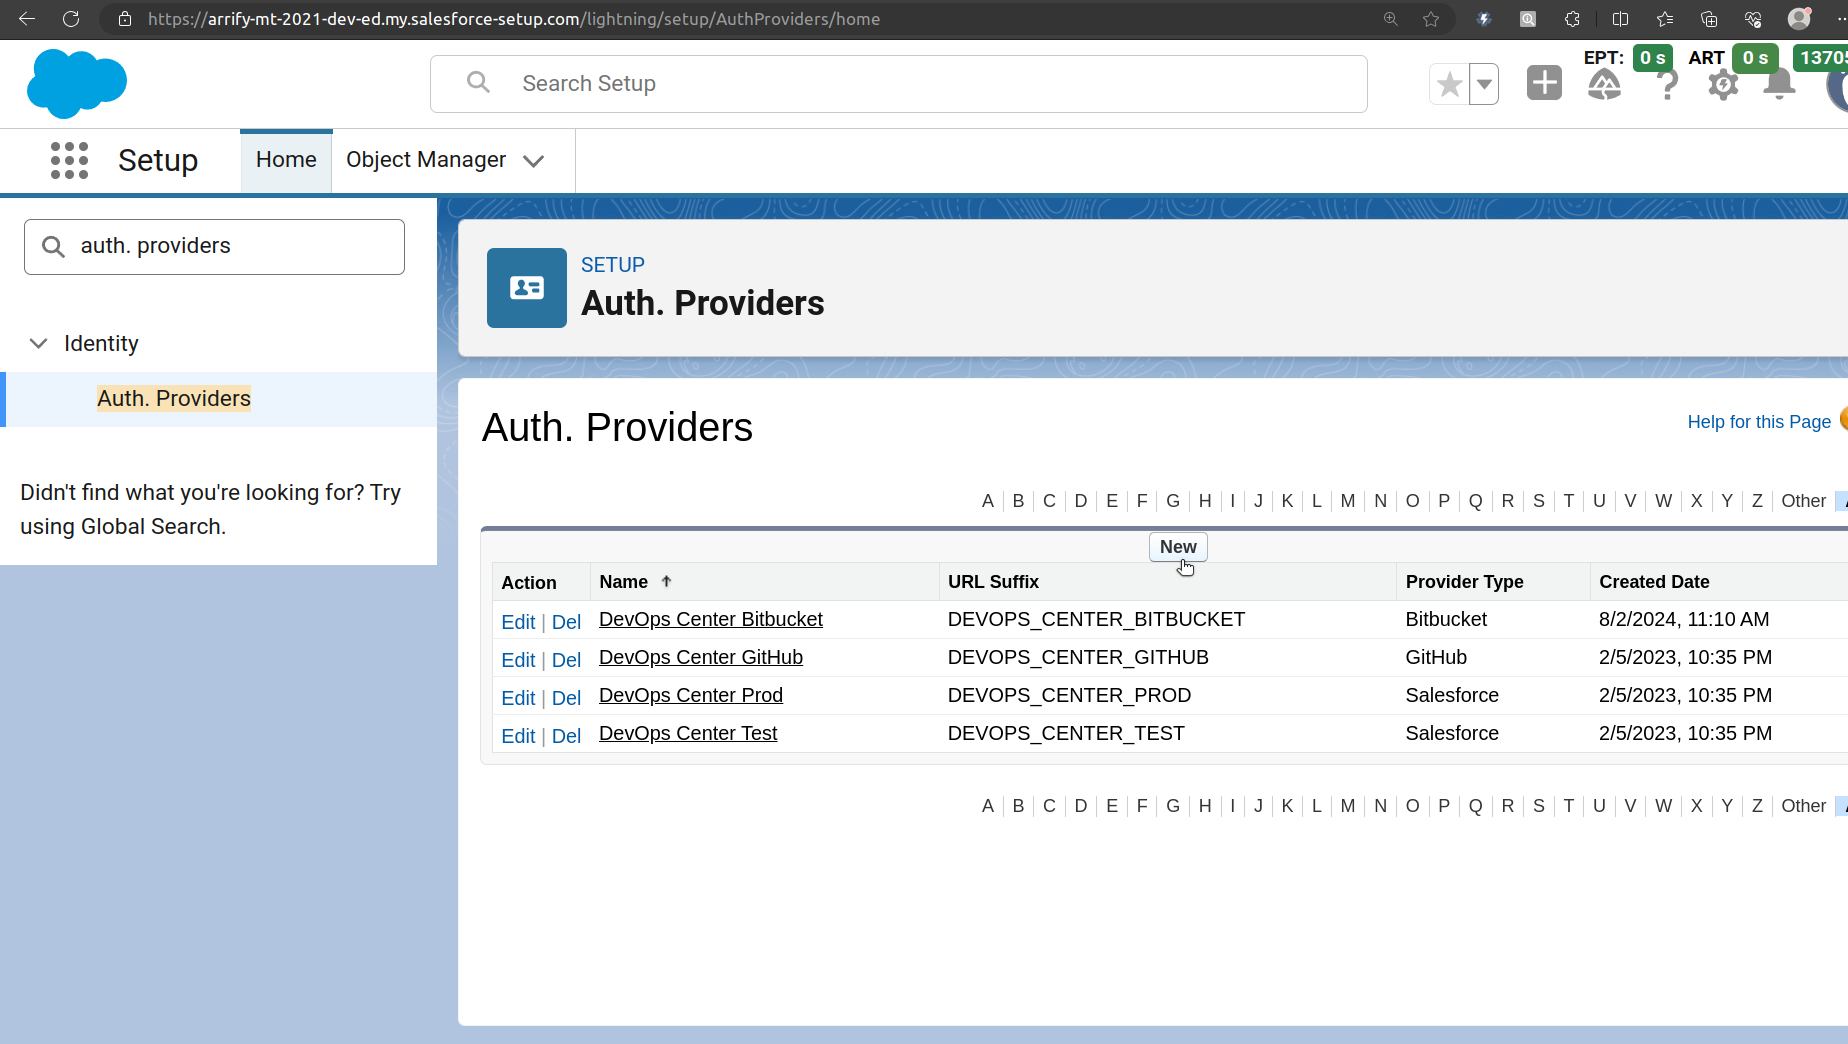
From Setup, enter “Auth. Providers” in the Quick Find box, and then select Auth. Providers.
Click on New.
Edit Auth Provider
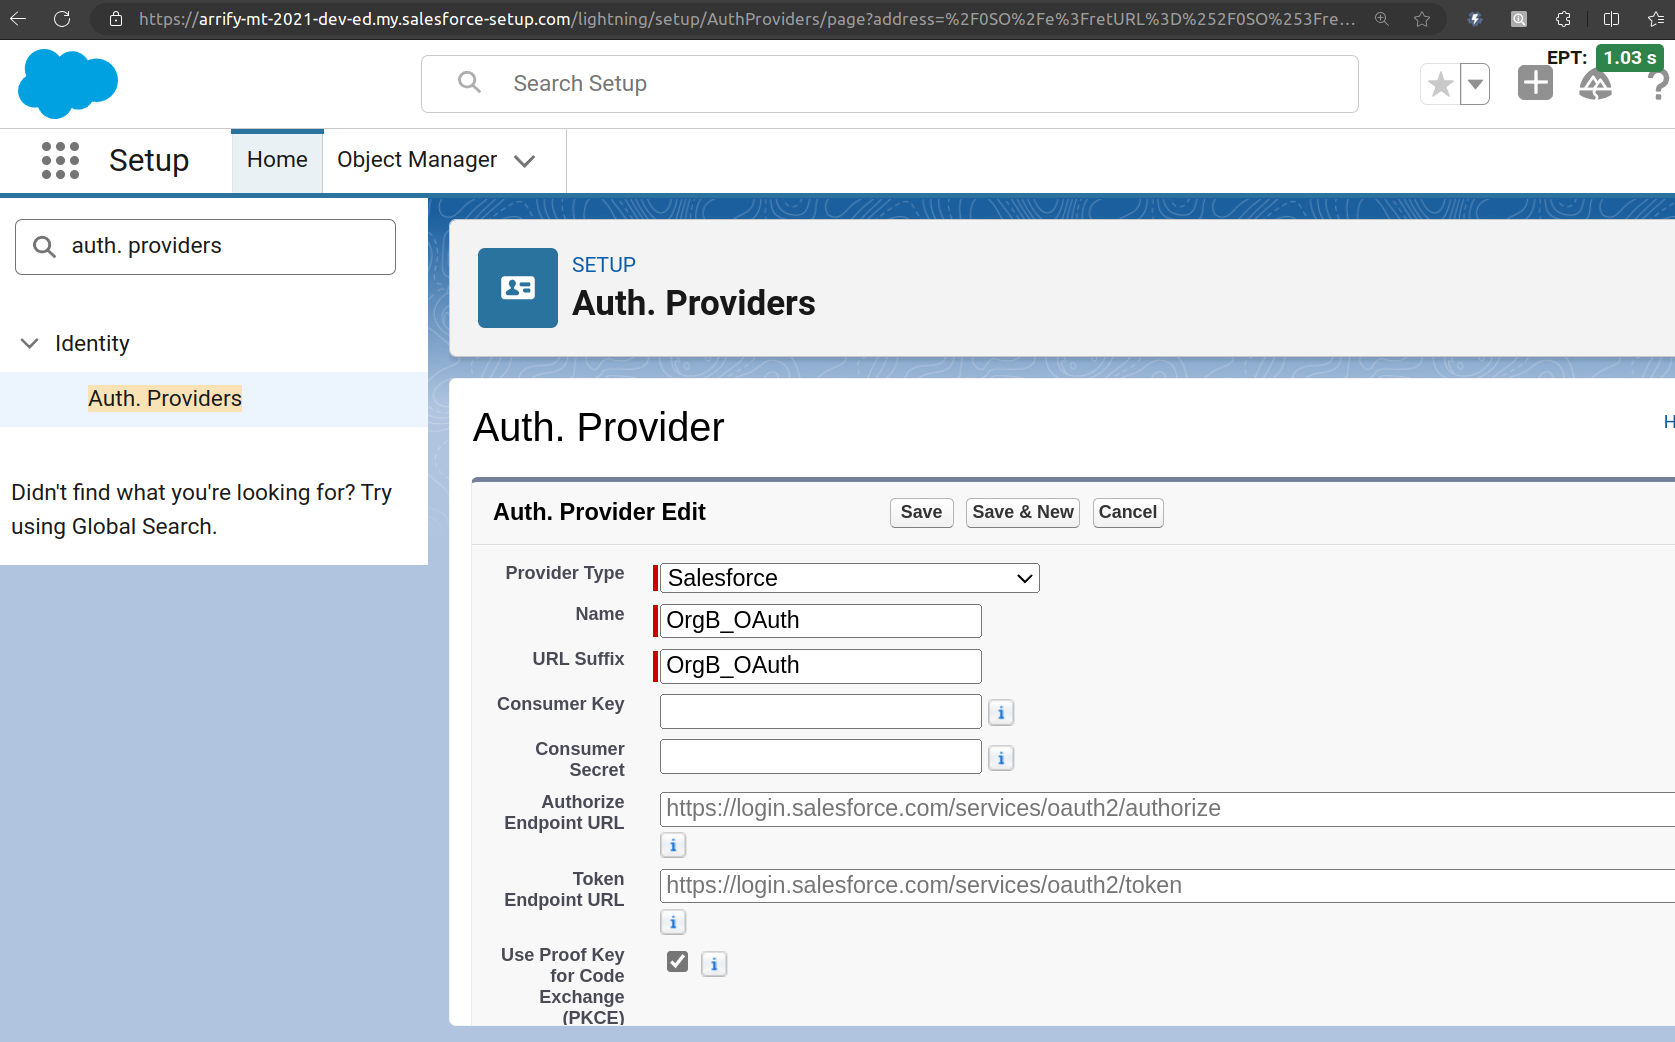
From the Provider Type dropdown, select Salesforce.
Fill in the required details:
Name: Enter a clear name, for example, OrgB_OAuth.
Consumer Key: Copy this from Org B’s Connected App.
Consumer Secret: Copy this from Org B’s Connected App as well.
Click Save.
After saving, Salesforce will automatically generate several URLs under the Salesforce Configuration section such as Authorize Endpoint URL, Token Endpoint URL, and Callback URL.
Important : Copy the Callback URL from this section and go back to Org B’s Connected App.
Edit the Connected App and paste this Callback URL into the Callback URL field there, then Save your changes
In Org A(arrify-mt): Create External Credential
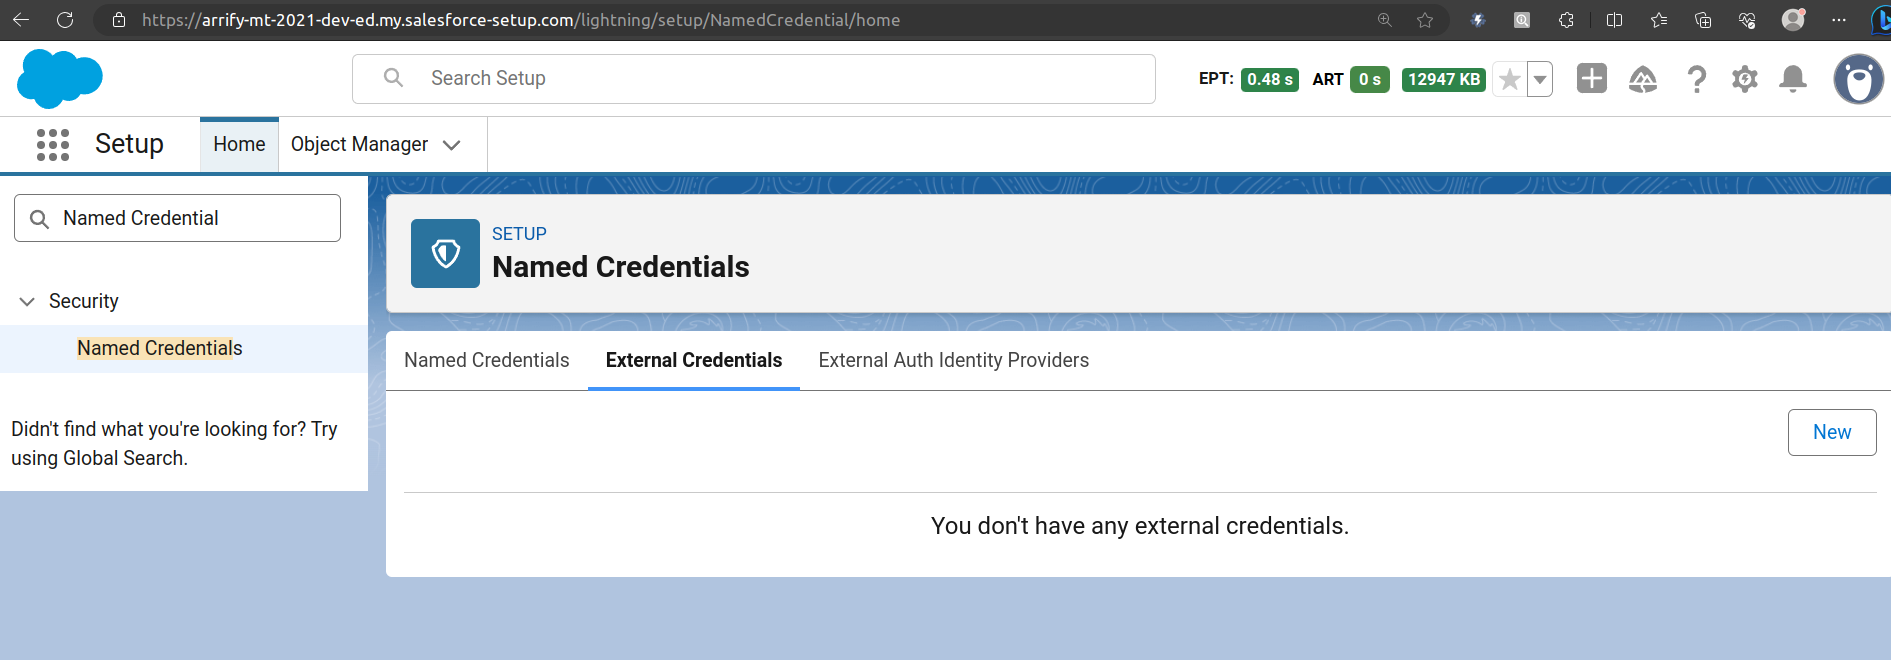
From Setup, enter “Named Credential” in the Quick Find box, and then select Named Credential.
Click the External Credential tab, and then click New.
Fill New External Credential
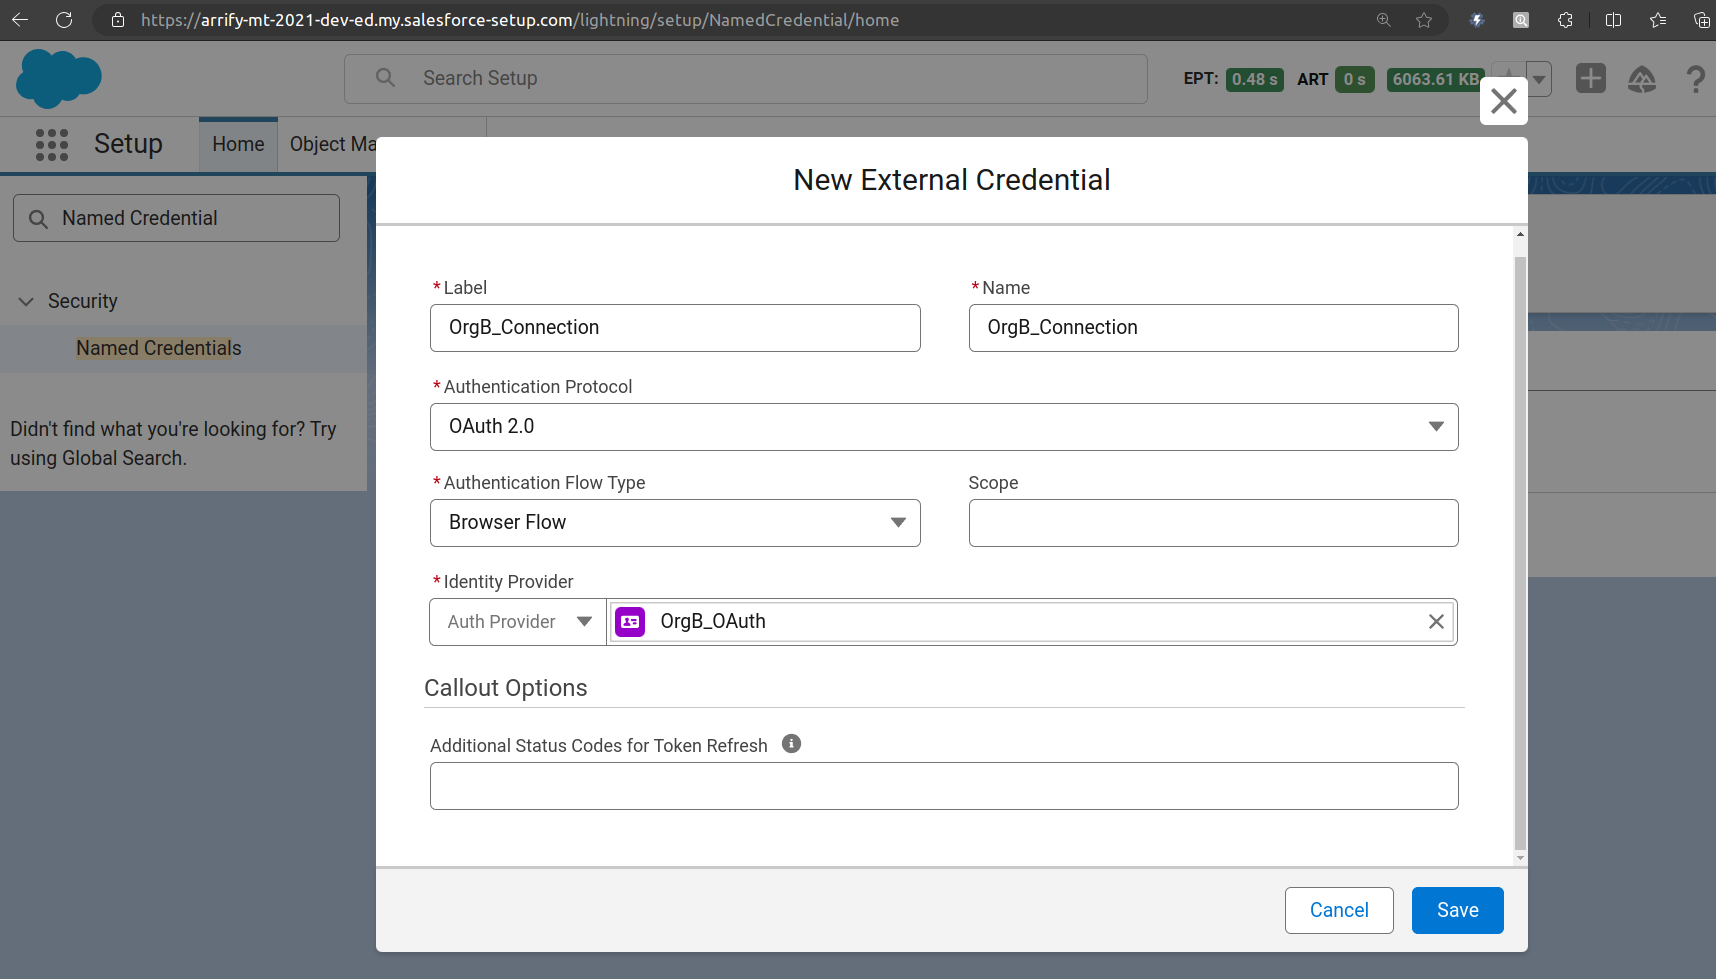
Fill up -> Label / Name
Identity Type -> Named Principal
Authentication Protocol -> OAuth 2.0
Authentication Flow Type -> Browser Flow
Identity Provider -> Auth Provider
Click on Save
In Org A(arrify-mt): Create Named Credential
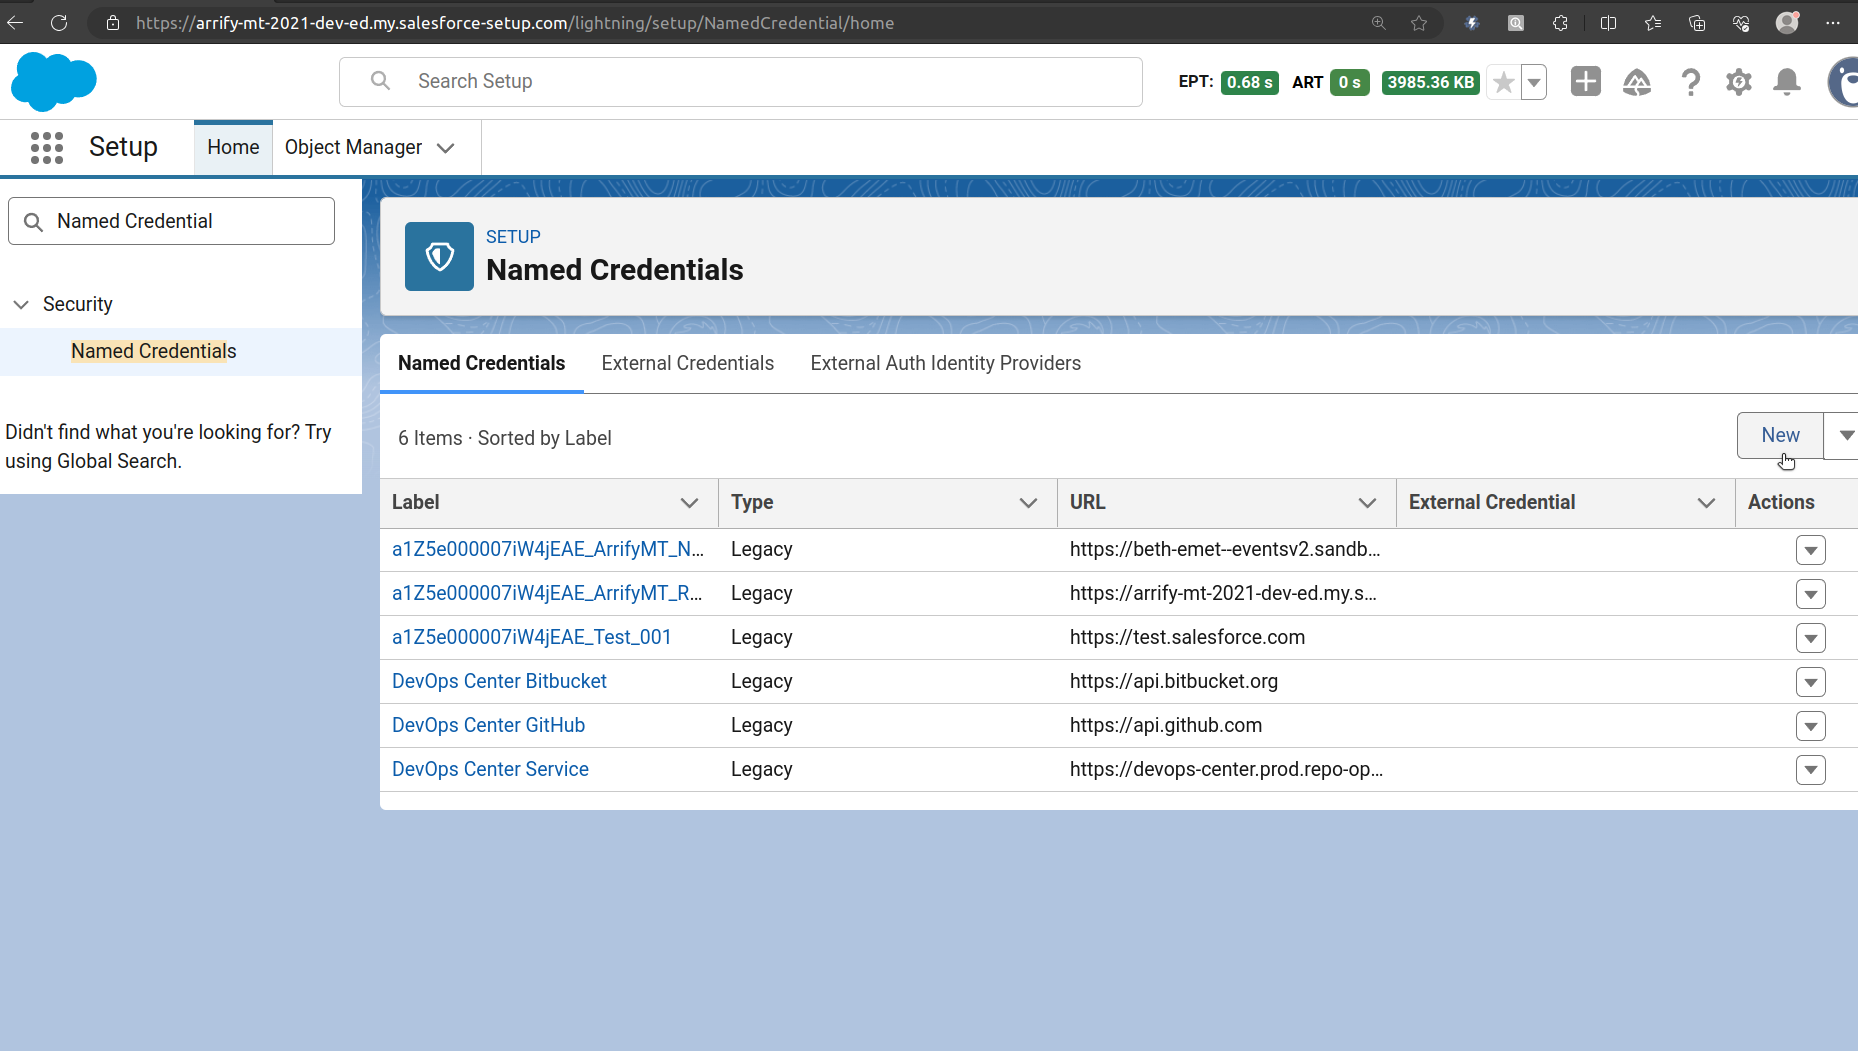
From Setup, enter “Named Credential” in the Quick Find box, and then Select Named Credential.
Click the Named Credential tab, and then click New.
Fill New Named Credential
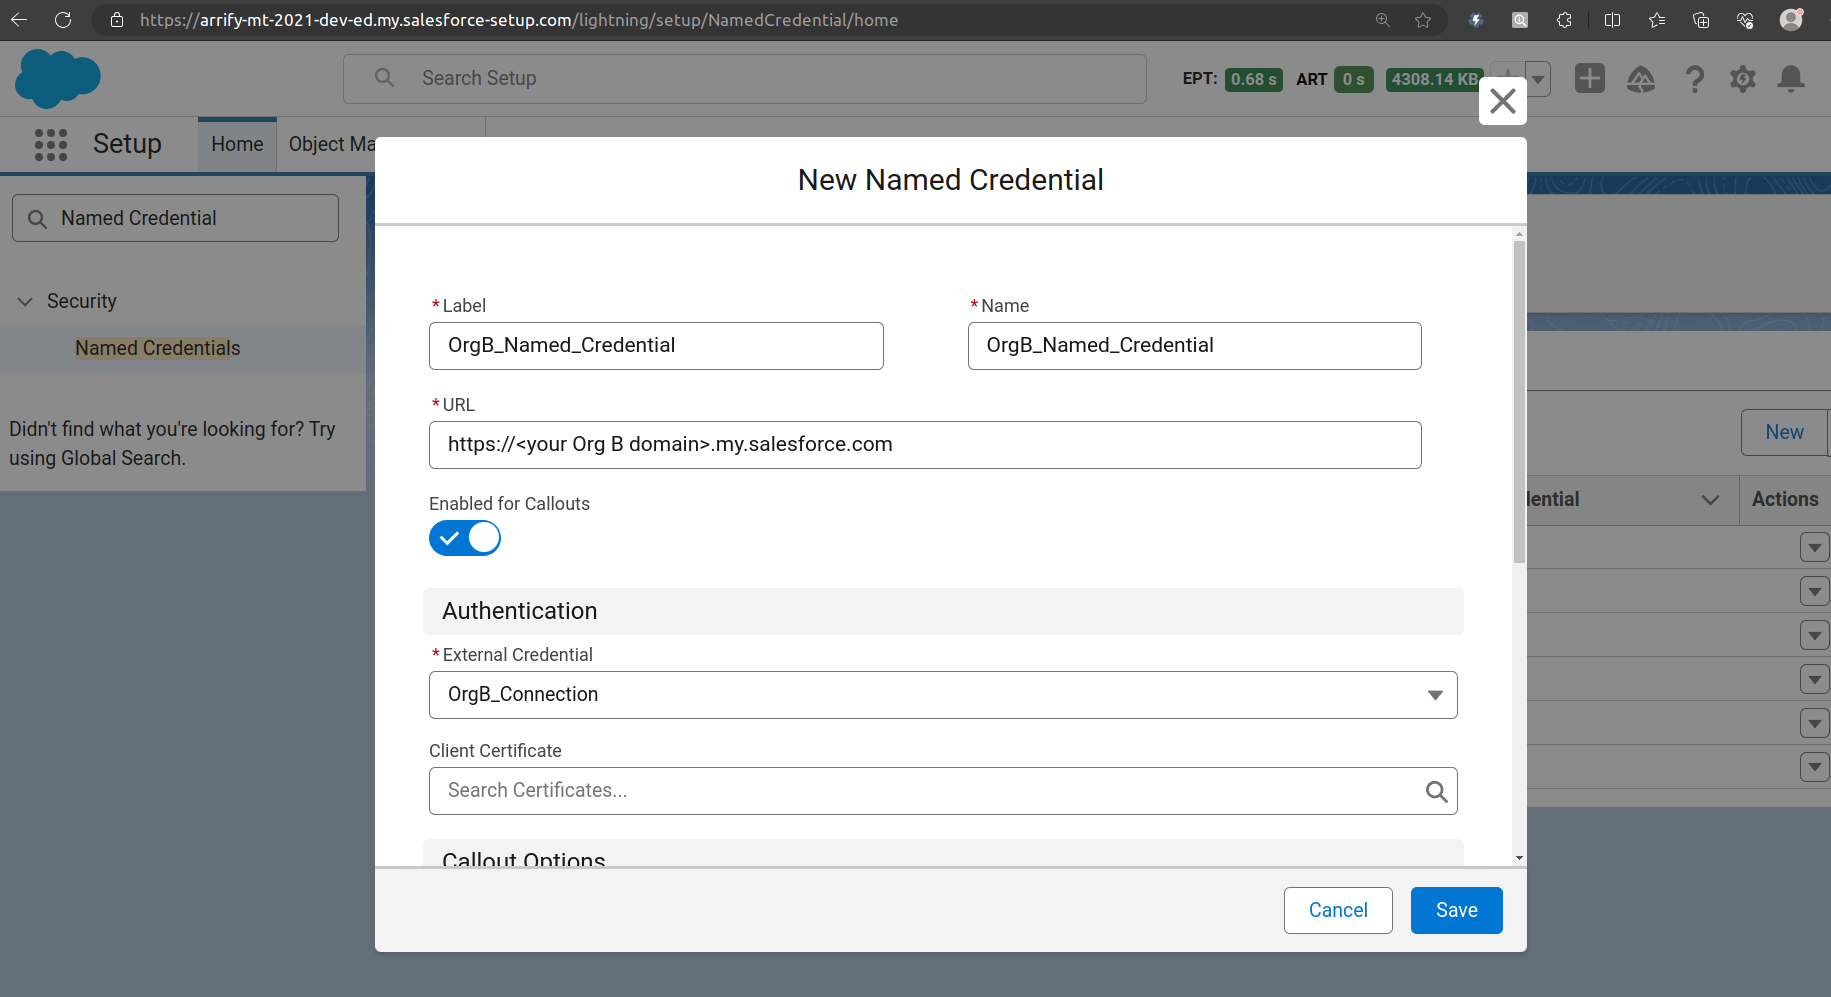
Fill up -> Label / Name
URL (Endpoint) -> https://<your-orgB-domain>.my.salesforce.com
Replace <your-orgB-domain> with your real My Domain (eg. puneet21-dev-ed).
External Credential -> Select previously created “OrgB_Connection” External Credential.
Click on Save.
Open External Credential to Setup Principals
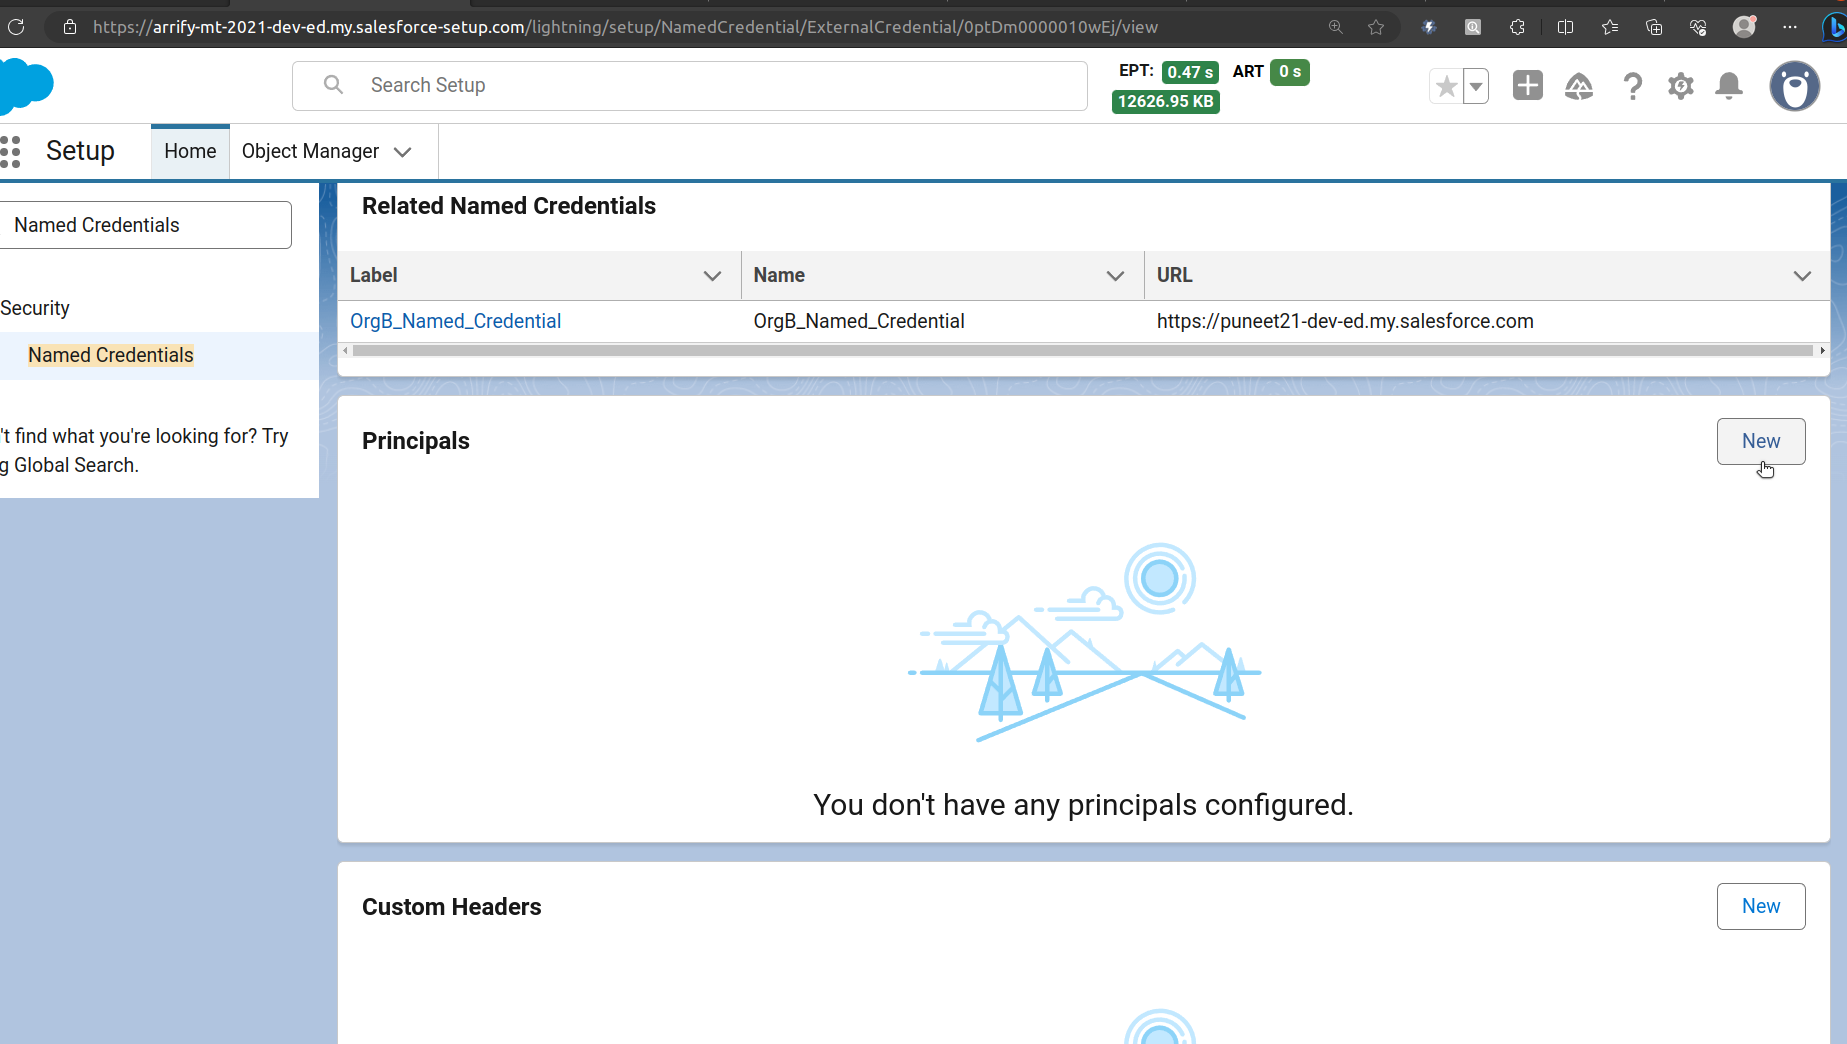
From Setup, enter “Named Credential” in the Quick Find box, and then select Named Credential.
Click the External Credential tab, and scroll to Principals section then click New.
Create Principals
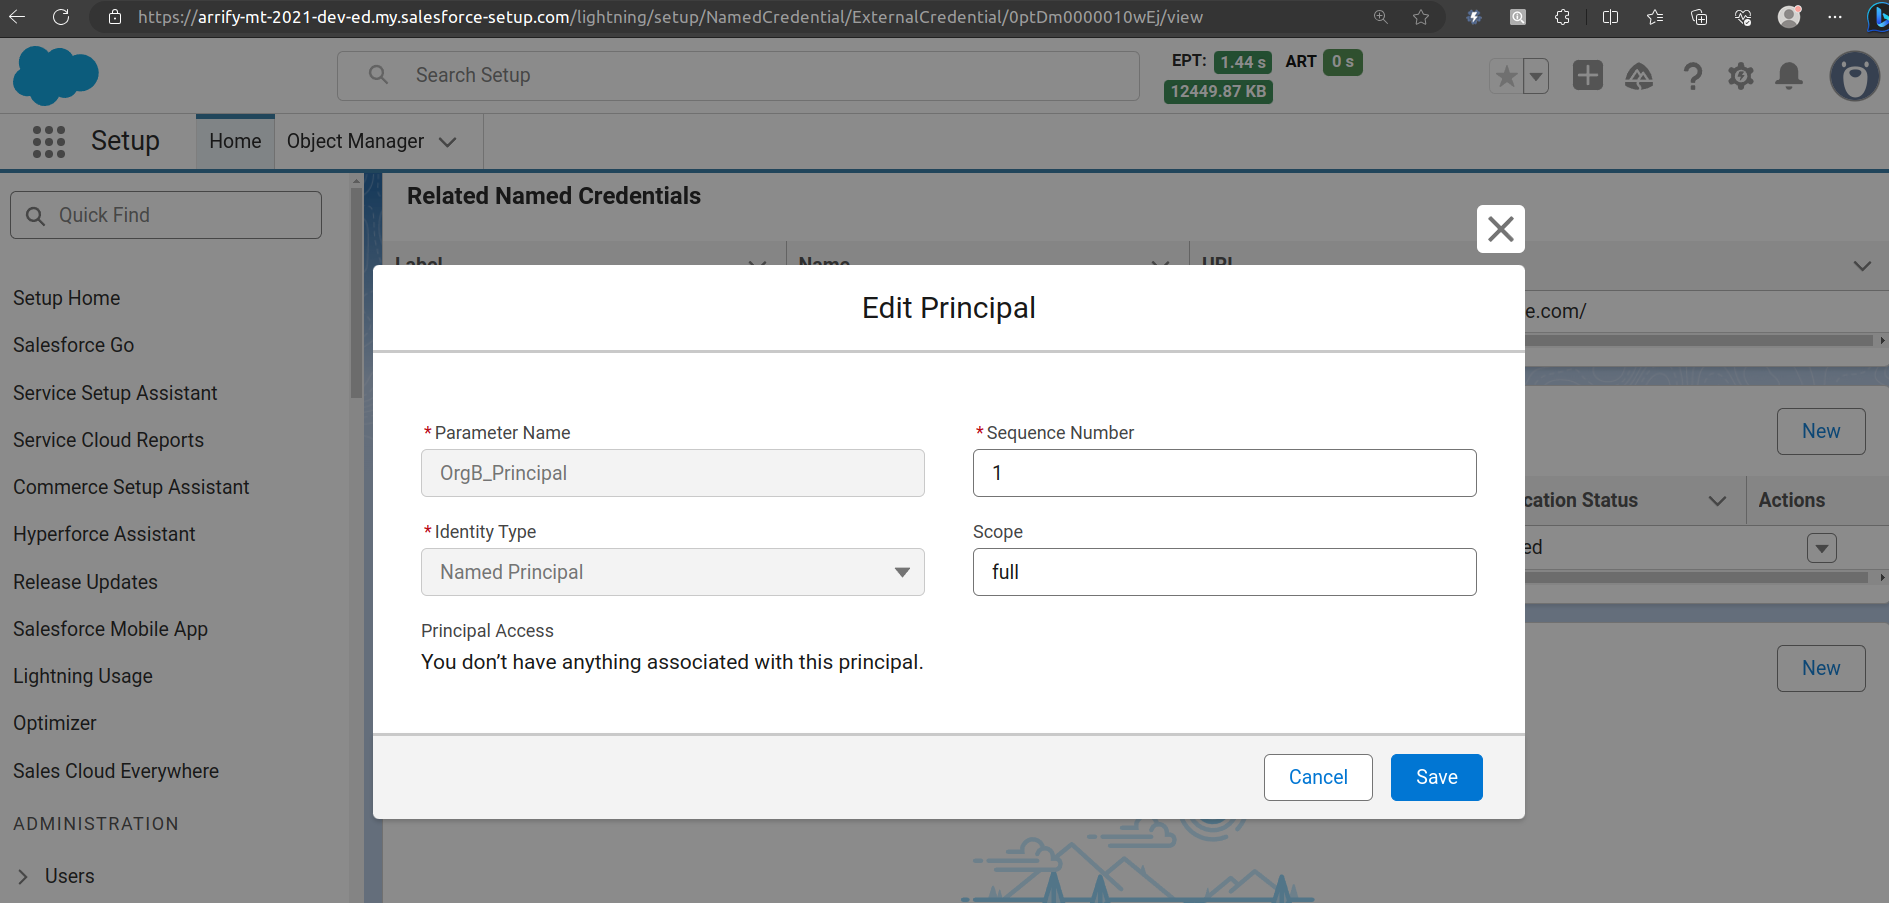
In Identity Type, there’s a Named Principal (for all users) or Per User (each must authenticate).
Click on Save.
Authenticate Principal
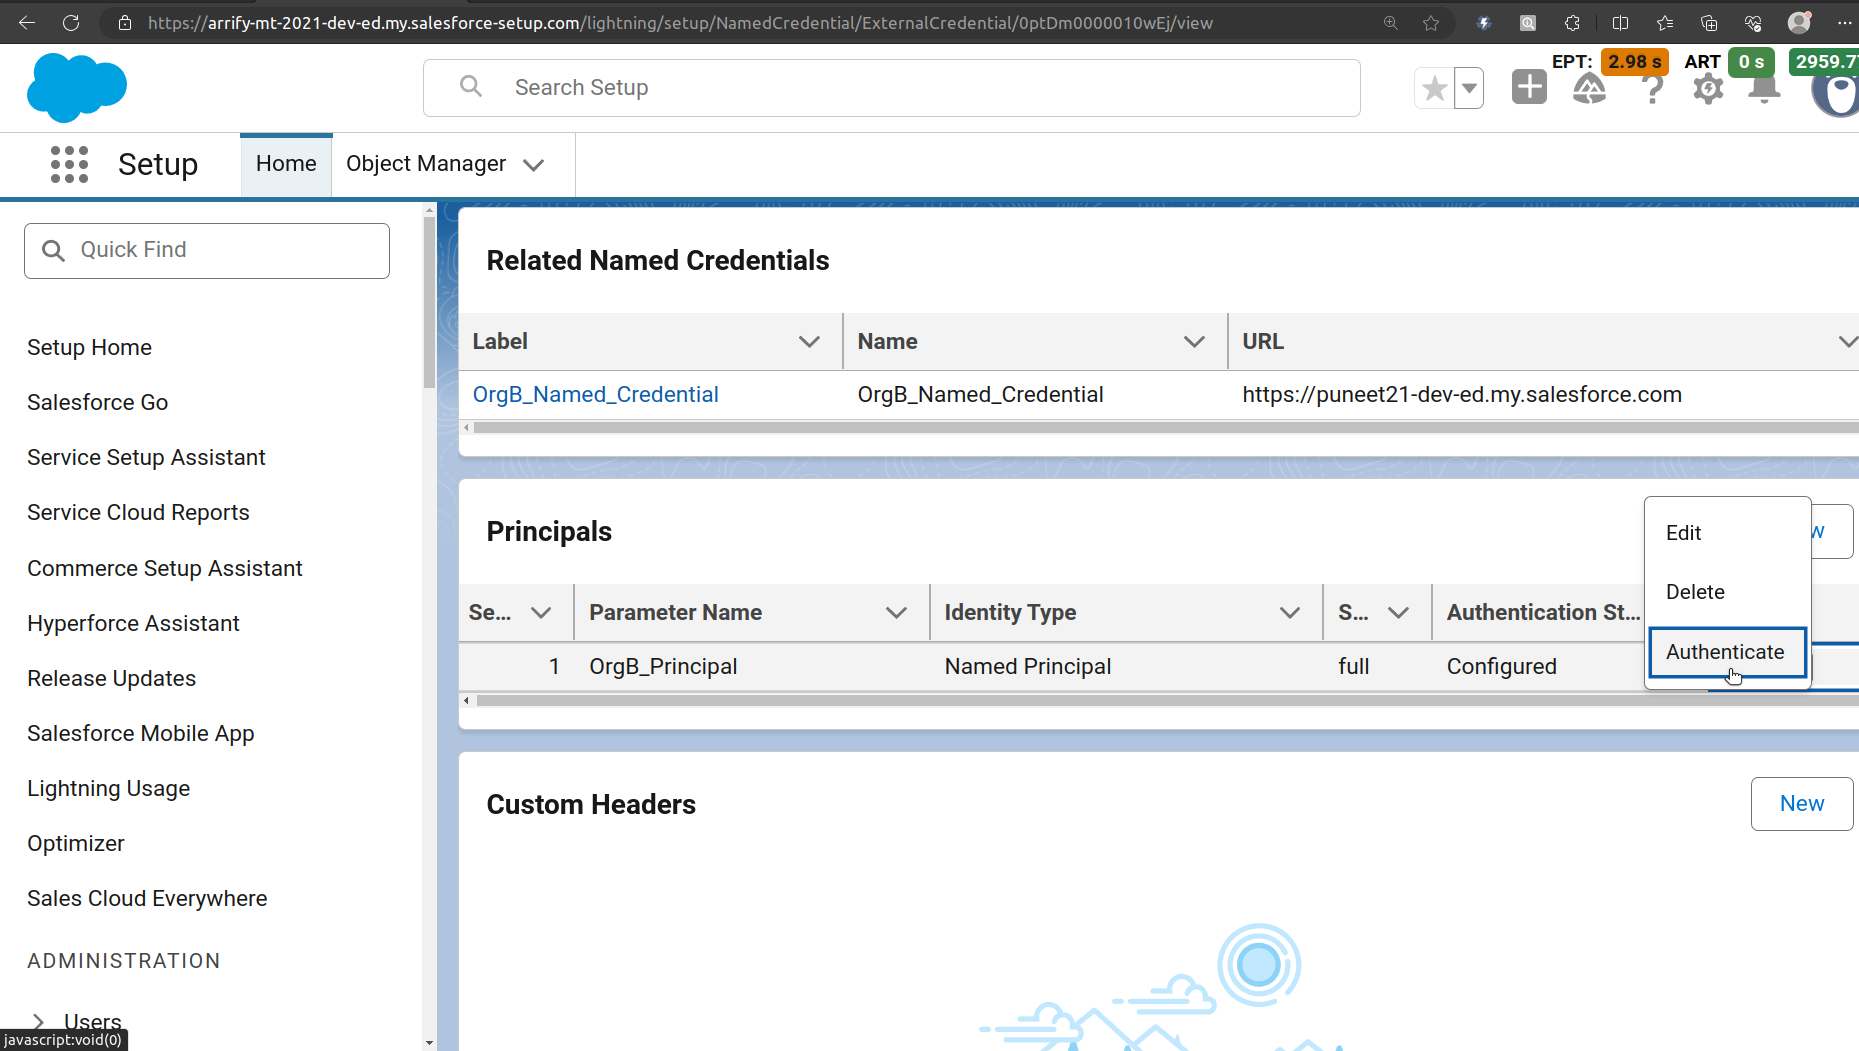
After you successfully authenticate the principal, the Authentication Status will change from “Not Configured” to “Configured.”
Re-authenticate Org B(puneet21)
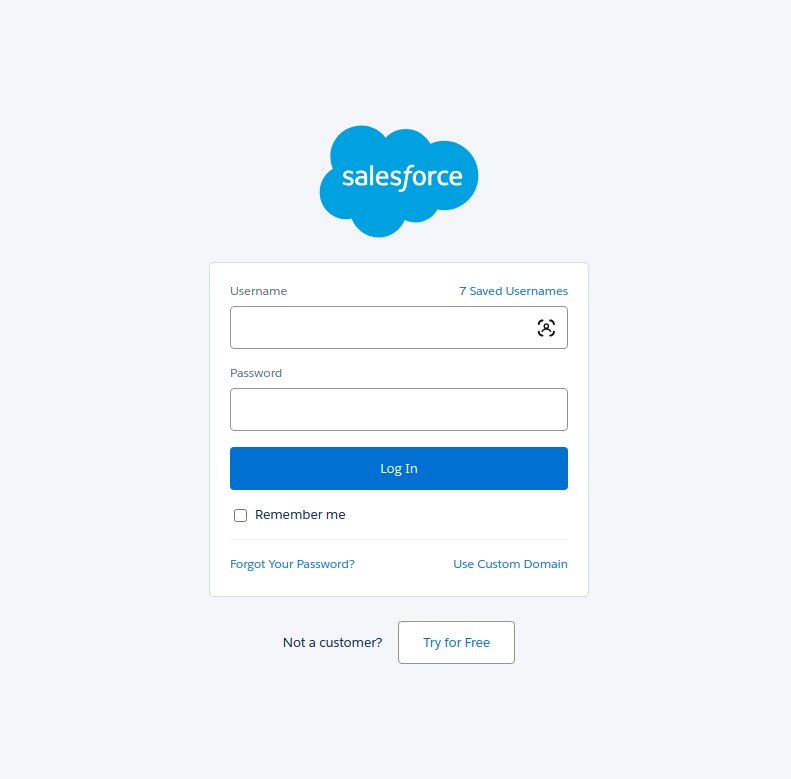
Enter username & password of target org such as “Org B(puneet21)” then → log in → click Allow.
Setup a Permission Set on Org A(arrify-mt)
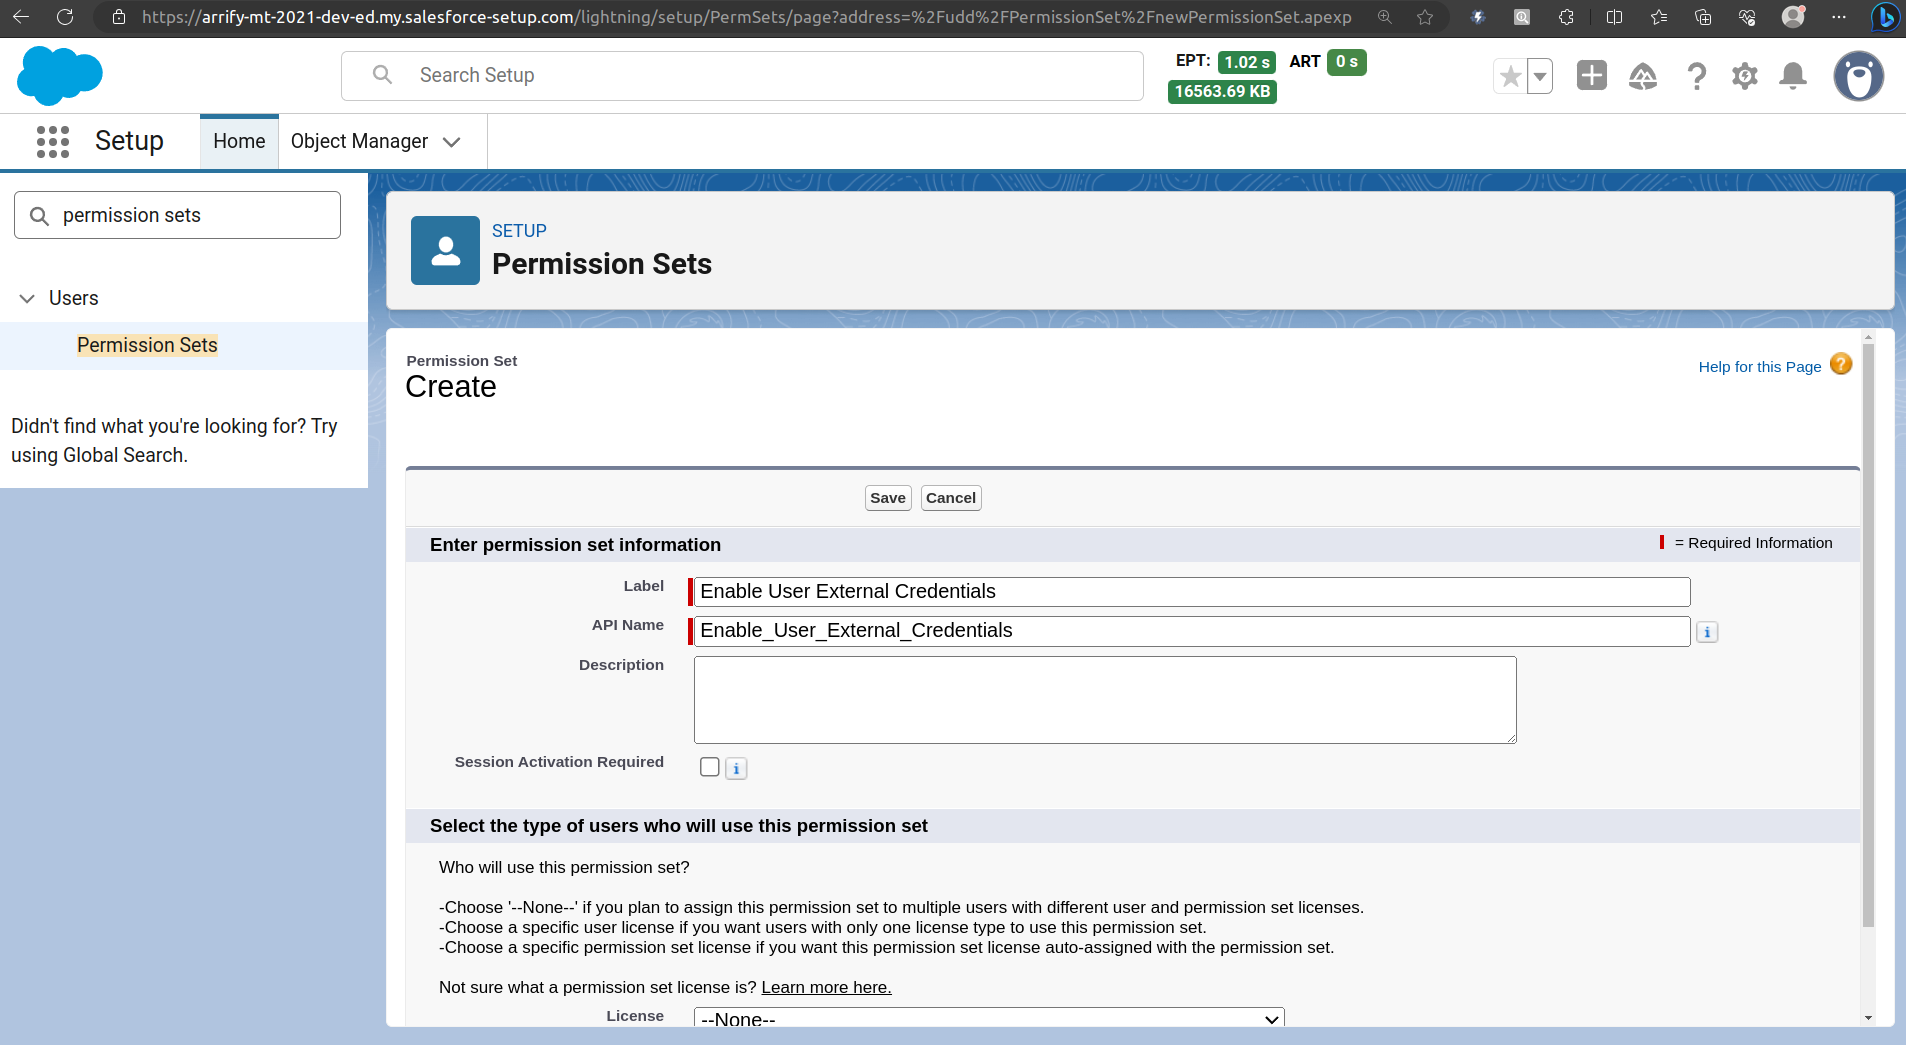
From Setup, enter “Permission Sets” in the Quick Find box, and then select Permission Sets.
Click New.
Configure External Credential Principal Access
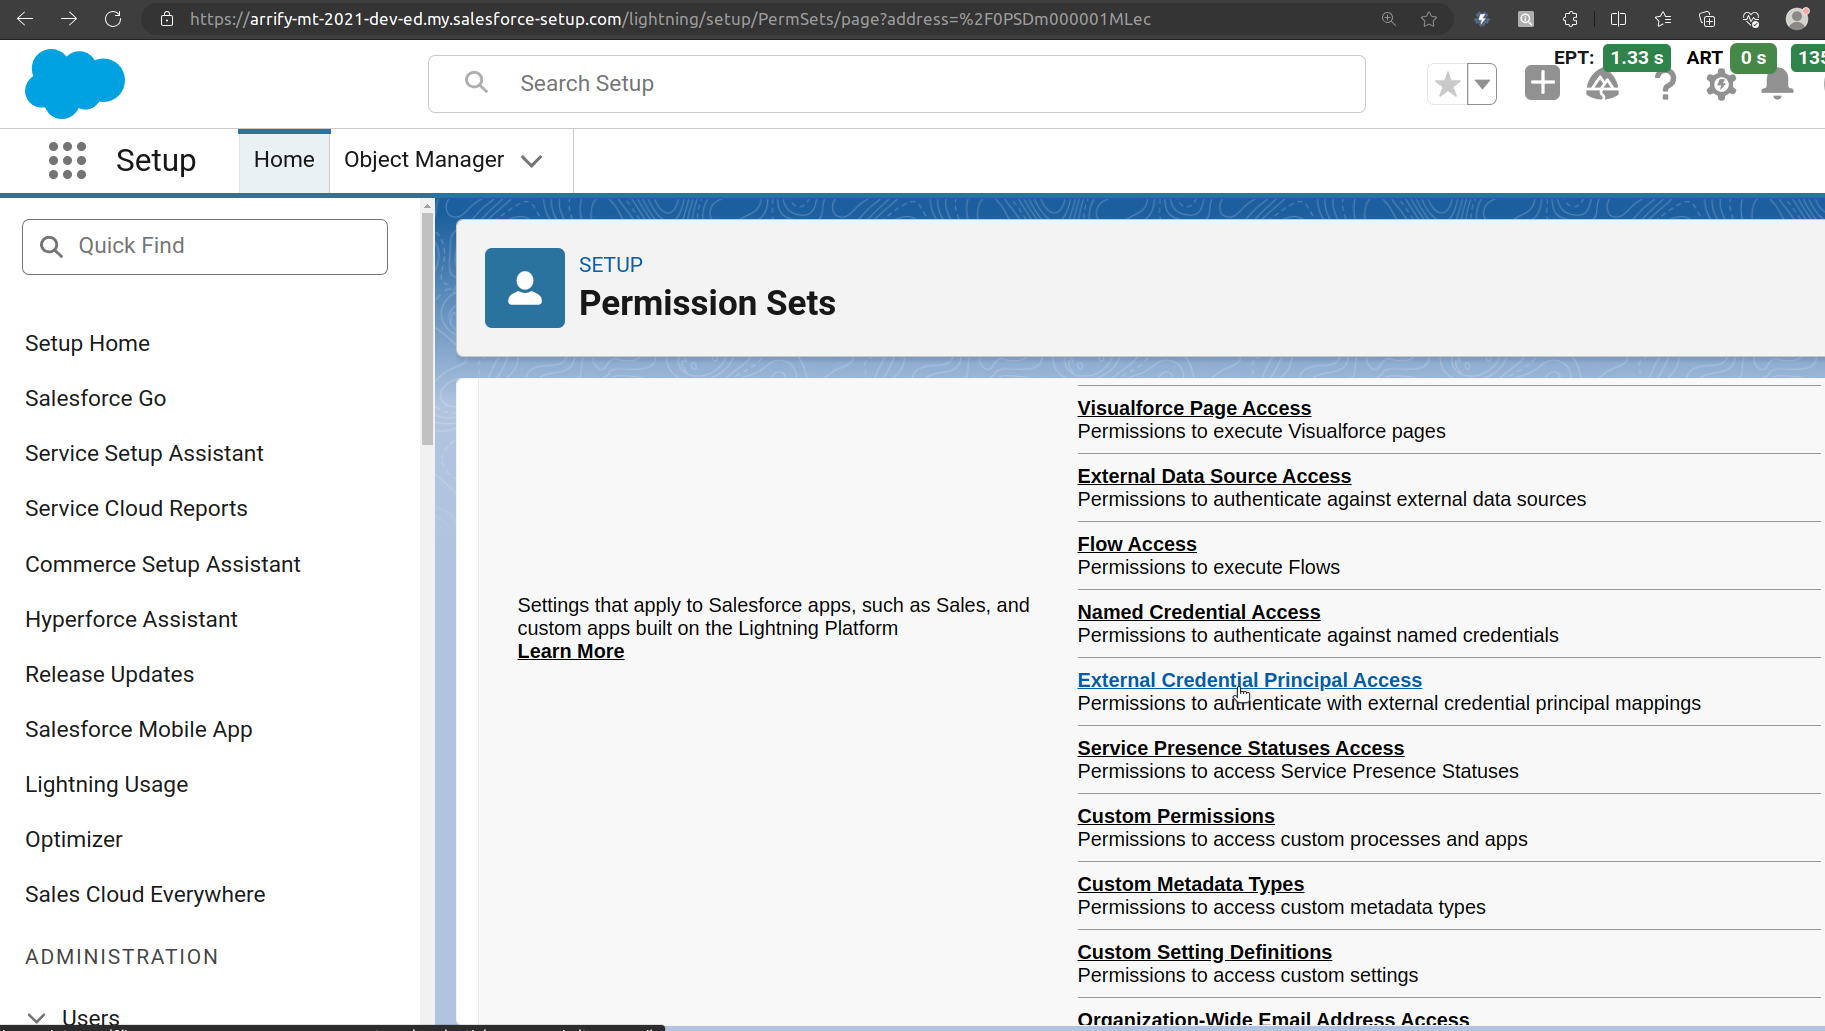
In the Apps section of the Permission Set, click External Credential Principal Access.
Click Edit.
If this permission is missing, you might encounter :
EXCEPTION: We couldn’t access the credential(s). You might not have the required permissions, or the external credential “<External Credential>” might not exist.
Give Access -> External Credential Principal Access
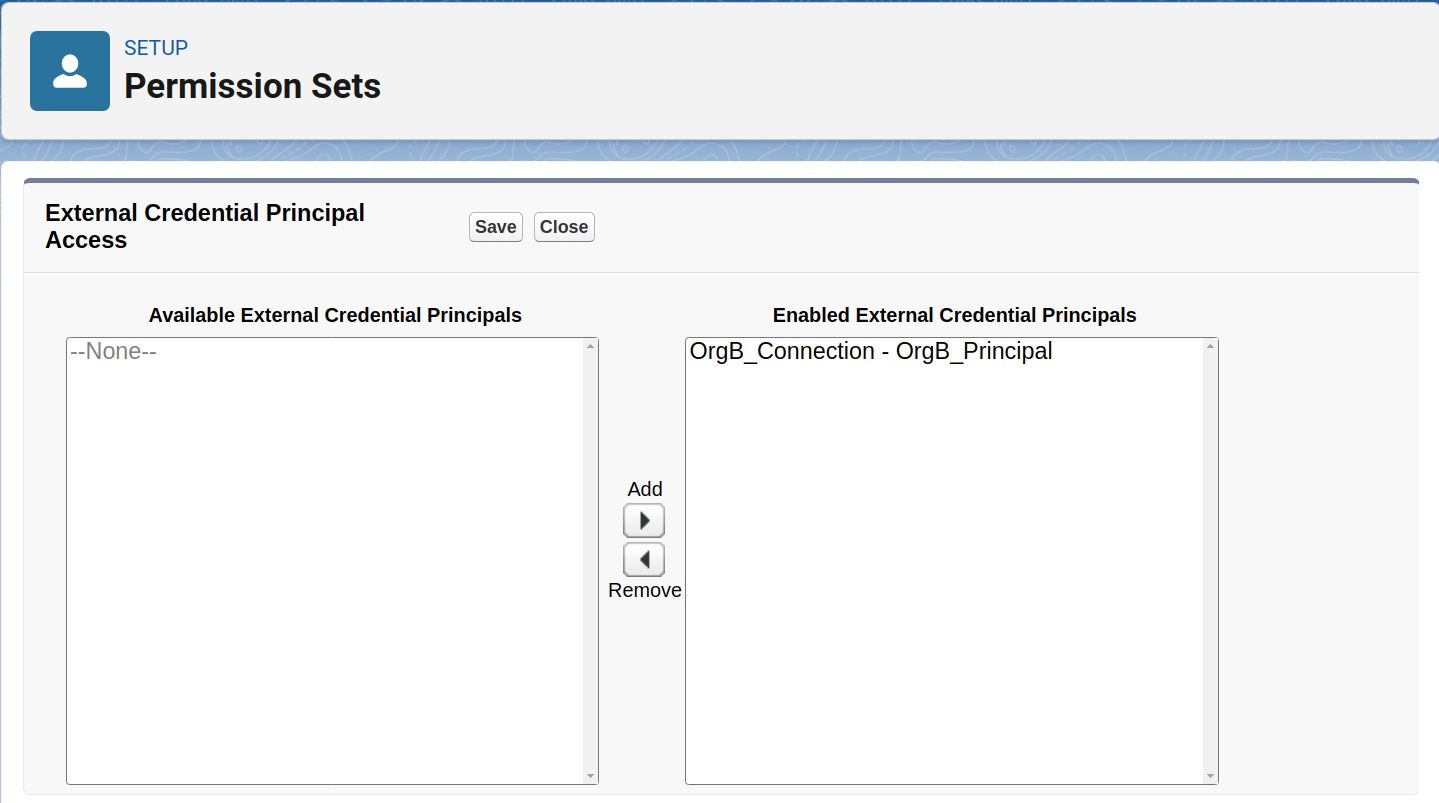
In the Available External Credential Principals box, find your newly created Principal.
Move it to the Enabled External Credential Principals box.
Click on Save.
Assign Permission Set -> User
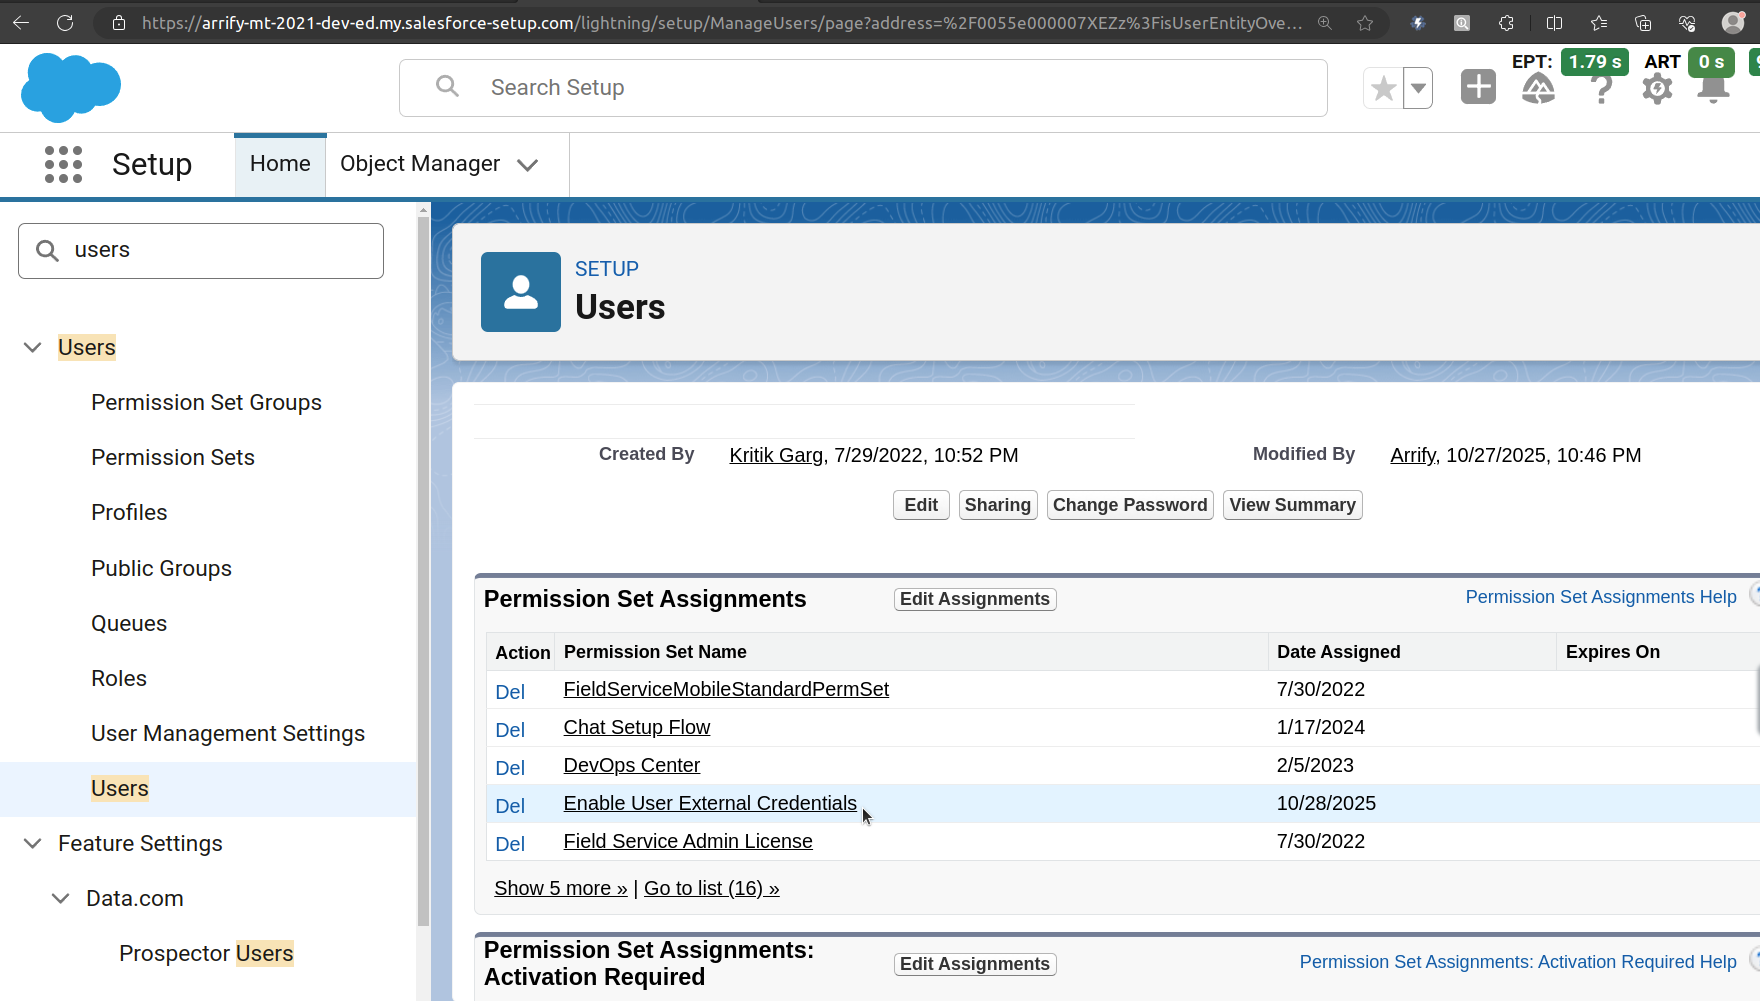
Go to Setup → Users → Users in Salesforce.
Scroll down to the Permission Set Assignments related list.
Click Edit Assignments.
From the Available Permission Sets, select the Permission Set you created earlier.
Move it to Enabled Permission Sets, then click Save.
Register External Service in Org A(arrify-mt)
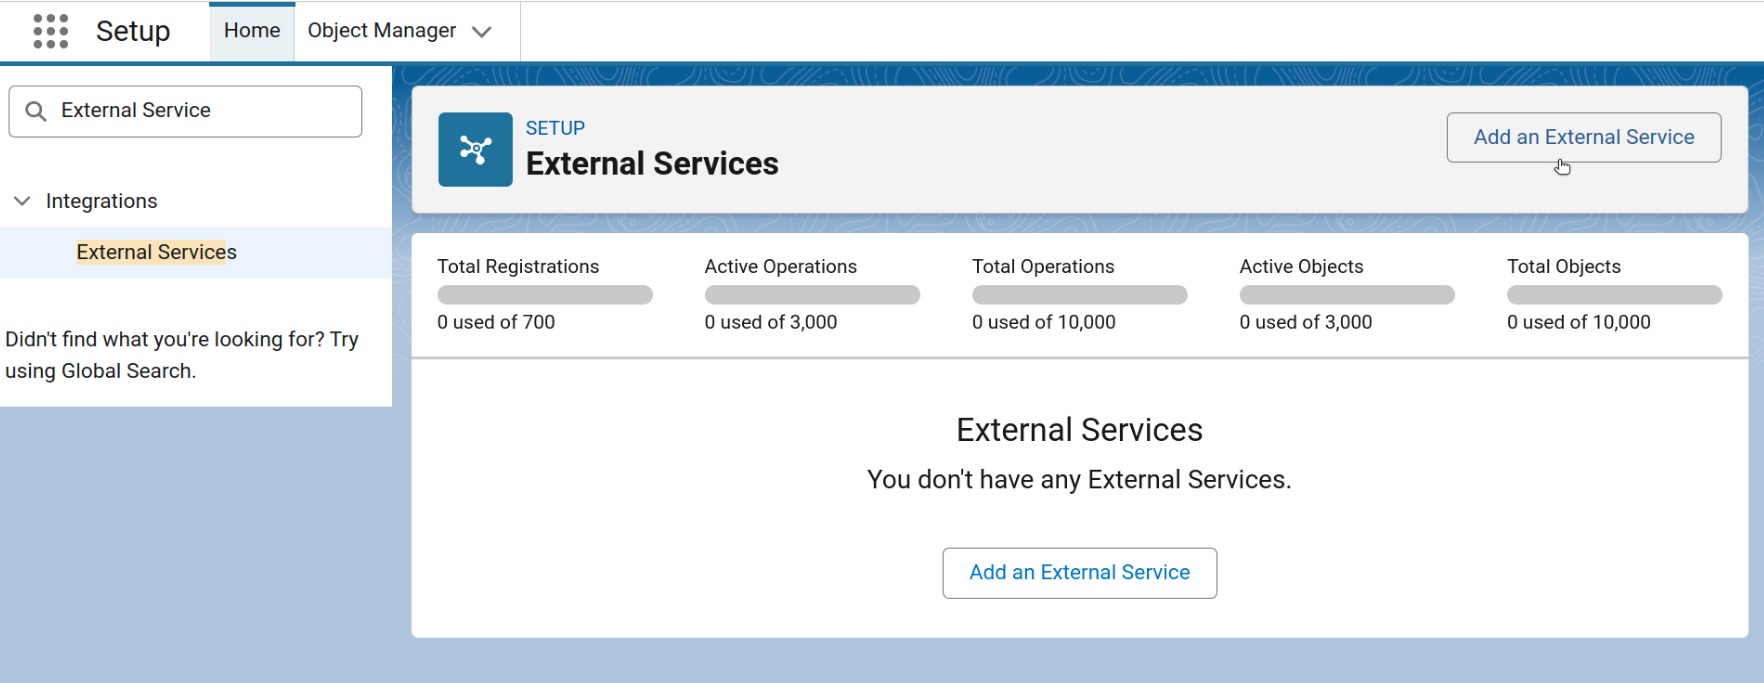
We’ll tell Salesforce about the API we want to use as Flow Actions.
In Org A, go to Setup → Search for “External Services”.
Click Add an External Service.
Select API Source
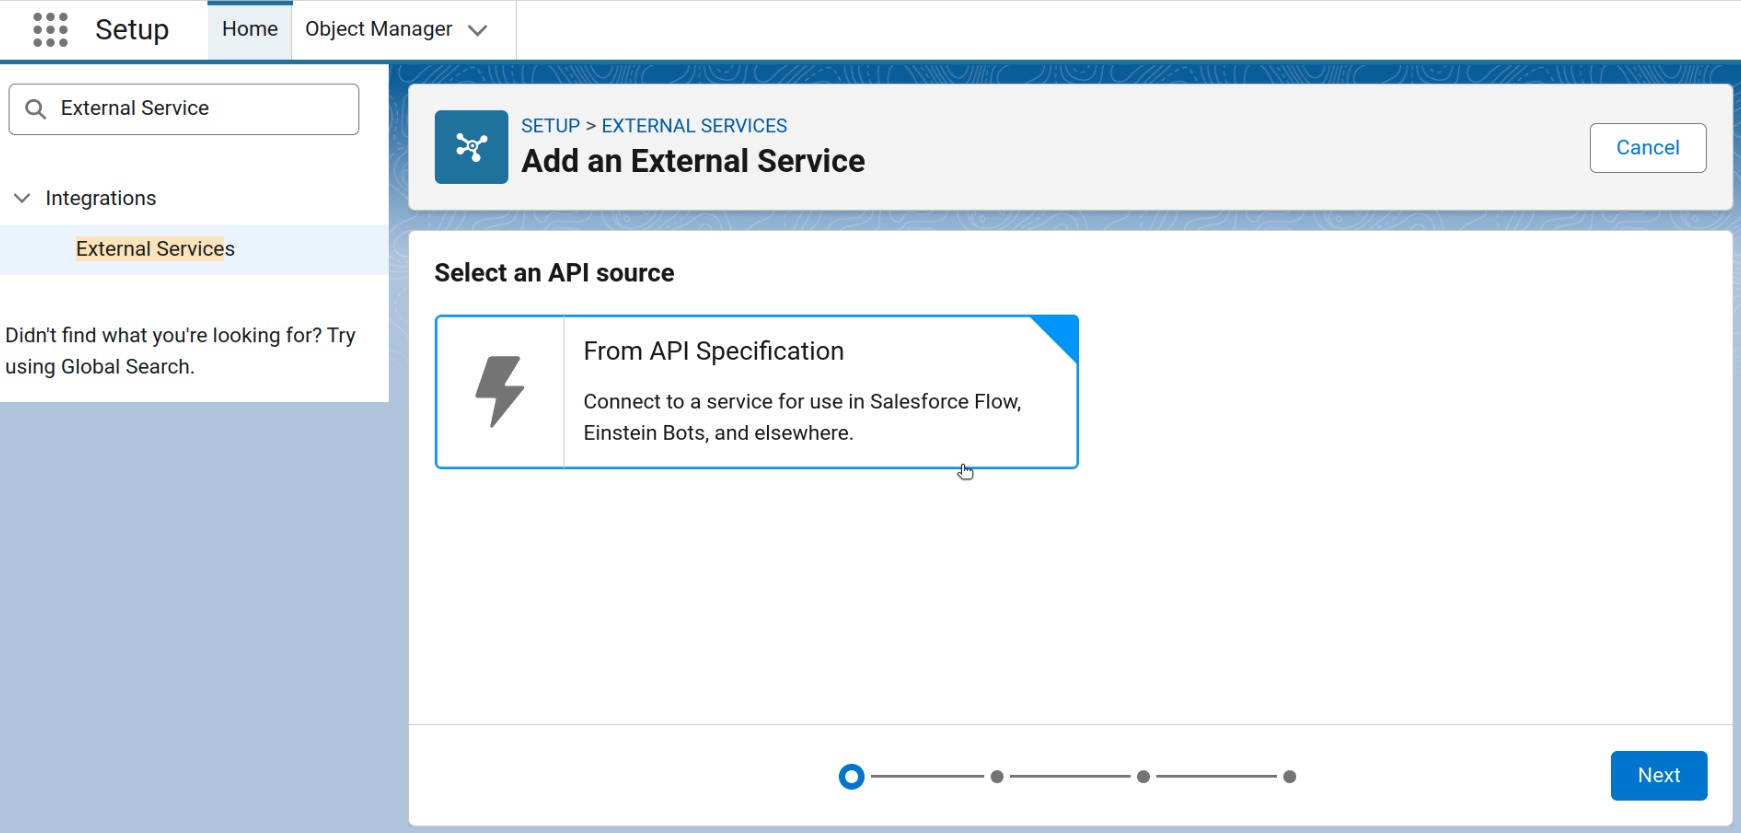
Just Select an API Source, Click Next.
Provide Registration Details
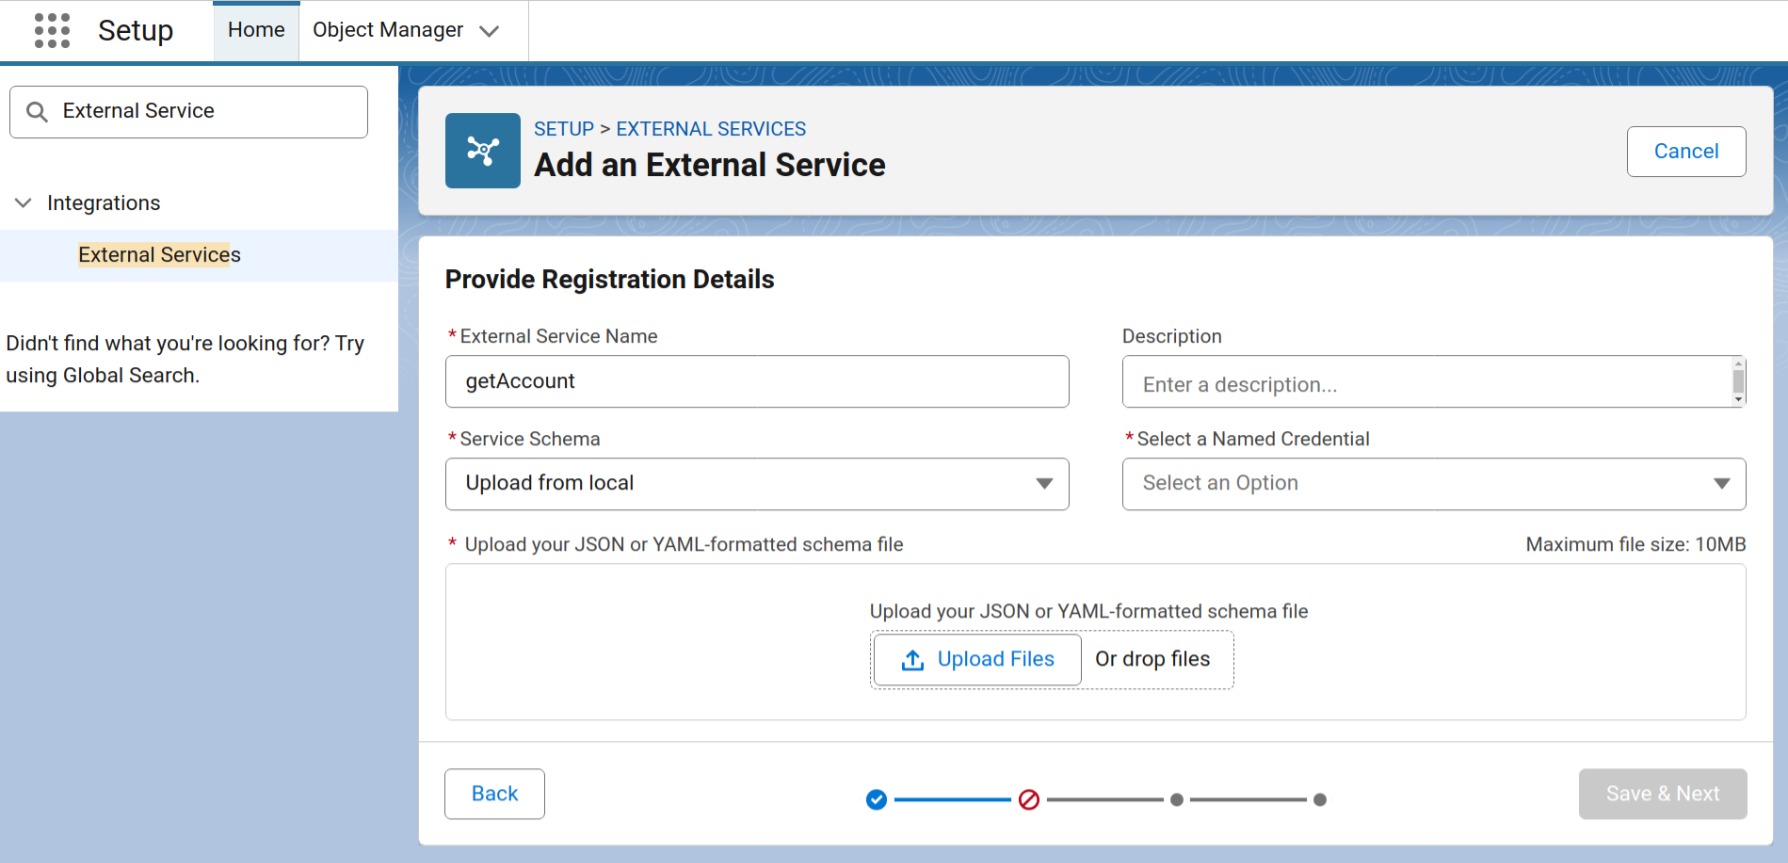
Name: Enter a name.
Named Credential: From the dropdown, select the Named Credential you created earlier. This defines how Salesforce will authenticate and securely connect to the external system (Org B).
Service Schema: Choose “Upload from Local.”
Click Upload File and select the OpenAPI (JSON or YAML) schema file you created earlier.
Once uploaded, Salesforce will read the schema and prepare to generate Flow actions based on the API definition.
Save Registration Details
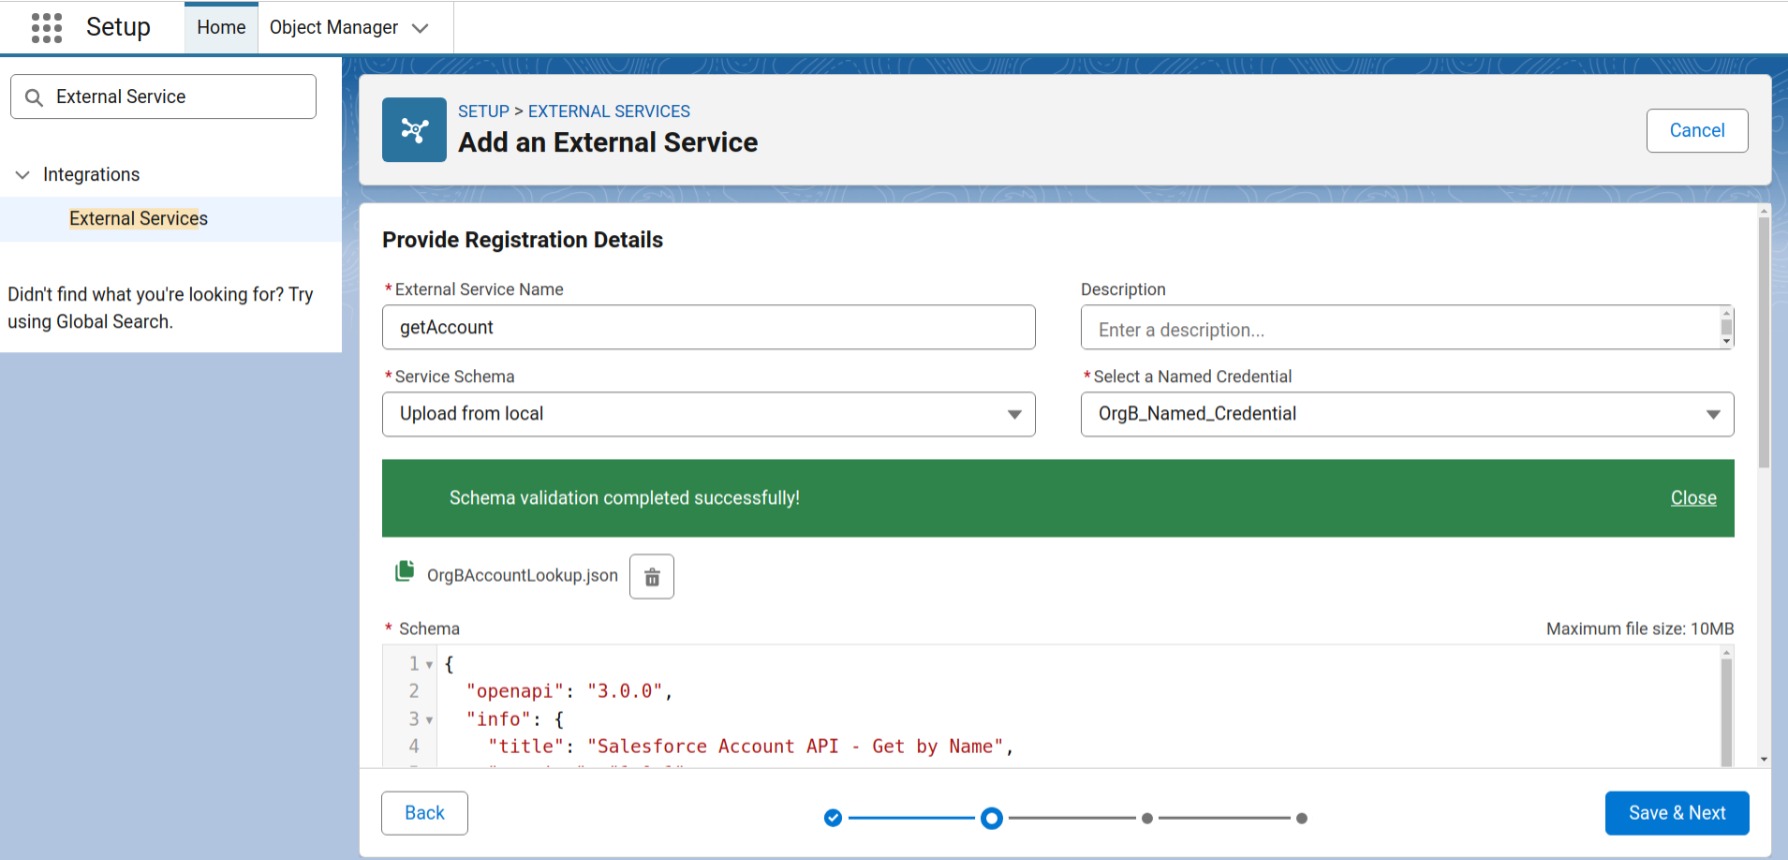
After all details & Scema file are uploaded, Click Save & Next.
When you upload a schema file (JSON or YAML), Salesforce reads it and automatically generates invocable actions that you can use in Flow.
Select External Service Operations (Auto-Generates Flow Actions)
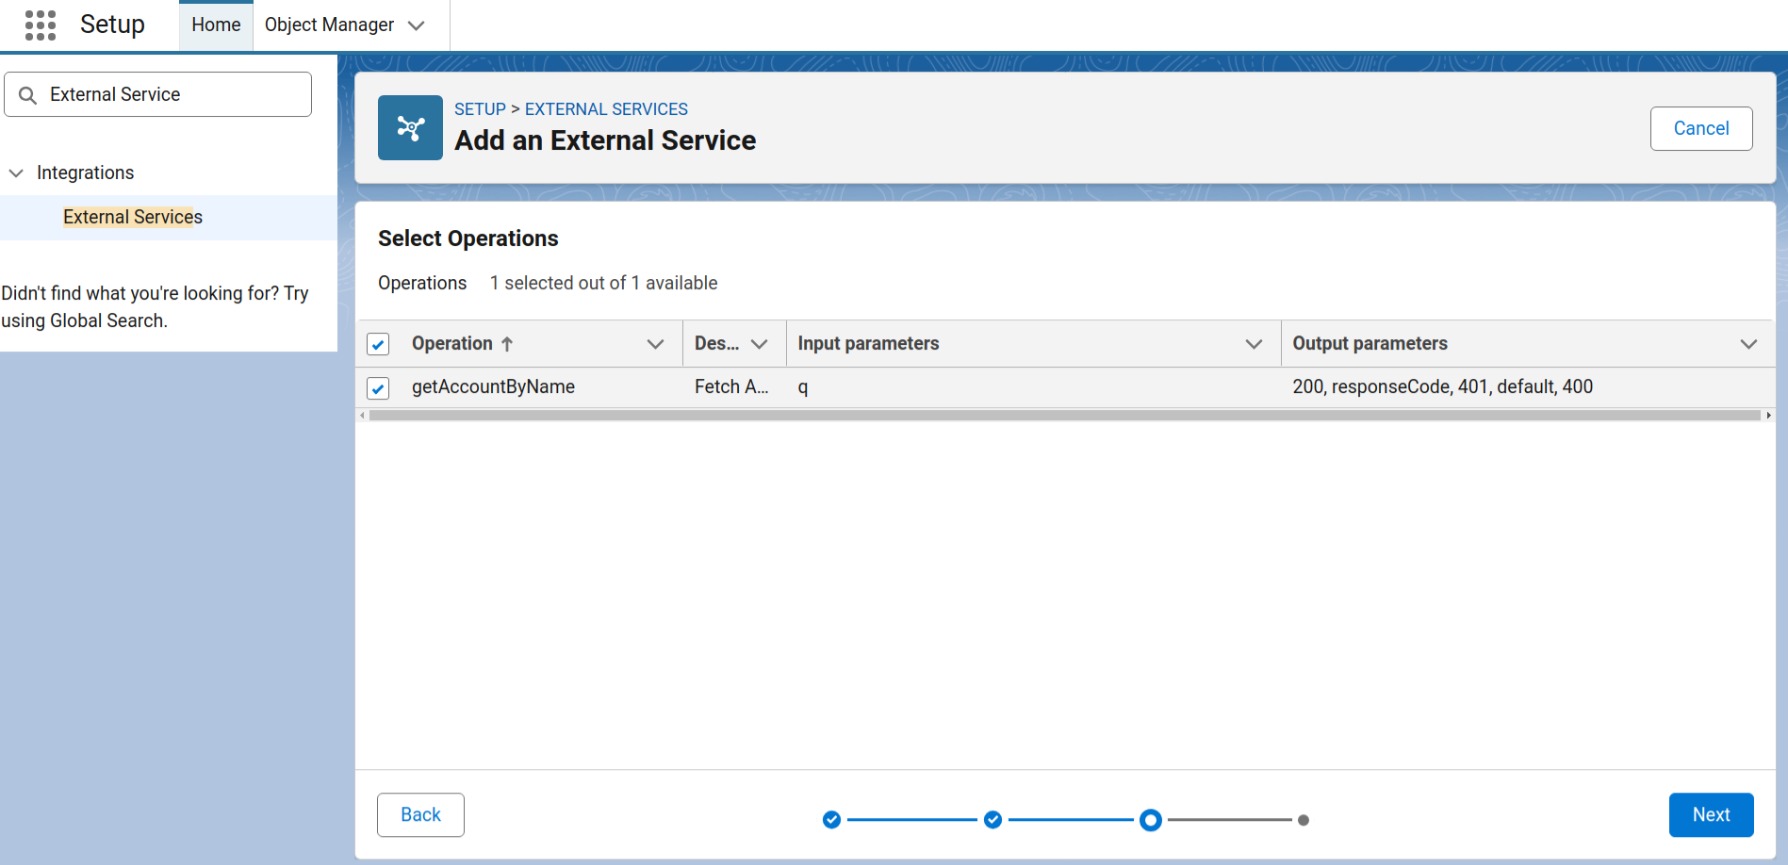
Once you’ve uploaded your OpenAPI schema file and connected it to your Named Credential, Salesforce automatically scans the file to detect all the available API operations (endpoints) defined in your schema.
At this step, you’ll choose which operations you want to make available for use in Flow.
(You can always return later to add or modify the selected operations if needed.)
After selecting the operations you want, click Next, review the generated External Service Actions, and then click Finish to complete the registration.
External Service Created
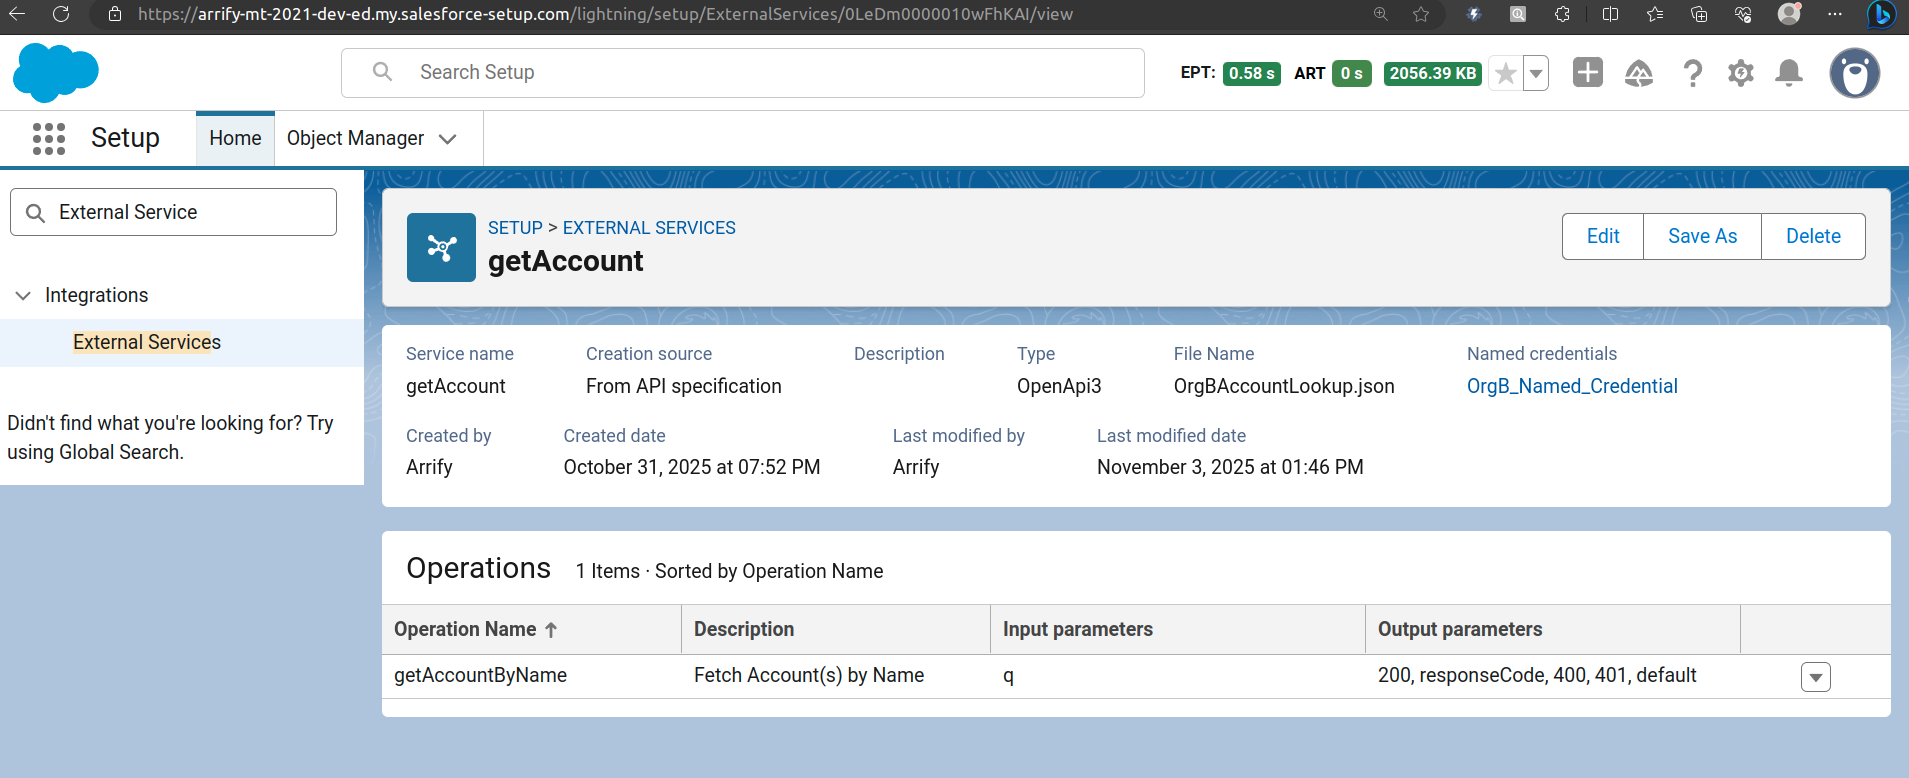
You can now use that External Service action inside Flow to call Org B’s API declaratively!
Build Flow in Org A(arrify-mt)
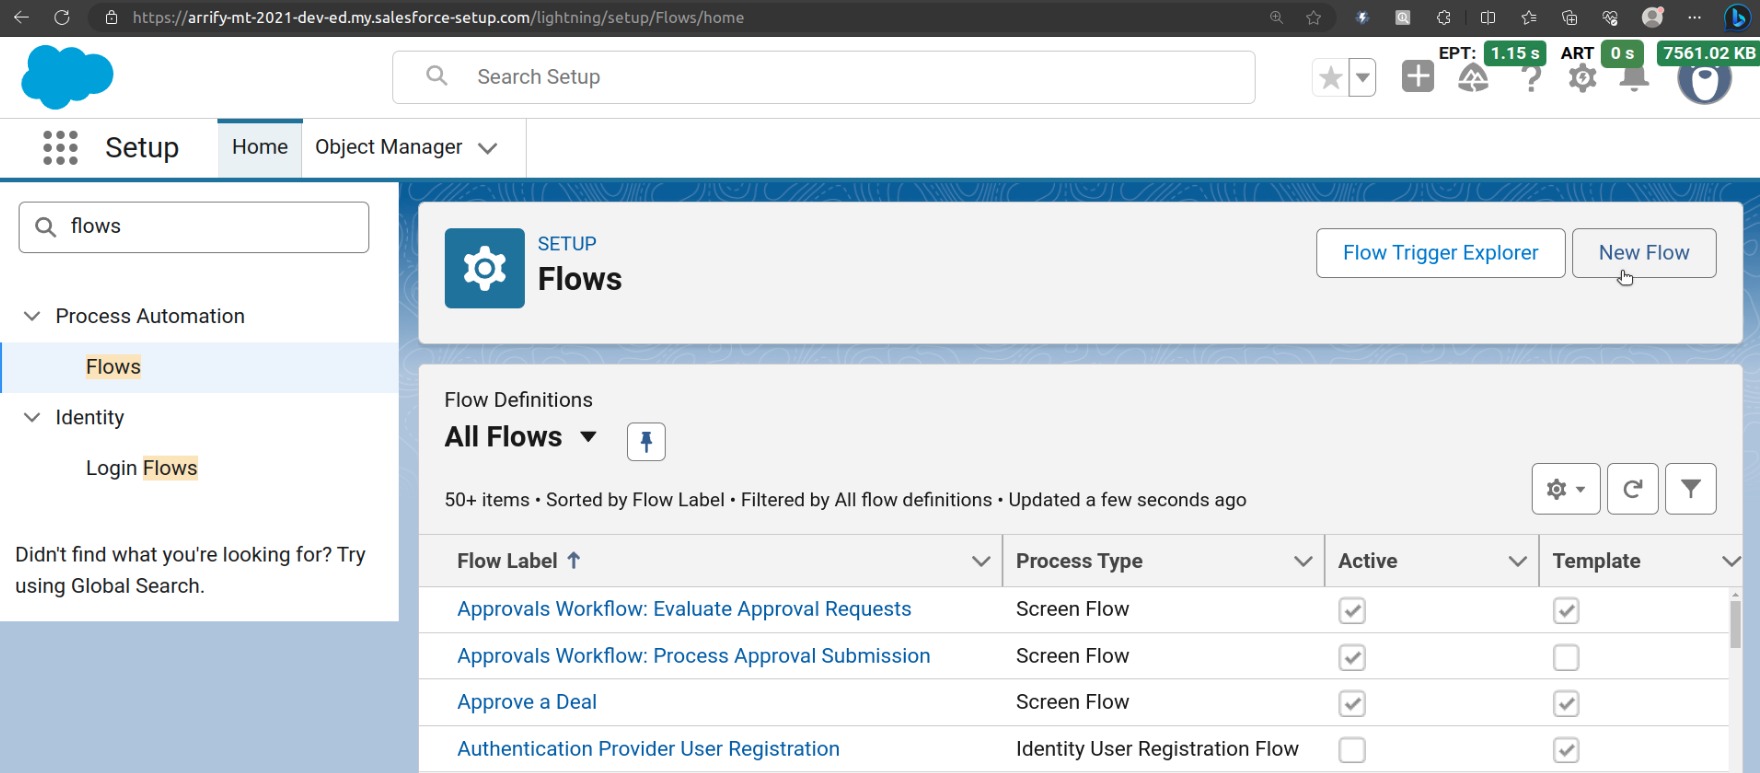
Go to Setup → Flows → New Flow.
Select Screen Flow and click Create.
Create the “Account Creation Screen”
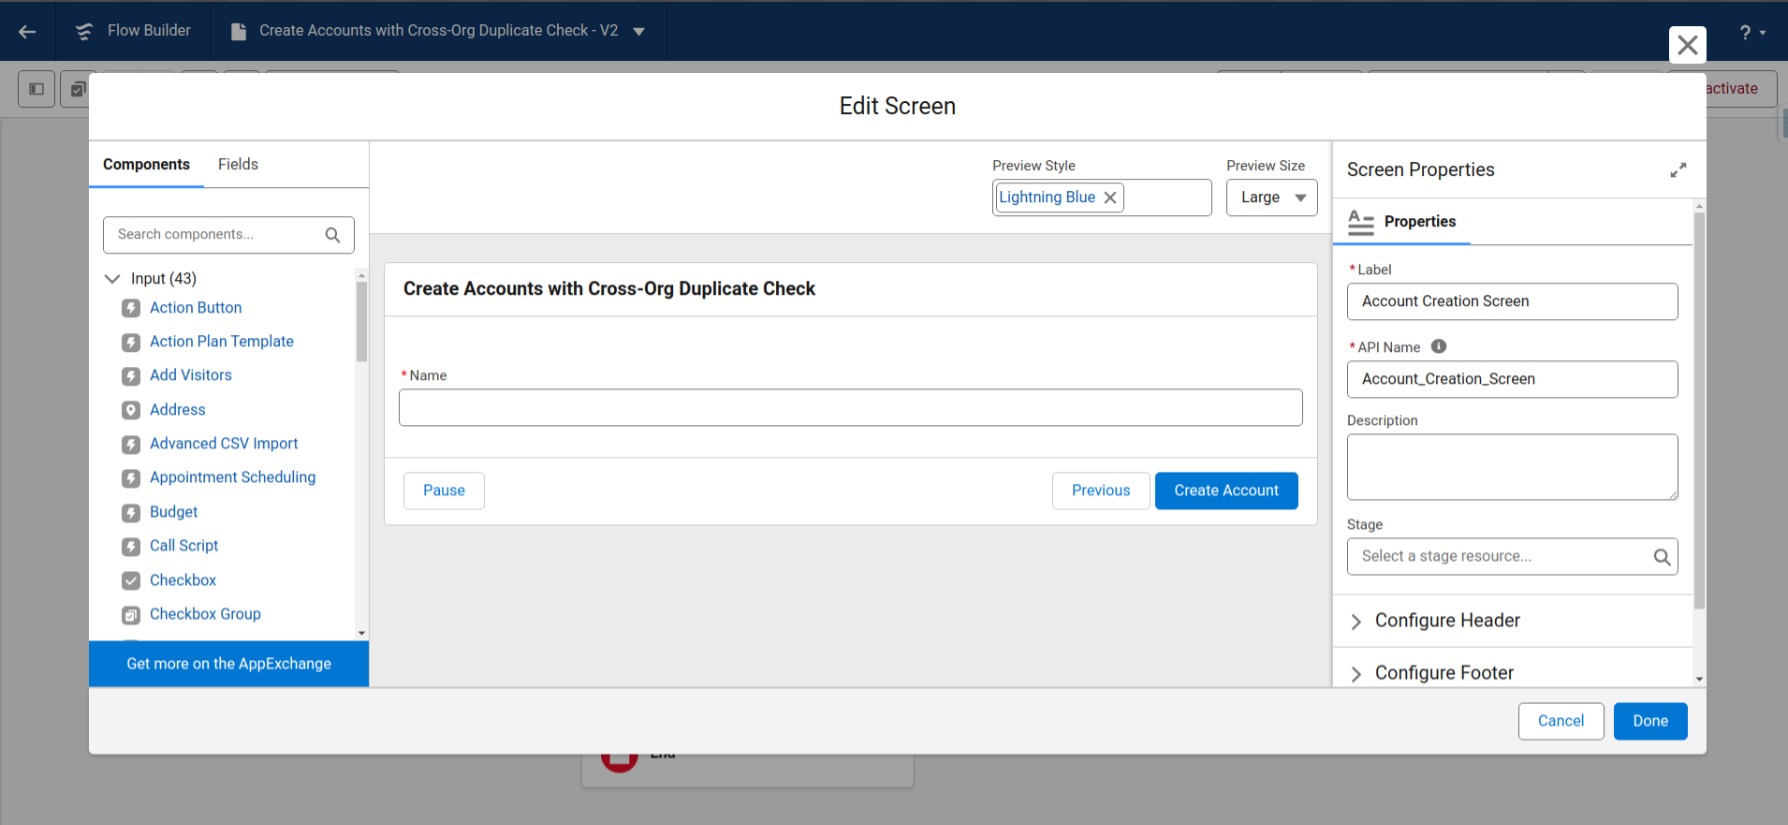
Add a Screen element after the Start node.
Set the Label
In the Components panel (on the left), drag a Text input field to the screen.
Set properties:
Label: Name
API Name: Name
Required: Checked
Configure Footer: Add custom label ” Create Account”
Click Done to save.
Add New Resource(Formula)
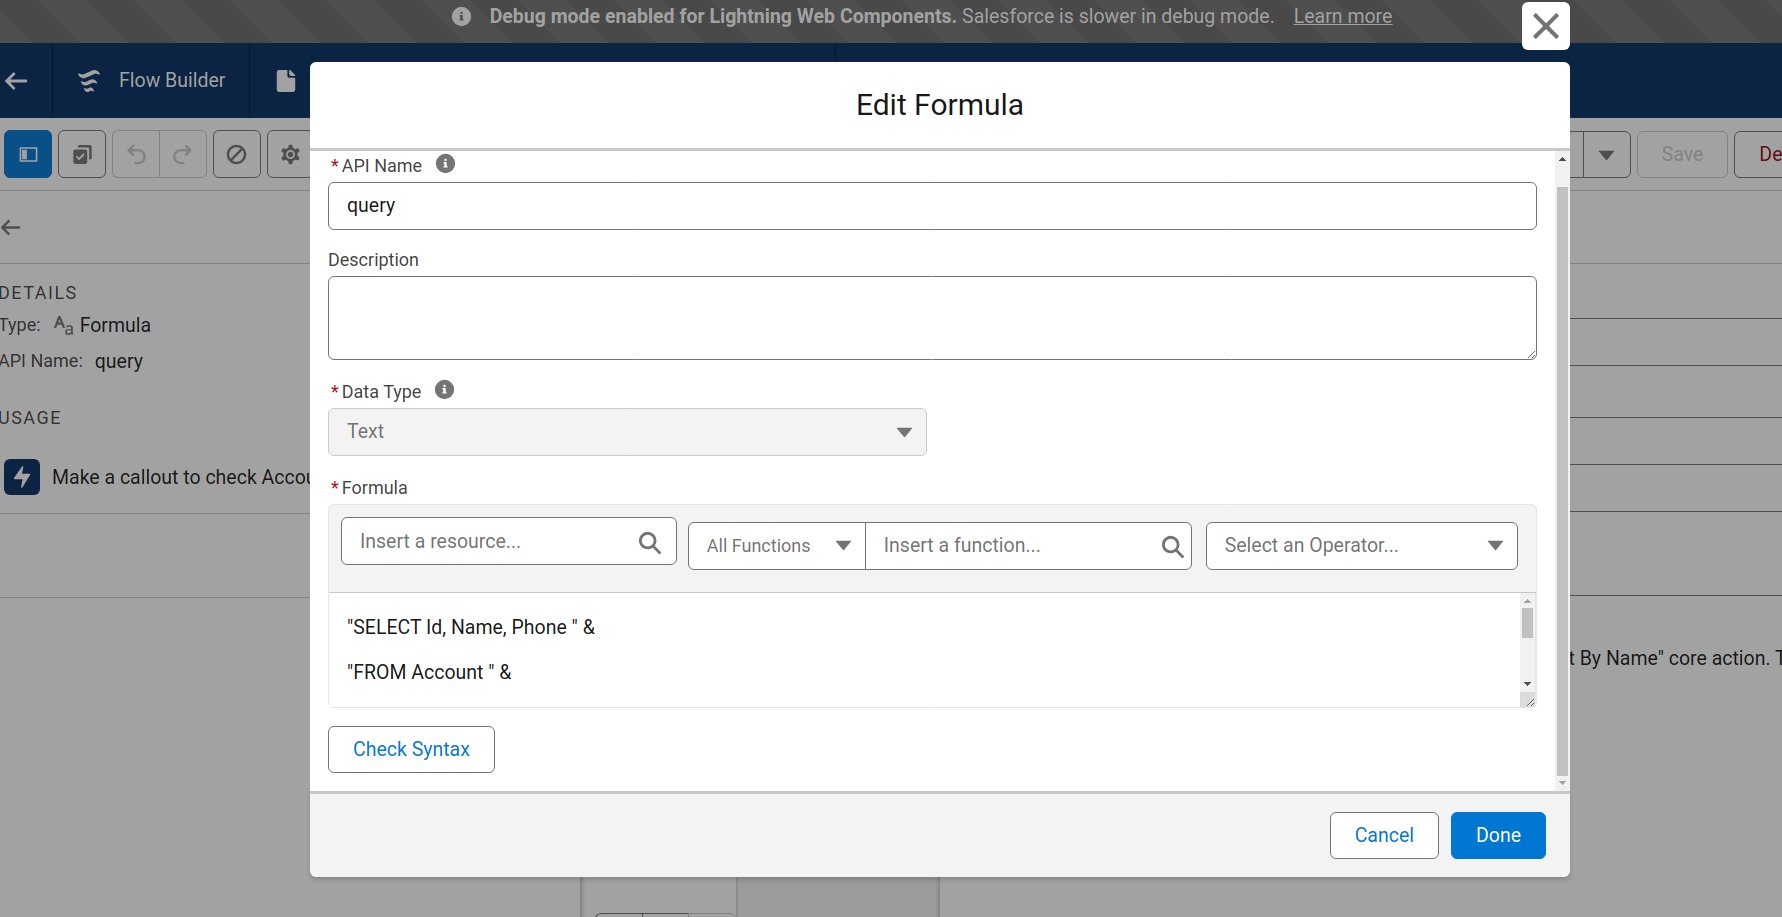
Enter a Formula to dynamically pass the SOQL query:
“SELECT Id, Name, Phone FROM Account WHERE Name LIKE ‘%” &
SUBSTITUTE({!Name}, “‘”, “\’”) &
“%’ LIMIT 1”
{!Name} : Import input from Account Creation Screen
Add an Action to Call External Service
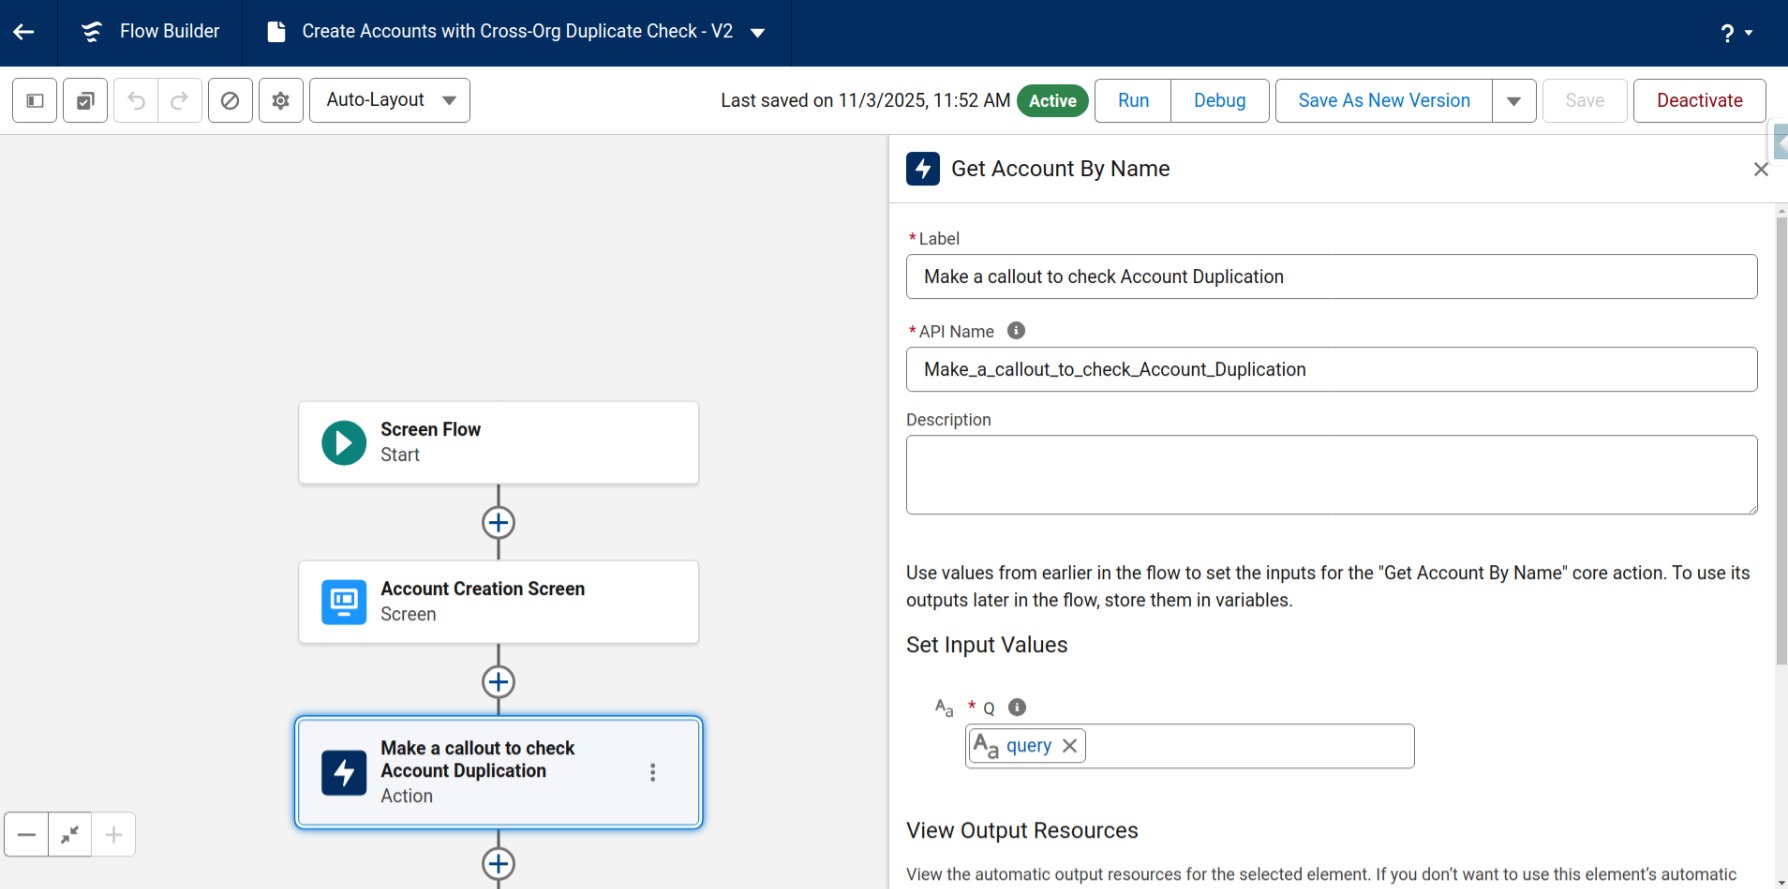
Click the + icon below the “Account Creation Screen.”
Select Action → Category: External Services.
Search for the External Service operation you registered earlier, for example: getAccountByName (from your schema file).
Set the Label & API Name
Under Set Input Values:
Set newly created resource as input parameter q.
IsAccountExist : Add New Resource(Formula)
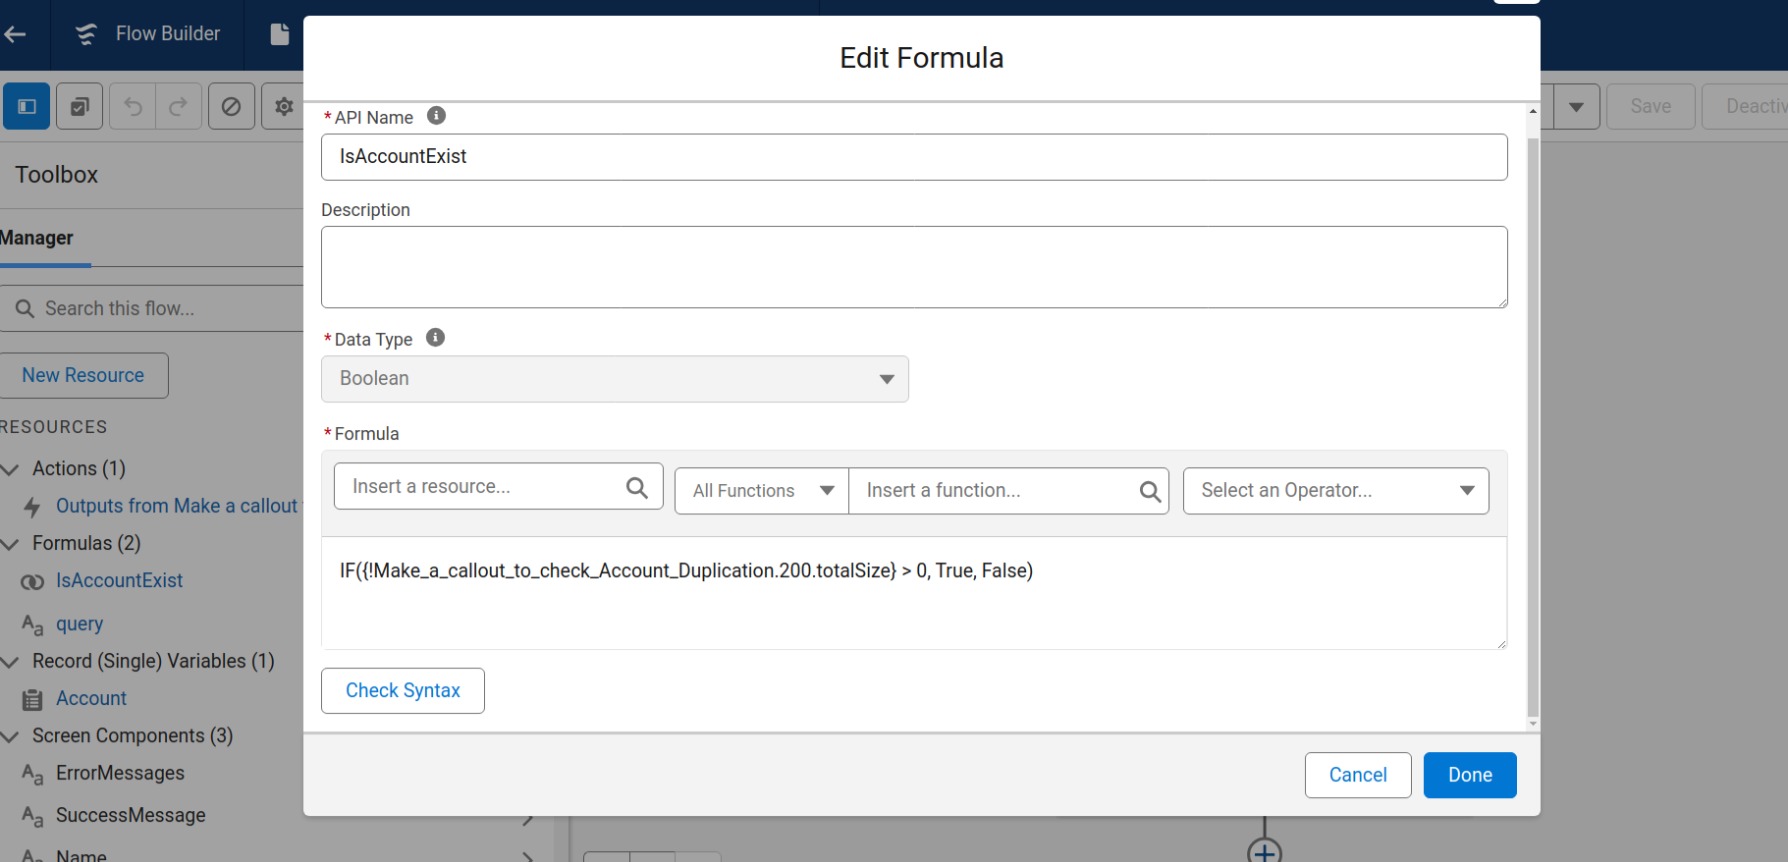
The formula checks the API response from your External Service action.
If the totalSize field (returned by the callout) is greater than 0, it means at least one matching Account exists in Org B → returns True.
Otherwise, it returns False, allowing the Flow to continue with Account creation.
Add Response Screen
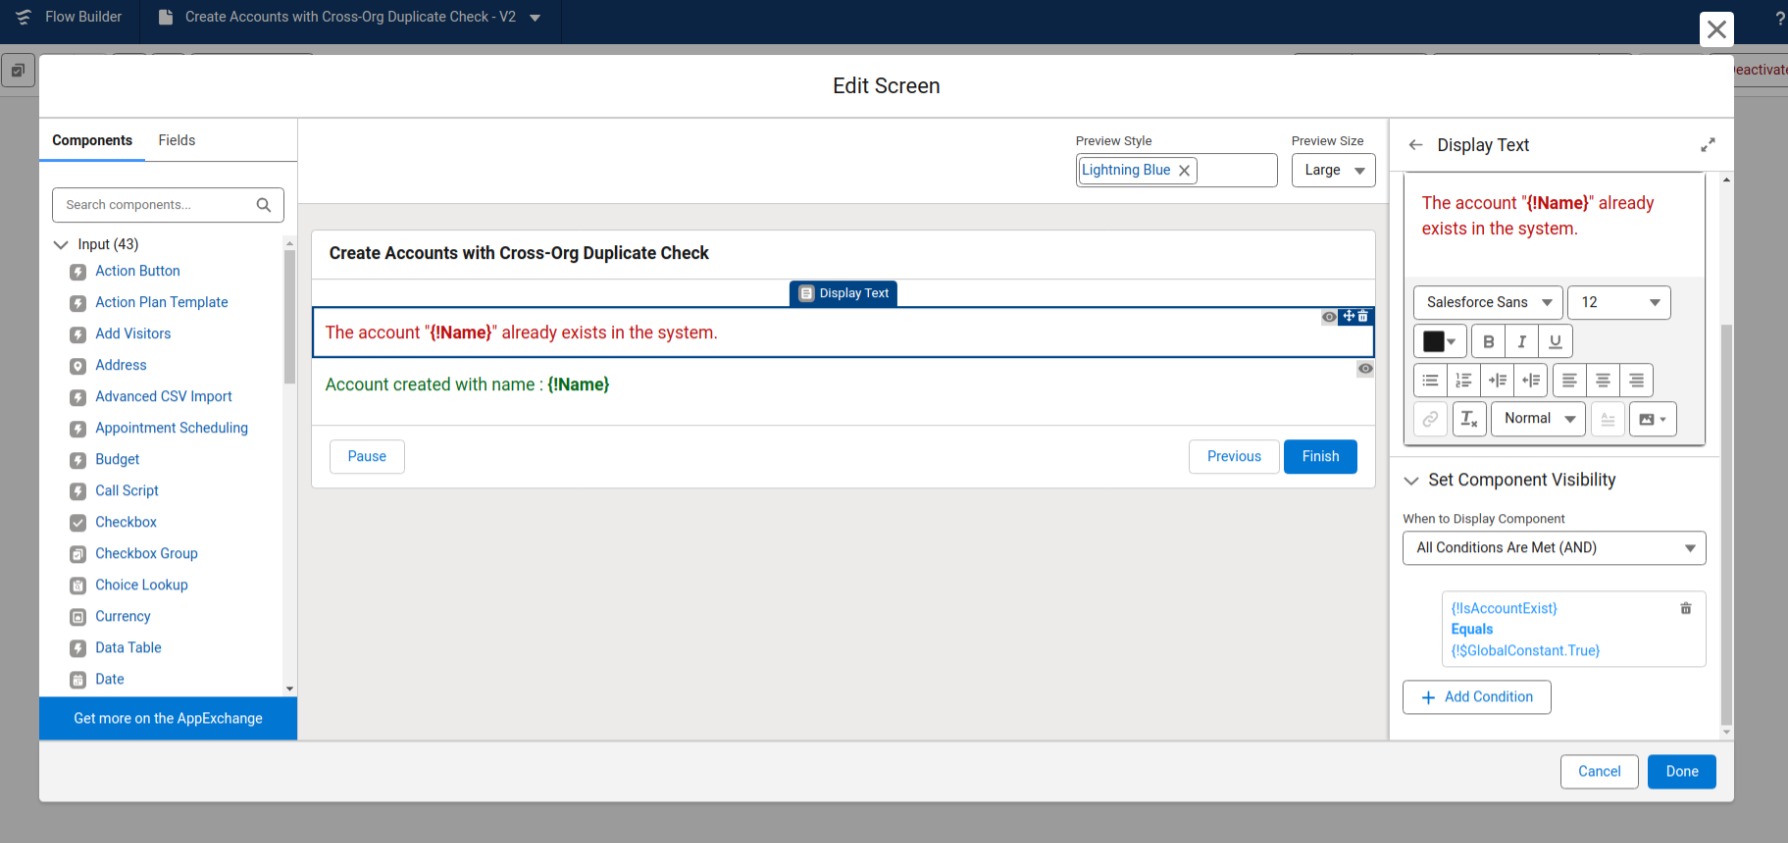
Add another Screen element after the Action.
(This screen will display whether the Account already exists in Org B or can be created.)
Drag two Display Text components from the left panel:
One for duplicate found → “The account ‘{!Name}’ already exists in the system.”
One for account creation success → “Account created with name: {!Name}.”
Configure Set Component Visibility:
For the duplicate message → {!IsAccountExist} Equals {!$GlobalConstant.True}
For the success message → {!IsAccountExist} Equals {!$GlobalConstant.False}
Save and Activate the Flow
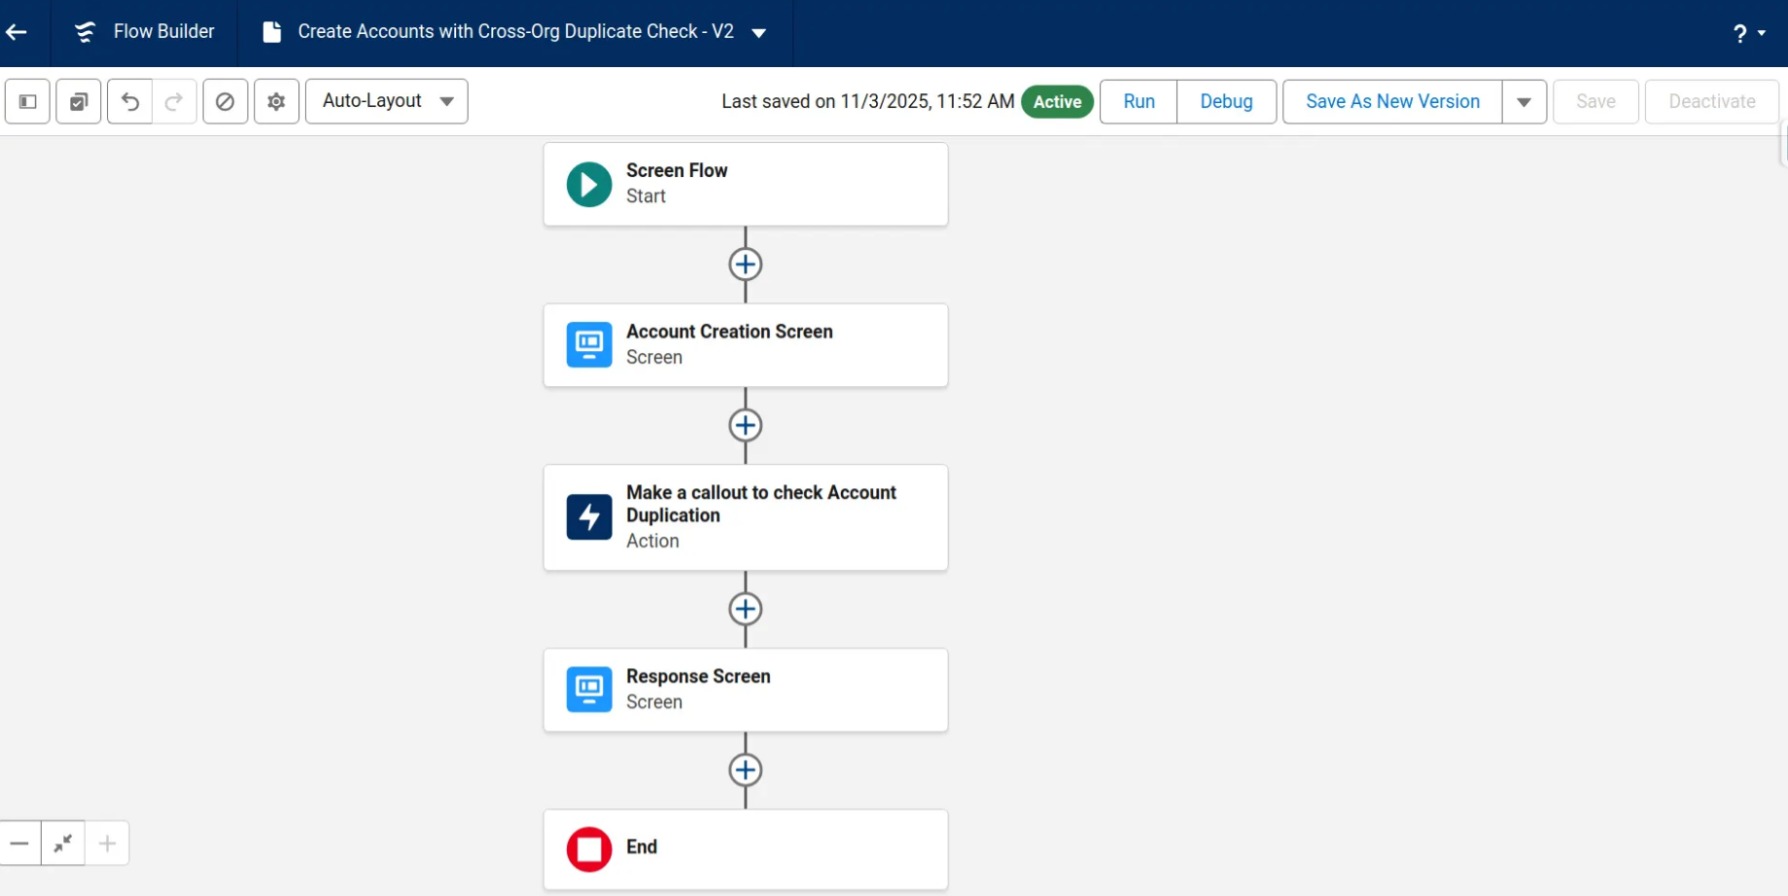
Click Save → name it:Create Accounts with Cross-Org Duplicate Check.
Click Activate.
Your flow is now ready to use!
Testing Flow Functionality : Set Up Test Record in Org B
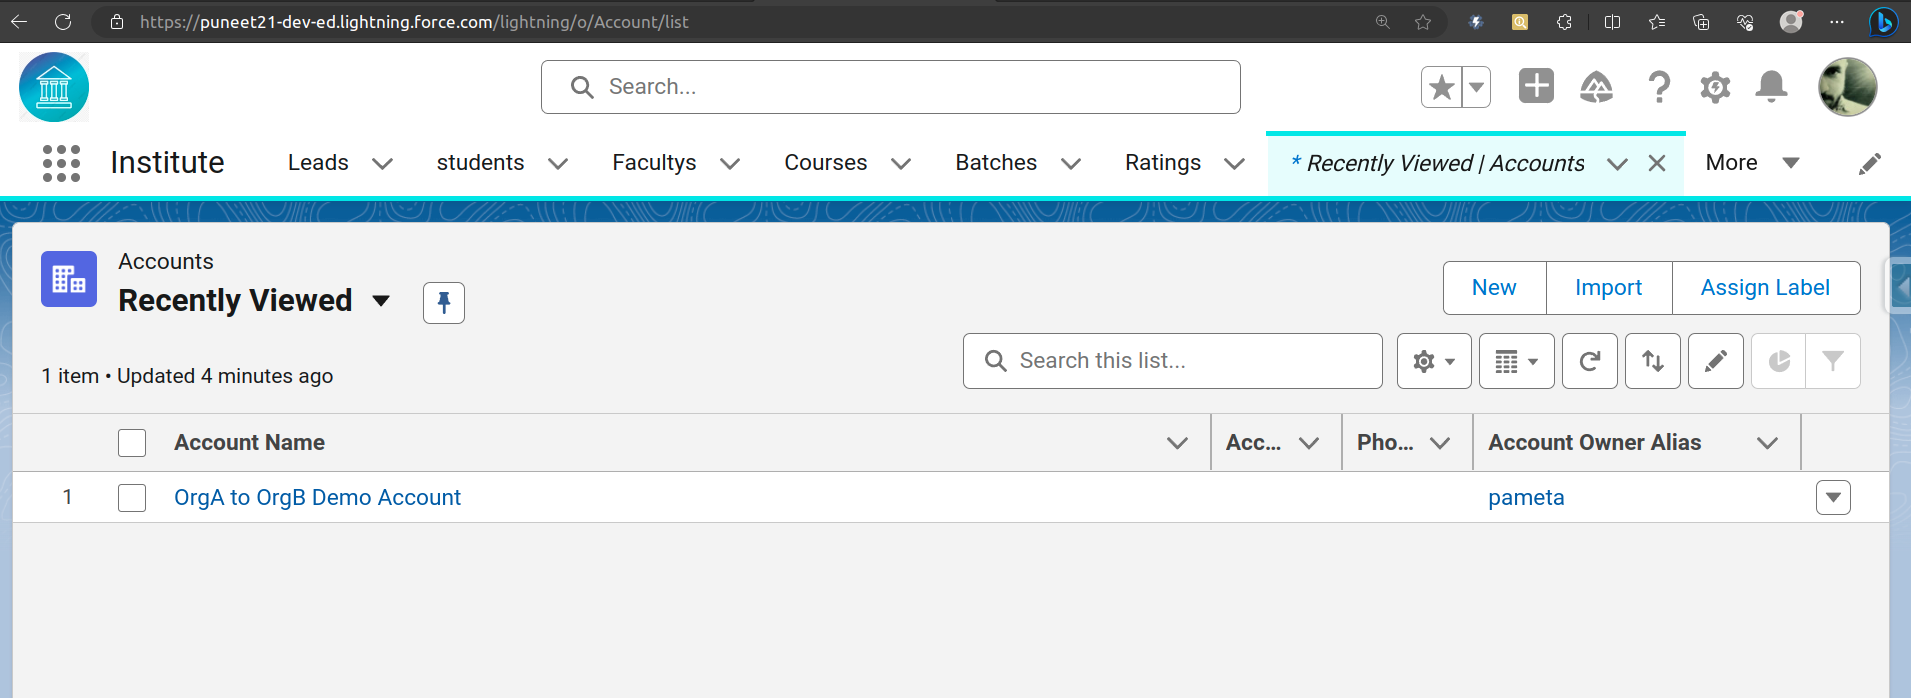
First, we created a new Account record in the target org (Org B – arrify-mt) named “OrgA to OrgB Demo Account.”
This record will be used to verify that our integration correctly detects existing Accounts in Org B when testing from Org A.
Add Flow to the Home Page in Org A
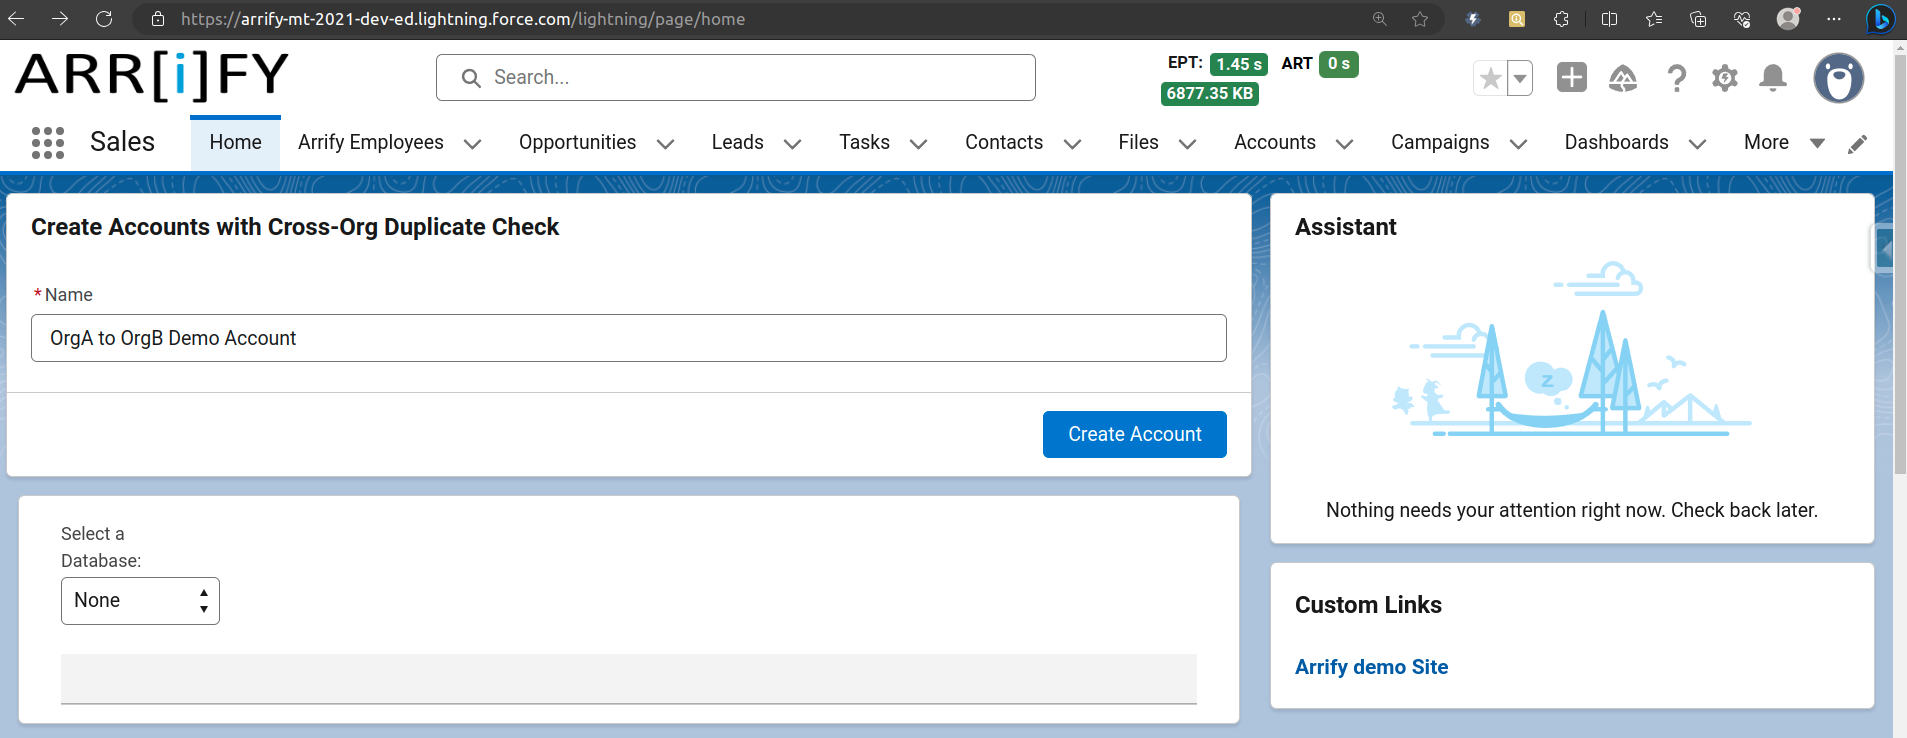
To make it easy for users to create new Accounts directly using the duplicate-check Flow, we’ll add the Flow to the Home page in Org A.
Go to Setup → Edit Page.
From the Components panel, drag the Flow component onto the page.
In the Flow properties panel on the right:
Select Flow: Choose the Flow you created.
Save and Activate the page.
Test the Flow : Try with the Same Name
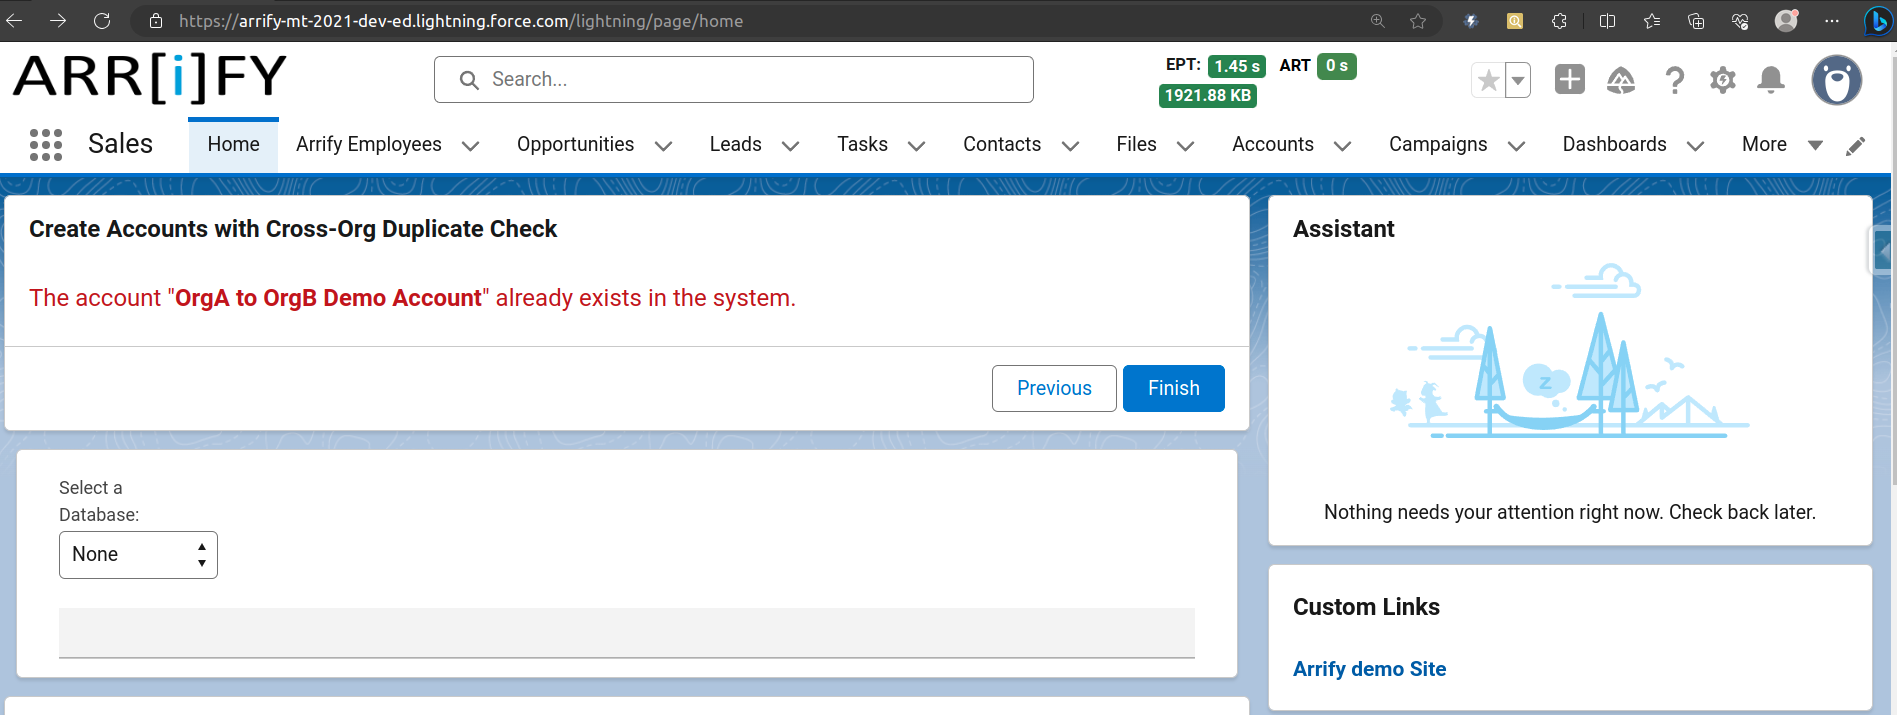
Account Name -> “OrgA to OrgB Demo Account”.
Click Create Account.
The Flow calls Org B via External Services, finds a matching record, and displays this message:
“The account OrgA to OrgB Demo Account already exists in the system.”
This confirms that the duplicate-check logic is working correctly.
Try with a Different Name
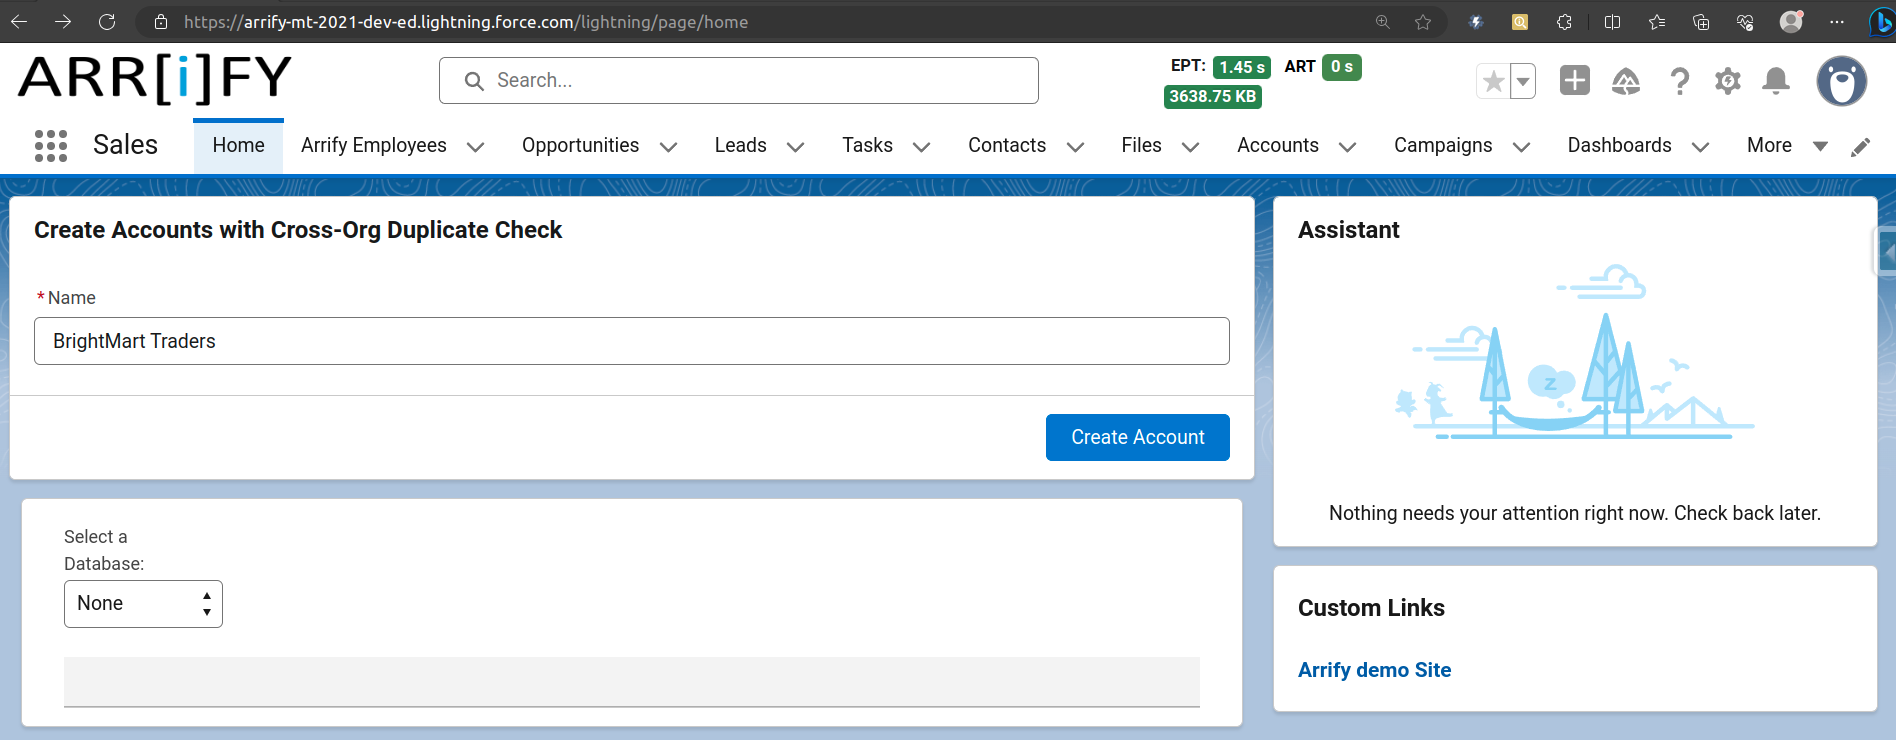
Account Name -> “BrightMart Traders”
Click Create Account.
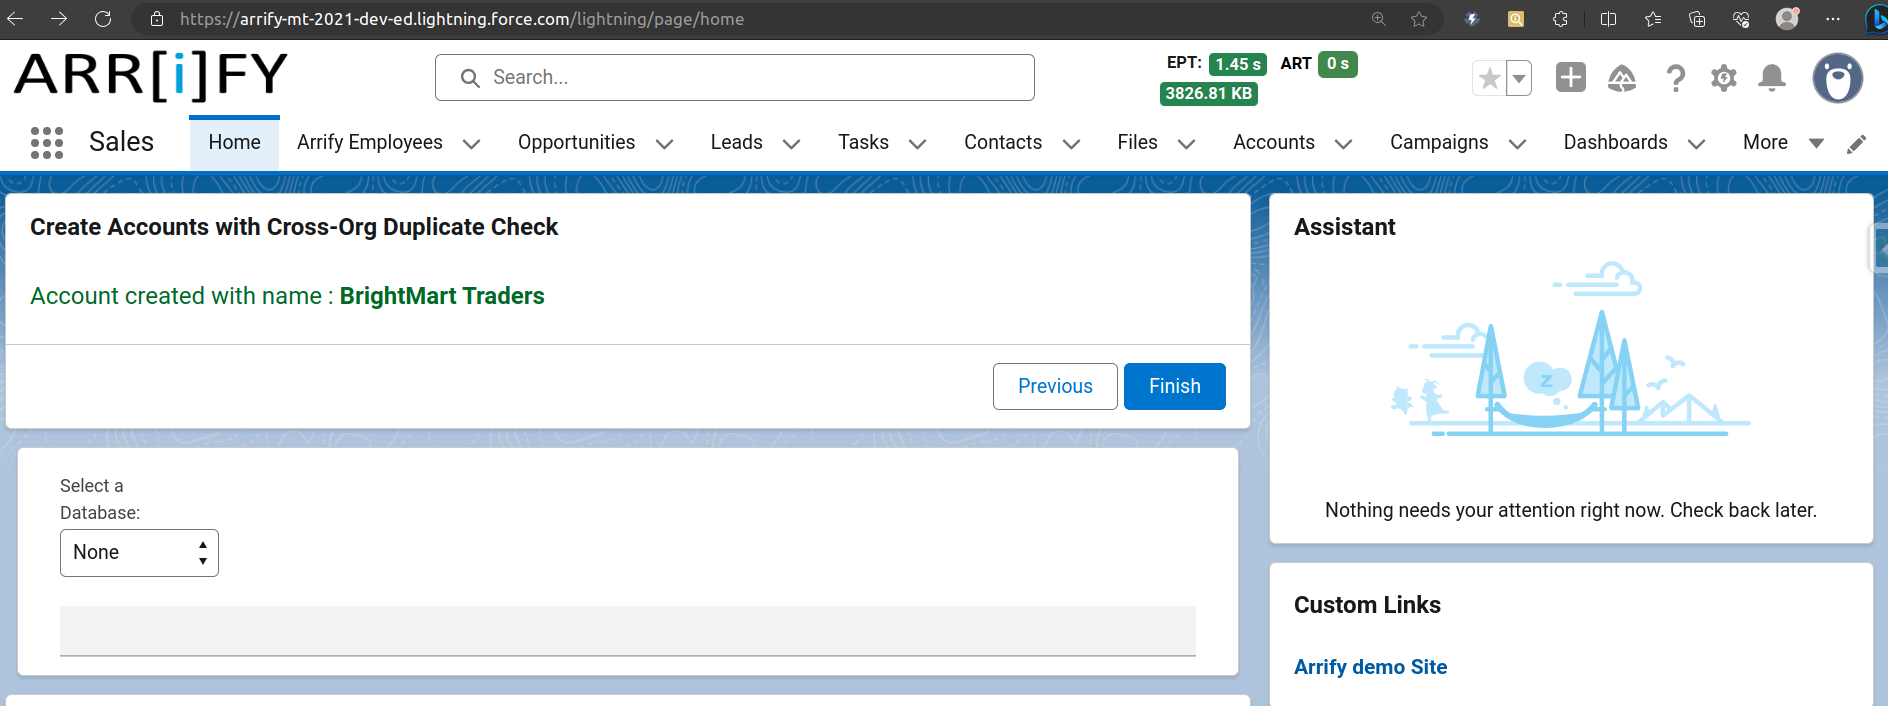
No match is found in Org B, so the Flow proceeds to create the record in Org A and displays:
“Account created with name: BrightMart Traders.”
Congratulations! You’ve successfully learned how to connect two Salesforce organizations and perform callouts through External Services, without the need for any Apex code.
Considerations of External Services
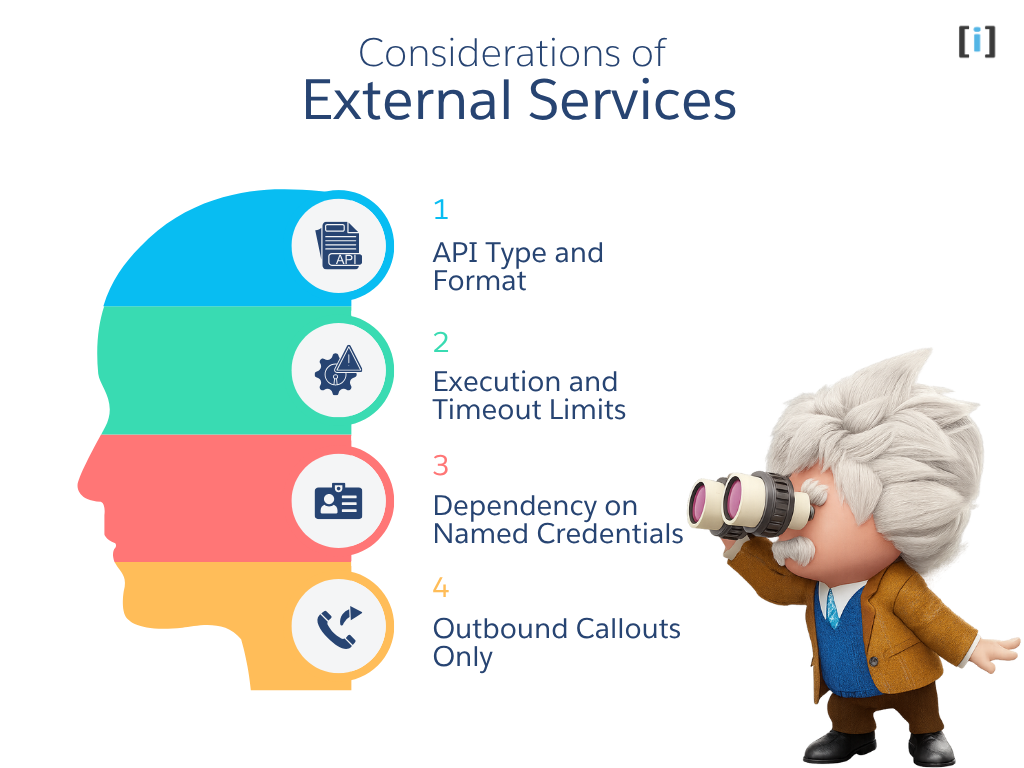
While Salesforce External Services make integrations easier than ever, they do come with some important considerations and technical limitations. Understanding some of will help you plan integrations that are efficient, secure, and scalable.
API Type and Format
External Services work only with REST-based APIs that follow the OpenAPI 2.0 or 3.0 specification.
If your external system exposes SOAP or GraphQL APIs, or doesn’t have an OpenAPI-compatible schema, you’ll need to use custom Apex callout instead.
Execution and Timeout Limits
Each API call made through External Services still runs within Salesforce governor limits. This means:
- External Service callouts must complete within the standard callout timeout (up to 120 seconds).
- You can only make a limited number of callouts per Flow transaction.
- Large or slow responses may cause timeouts.
Dependency on Named Credentials
External Services can’t function without a valid Named Credential. If the Named Credential is deleted, expired, or misconfigured, all associated Flows will fail.
Outbound Callouts Only
External Services only support outbound callouts where Salesforce Flow calling out to another system’s API.
Inbound callouts or webhooks are not supported. This means you can’t use External Services for two-way or event-driven communication, where an external system needs to trigger or push data into Salesforce.
Conclusion
External Services make it possible to connect Salesforce Flows with the outside world securely, declaratively, and without a single line of code.
By combining an API schema, a Named Credential, and a few simple steps in Flow Builder, you can connect to virtually any system whether that’s another Salesforce org, a public web service, or an internal business platform in just minutes. Whether you’re:
- Syncing customer data between orgs,
- Fetching live information from an external database, or
- Triggering real-time updates to another system
Salesforce has made integration more accessible than ever. With External Services, even non-developers can build powerful, secure, real-time connections between Salesforce and the rest of their digital ecosystem that all through clicks, not code.
