What is the Utility Bar in Salesforce?
The Utility Bar in Salesforce is the new and more responsive global context bar located at the lower part of the interface in the Lighting It helps to make the access of the tools, actions and shortcuts easy. As such, the particular tool is designed to enable the users to easily find various functions, tools and utilities that might be required to work to execute duties within the existing interface, without necessarily having to navigate to another page or section.
How to enable Utility Bar in Salesforce?
Step to enable the Utility Bar in Salesforce:
Navigate to Setup
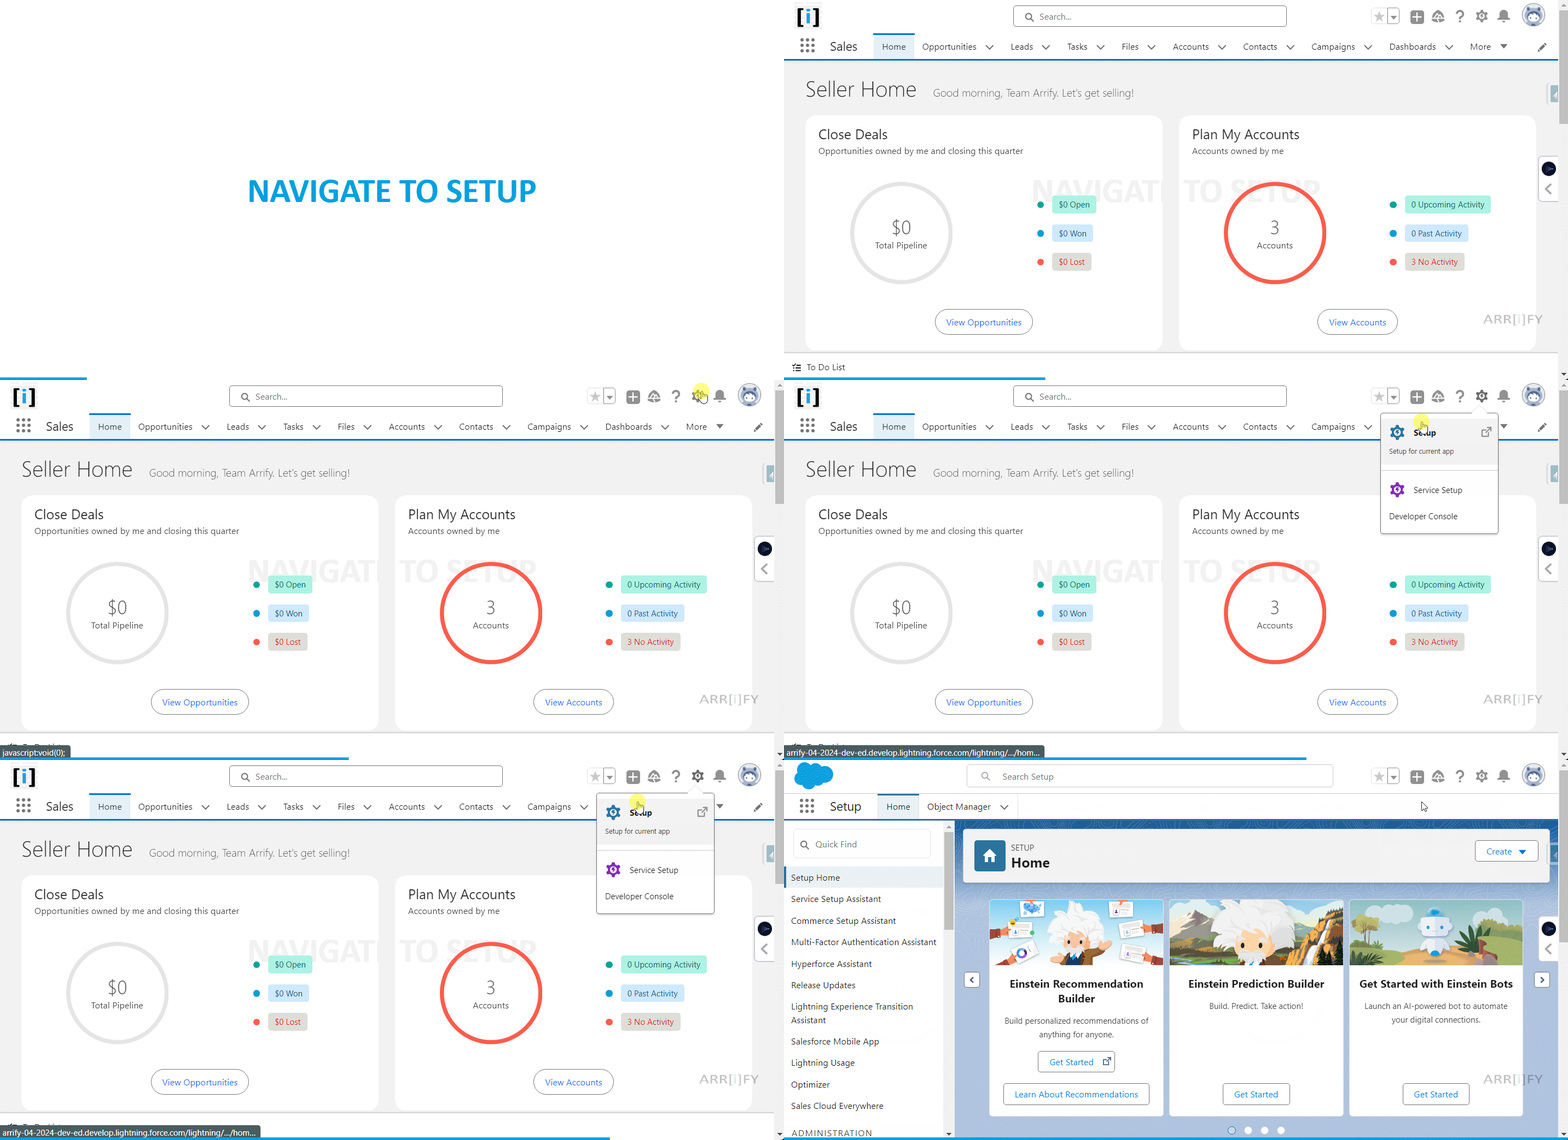
Click on the gear icon in the top-right corner.
Select Setup from the dropdown menu.
Access App Manager
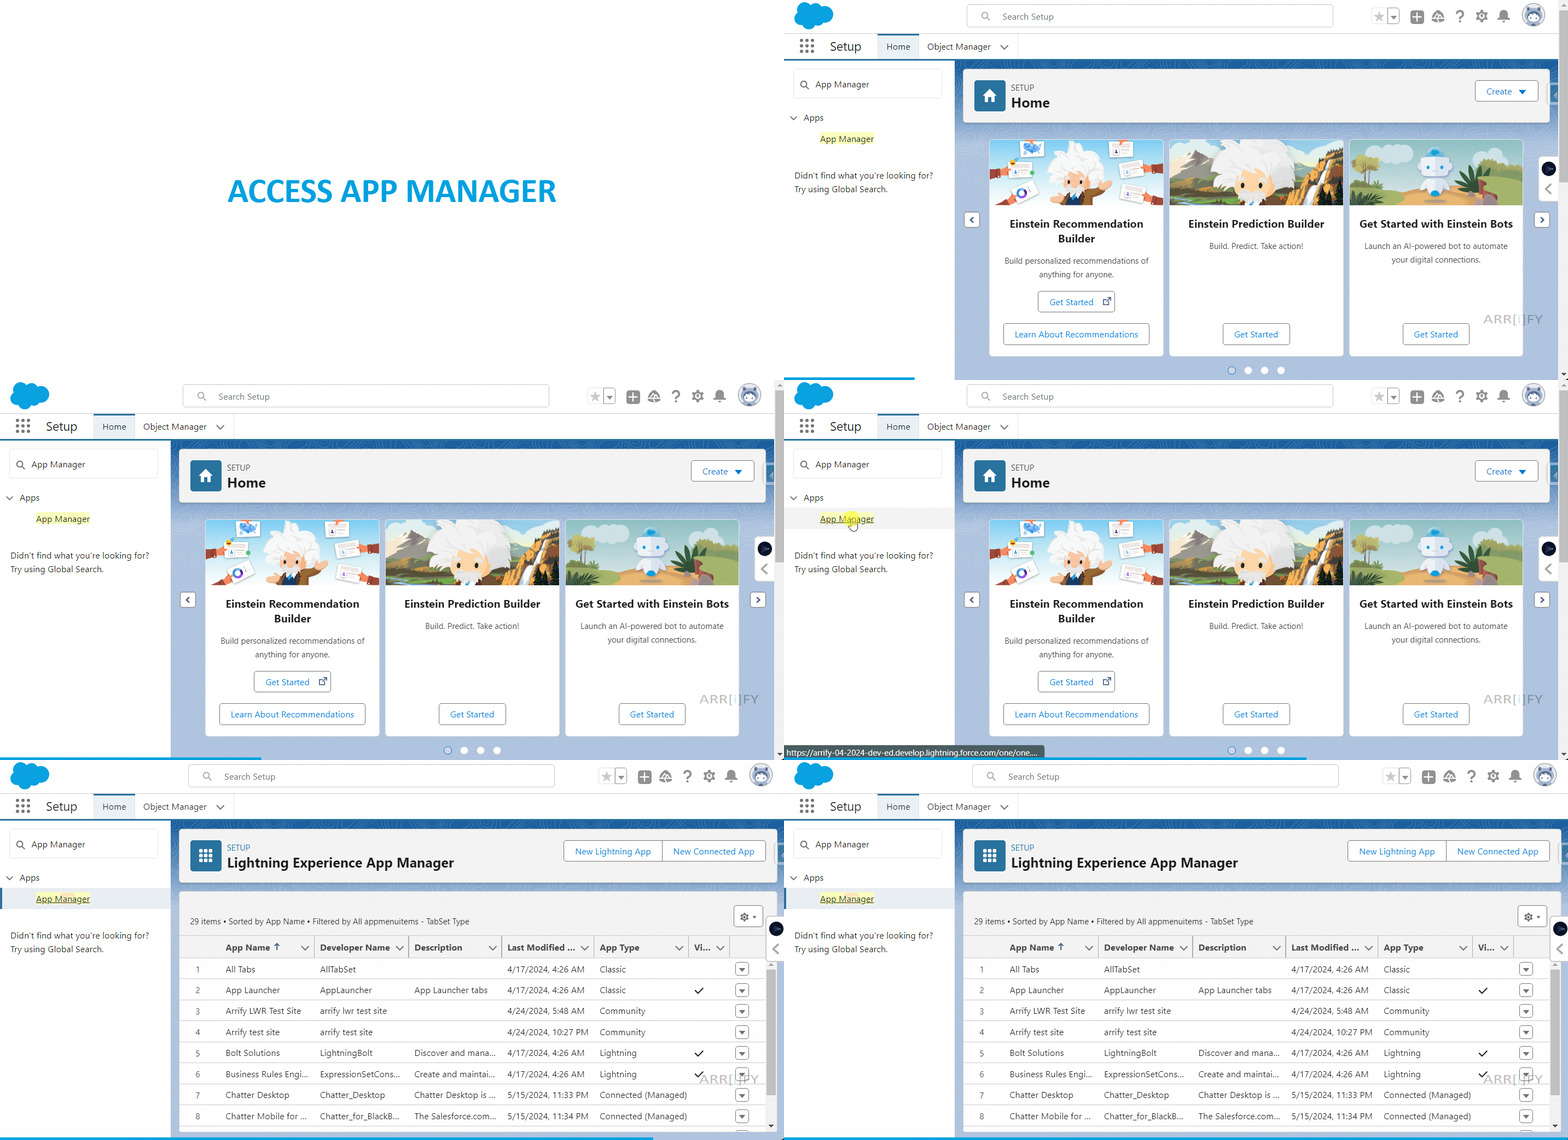
In the Setup menu, type App Manager into the Quick Find box and select it.
Create a New Lightning App
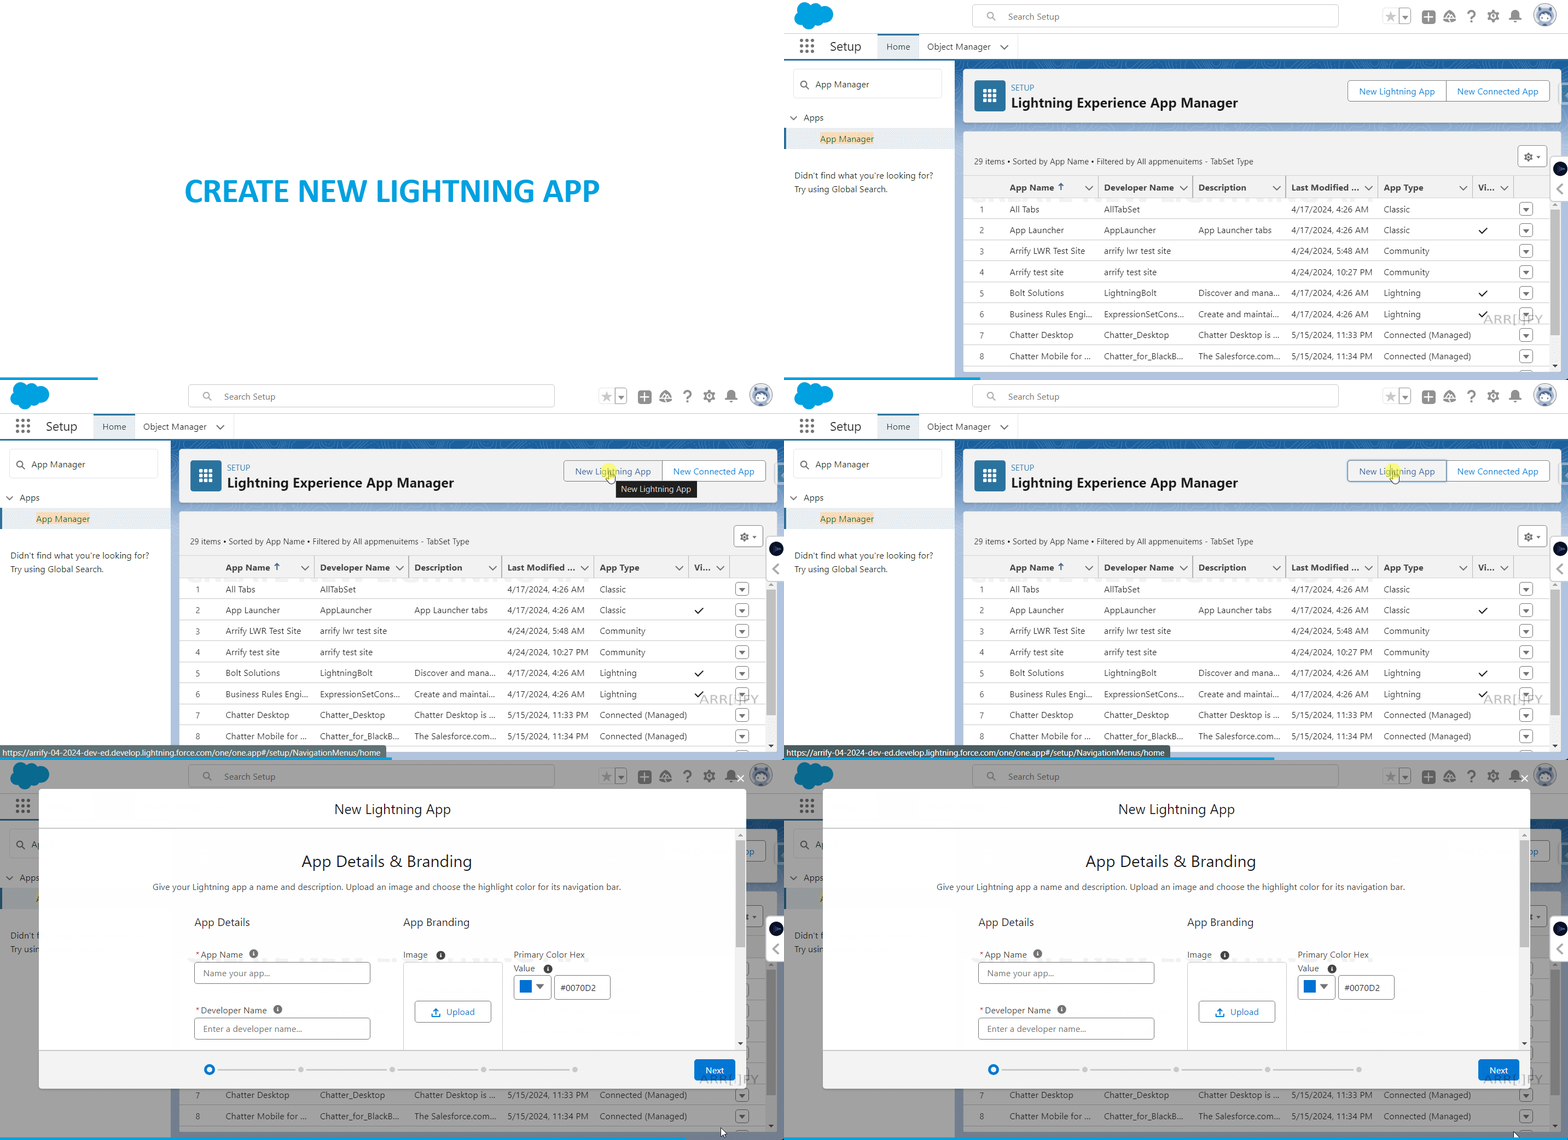
Create a new lightning app by clicking the New Lightning App button and adding all the utilities to it.
App Details and Utility Item
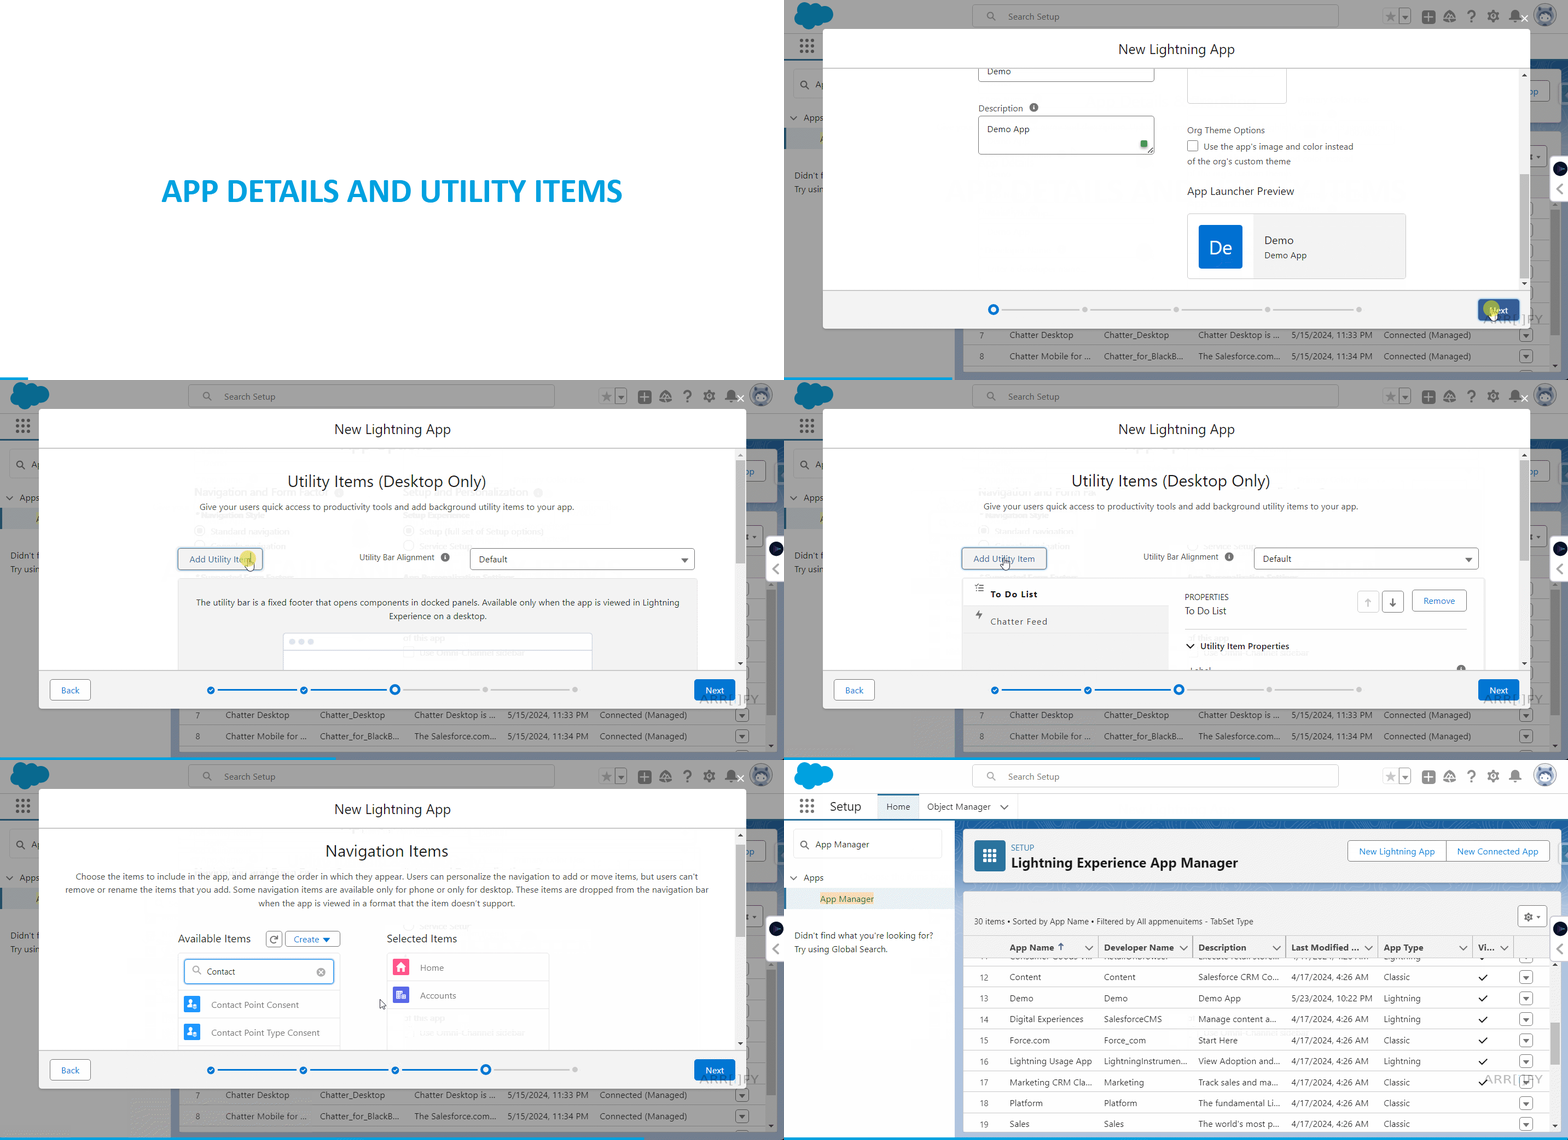
In this step, we are providing all the necessary information to create a new lightning app and select all the Utility items that we want to show on the Lightning App.
In the App Settings, scroll down to the Utility Bar section and click on Add Utility Item.
Select the utilities you want to add from the available options, such as Notes, Chatter Feed, etc.
Configure the properties of each utility, including the label, icon, and utility-specific settings.
Once you’ve added and configured all desired utilities, click Save.
Ensure that the app is assigned to the appropriate user profiles so that users can access the app and the Utility Bar in Salesforce.
Navigate to New Lightning App
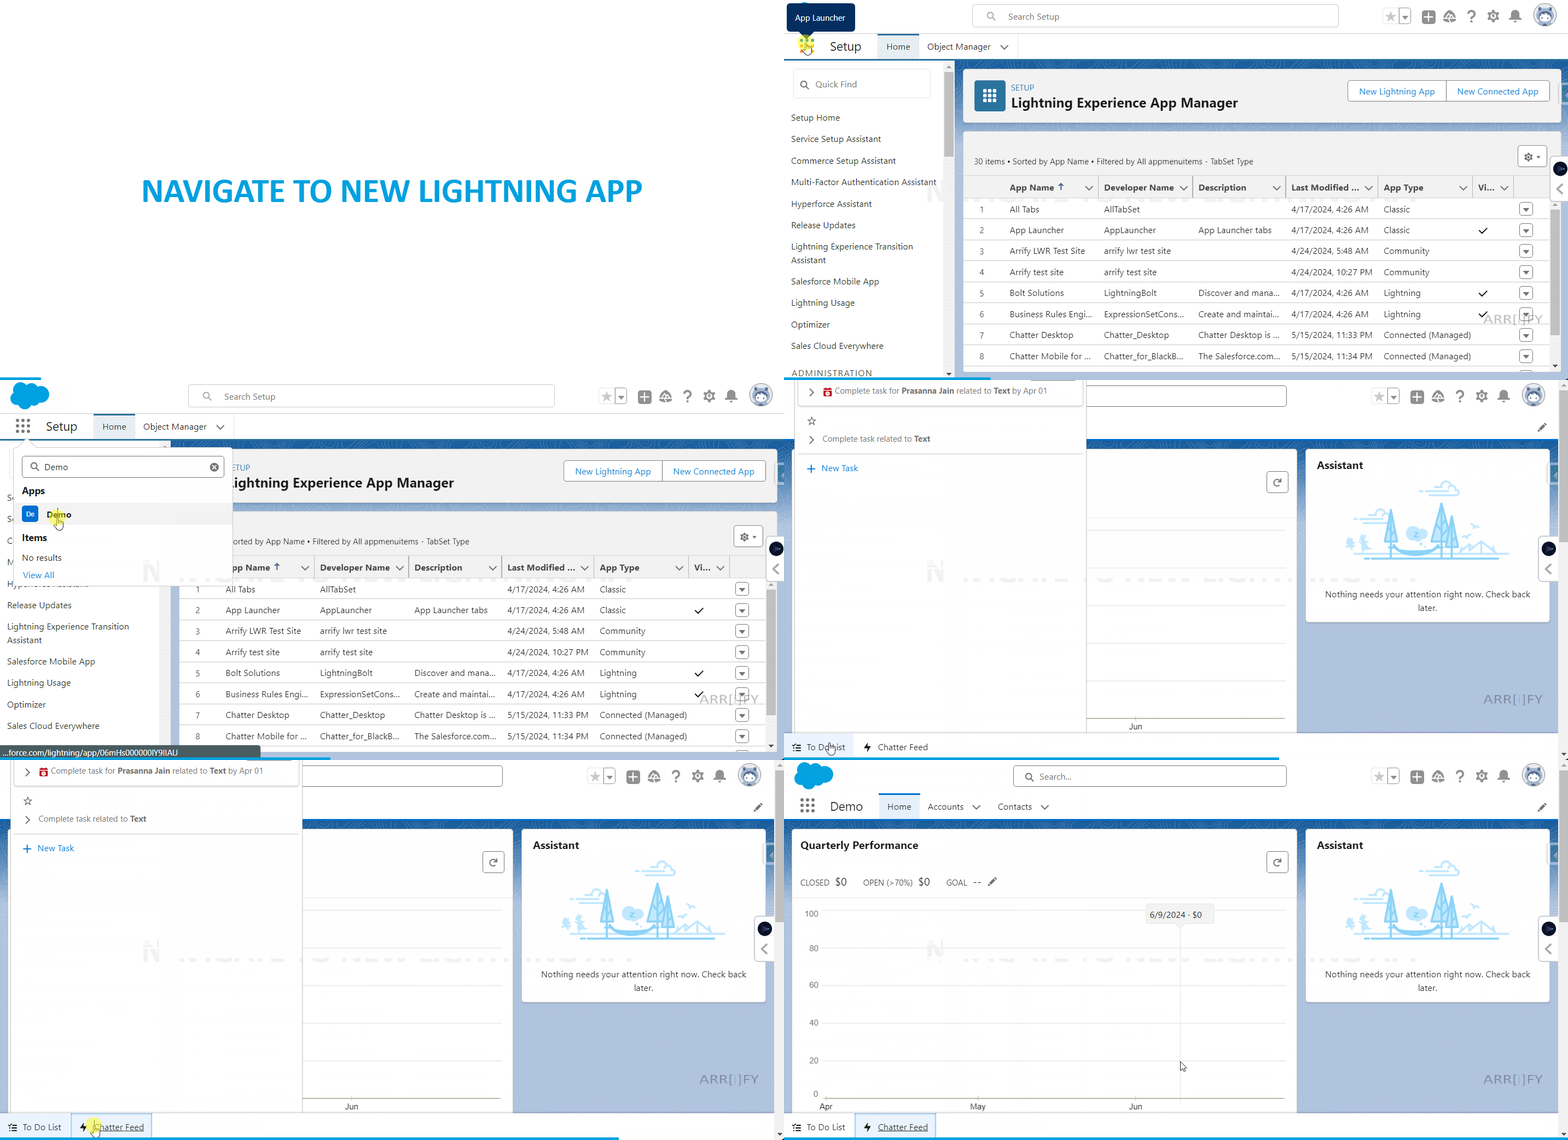
Once we have finished the above steps, we can access the App in the Lightning Experience. This way we can see the utility window in the lightning app.
Customizing the Utility Bar in Salesforce
Before diving into customization, it’s essential to identify the key functions and tools your team frequently utilizes. This could include accessing reports, creating records, launching specific apps or even integrating third-party applications.
Step 1: Click Edit

Once in Setup, search for “App Manager” in the Quick Find box and select it. Then, choose the Lightning app you want to customize the Utility Bar for. Click on the ‘Edit’ button next to the selected app.
Step 2: Edit Utility Items

In the App Editor, you’ll see the Utility Bar section. Here, you can add or remove items as per your requirements. Salesforce provides various standard components like Actions, Recent Items, Notes, etc. You can also add custom components or third-party integrations using Lightning Components.
Add the items on the Utility Bar according to their priority and frequency of use. You can drag and drop items to reorder them as needed.
Before finalizing your customization, it’s advisable to preview the changes to ensure everything looks and functions as intended. Once satisfied, click ‘Save’ to apply the changes.
Step 3: Navigate to the Lightning App

Navigate to the Lightning App and see the changes you have made.
Utility Bar in Salesforce may be customised to give your team easy access to the features and tools they use most frequently, which can streamline their workflow and increase productivity. In the long term, this minor adjustment can have a big impact and further customise Salesforce to meet the specific needs of your company.
What Type of Items Can Be Added?
- Standard Utility Items
- Notes
- Description: Allows users to quickly jot down notes without leaving their current context.
- Use Case: Useful for keeping track of thoughts, meeting minutes or reminders directly within Salesforce.
- History
- Description: Provides a list of recently accessed records and items.
- Use Case: Helps users quickly navigate back to records they have recently worked on, improving workflow efficiency.
- Omni-Channel
- Description: Integrates Salesforce’s Omni-Channel feature to manage and route work items to agents.
- Use Case: Essential for call centres or support teams to handle customer service requests efficiently.
- Open CTI Softphone
- Description: Integrates a phone system within Salesforce using Computer Telephony Integration (CTI).
- Use Case: Allows sales and support teams to make and receive calls directly within Salesforce, often with features like click-to-dial and call logging.
- Recent Items
- Description: Displays a list of items the user has recently accessed.
- Use Case: Similar to History, it helps users quickly return to their recent work.
- Macros
- Description: Enables users to automate repetitive tasks by running macros.
- Use Case: Streamlines processes such as sending standard emails, updating fields or creating records.
- Calculator
- Description: Provides a simple calculator tool.
- Use Case: Useful for quick calculations without needing to leave Salesforce.
- List View
- Description: Displays a list view of records for a specific object.
- Use Case: Allows users to access and manage lists of records (like leads, opportunities, or cases) directly from the Utility Bar.
- Flow
- Description: Runs a specific Salesforce Flow, which is a sequence of automated actions.
- Use Case: Useful for guiding users through business processes, such as lead qualification or case resolution.
- Chatter Feed
- Description: Integrates the Chatter collaboration platform within Salesforce, allowing users to post updates, share files, and collaborate with colleagues.
- Use Case: Enhances communication and collaboration among team members directly within Salesforce.
- Visualforce Page
- Description: Embeds a Visualforce page within the Utility Bar.
- Use Case: Enables the display of custom functionality or information that is not readily available through standard Salesforce components.
- Report Chart
- Description: Displays a chart based on a Salesforce report.
- Use Case: Provides quick visual insights into key metrics or data trends without navigating away from the current page.
- Quip Association
- Description: Integrates with Quip, a collaborative productivity platform, to associate Quip documents or threads with Salesforce records.
- Use Case: Facilitates seamless collaboration and document management for Salesforce records, such as accounts, opportunities, or cases.
- Quip Notification
- Description: Provides notifications from Quip within Salesforce, alerting users to updates or mentions in Quip documents or threads associated with Salesforce records.
- Use Case: Keeps users informed of relevant Quip activity related to their work in Salesforce, promoting collaboration and engagement.
- Notes
- Custom Utility Items
- Custom Lightning Components
- Description: Allows the addition of custom-built Lightning components.
- Use Case: Developers can create custom utilities tailored to specific business needs, such as a task manager, dashboard or data entry form.
- Third-Party Integrations
- Description: Integrate third-party applications and tools using custom components or pre-built integrations.
- Use Case: Extends Salesforce’s functionality by incorporating tools like document management systems, chatbots or other business applications.
- Custom Lightning Components
Resources
Official document for Adding Utility Items on the Lightning App
Official document for learning Customize your Lightning App
FAQ
Are there any keyboard shortcuts for using the Utility Bar?
Yes, you can use the keyboard shortcut g, then u to go to the utility bar in Salesforce.
Can I access the Utility Bar in Salesforce mobile app?
The Lightning Experience utility bar isn’t available in the Salesforce mobile app.
What types of notifications are displayed in the Utility Bar in Salesforce?
These types of notifications are displayed in the Utility Bar in Salesforce:
[1] System Updates
[2] User Alerts
[3] Task Reminders
[4] Messages and Chats
[5] Error Notifications
[6] Subscription Updates
[7] Security Alerts
[8] Feedback and Announcements
Can I configure which notifications appear in the Utility Bar?
Yes, you can configure which notifications appear in the Salesforce Utility