Salesforce is not just a CRM anymore, it’s a powerful platform that can connect, communicate, and share data with other systems seamlessly. One of the key ways Salesforce achieves this is through REST API Endpoints.
In this blog post, we’ll explore the uses of Salesforce REST API Endpoints with a real-world example, where we connect two Salesforce orgs using a Connected App and Named Credential to demonstrate a complete, secure integration.
Before you begin, we recommend reading our comprehensive guide, Salesforce REST API Endpoints: The Key to Unlocking Integration Success. it’ll help you understand the basics.
Understanding Salesforce REST API Endpoints
The Salesforce REST API Endpoints allows to interact with Salesforce data from external systems (or even another Salesforce org) using simple HTTP methods like GET, POST, PATCH, and DELETE.
These APIs expose Salesforce objects and services via endpoints (unique URLs) that perform specific actions programmatically without logging into the Salesforce UI.
For example
https://yourInstance.salesforce.com/services/data/v61.0/sobjects/Account/This is one of Salesforce’s built-in standard endpoints. It allows you to perform actions like:
- DELETE: Remove an Account record
- GET: Retrieve Account records
- POST: Create a new Account
- PATCH: Update an existing Account
Salesforce REST API endpoints act as the entry points that enable systems (or even other Salesforce orgs) to communicate with Salesforce data securely and efficiently.
Real-World Use Case: Syncing Two Salesforce Orgs
Let’s understand this with a simple, beginner-friendly example.
Scenario
Imagine a company that operates with two separate Salesforce orgs:
- Org A (Sales Org): Used by the Sales team to manage leads, opportunities, and accounts.
- Org B (Support Org): Used by the Customer Support team to handle cases, complaints, and service requests.
Now, every time the Sales team in Org A creates a new Account, we want that same Account record to also exist in Org B.
This ensures both teams such as Sales and Support are working with the same, up-to-date customer data, without needing to manually re-enter information.
Goal
The goal is to automate this data sharing between the two Salesforce orgs. We’ll do this by using:
- Salesforce REST API Endpoints (custom) : To send and receive data.
- Connected App : To establish a secure connection between the two orgs using OAuth.
- Named Credential : To safely store authentication details and endpoint URLs, making the integration simple and secure.
With this setup, when an Account is created in Org A, Salesforce will automatically send that Account data through a custom REST API callout to Org B, where a matching Account will be created, all happening behind the scenes, without any manual effort.
Connected Apps and Named Credentials Explained
Before we can connect our two Salesforce orgs, we need to understand two very important components Connected App and Named Credential.
These are the tools that make secure communication possible between Salesforce orgs (or between Salesforce and any external system).
Let’s understand what they are and why we need them.
What Is a Connected App?
A Connected App in Salesforce acts like a digital handshake between Salesforce and another system, which could be:
- A third-party application, or
- Another Salesforce org that trying to access your org’s data.
In simple terms, when an external system or another Salesforce org wants to access your Salesforce data securely, it needs to be authorized and this authorization happens through a Connected App.
The Connected App uses OAuth 2.0 authentication, which ensures that access is granted securely using tokens (instead of sharing usernames and passwords).
When you create a Connected App in Salesforce, it generates:
- Consumer Key : Think of it as the app’s username.
- Consumer Secret : Think of it as the app’s password.
- OAuth Scopes : These define what the app can access (for example, full access, read-only, or API access).
In our example
We’ll create a Connected App in Org B (Support Org), which allows Org A (Sales Org) to connect to it via REST API.
So, whenever Org A sends a REST API request (to create same account) to Org B, the Connected App verifies that Org A is authorized to do so, just like checking an ID before granting access.
What Is a Named Credential?
A Named Credential in Salesforce is a secure way to stores the endpoint URL and authentication details (like OAuth tokens) required to call an external system.
Normally, when you make a callout from Salesforce, you’d have to manage:
- The endpoint URL (where the data is going),
- The access token,
- And sometimes even refresh the token manually when it expires.
This can be complicated and risky. Named Credential solves all of that by securely managing authentication for you.
Salesforce automatically handles the OAuth login, token refresh, and connection behind the scenes.
In our example
We’ll create a Named Credential in Org A (Sales Org) that stores the details of how to connect to Org B (Support Org) (which is already exposed via the Connected App).
This lets Org A make REST API callouts to Org B securely, without worrying about credentials or tokens expiring.
How They Work Together?
Here’s how the two work hand-in-hand:
| Component | Location | Role |
|---|---|---|
| Connected App | Created in Org B | Grants access to Org A and manages OAuth authentication |
| Named Credential | Created in Org A | Stores Org B’s endpoint and authentication settings securely |
Together, they form a secure bridge between the two Salesforce orgs
allowing Org A to communicate with Org B’s REST API endpoints safely and effortlessly.
Prerequisites Before You Begin : Salesforce REST API Integration
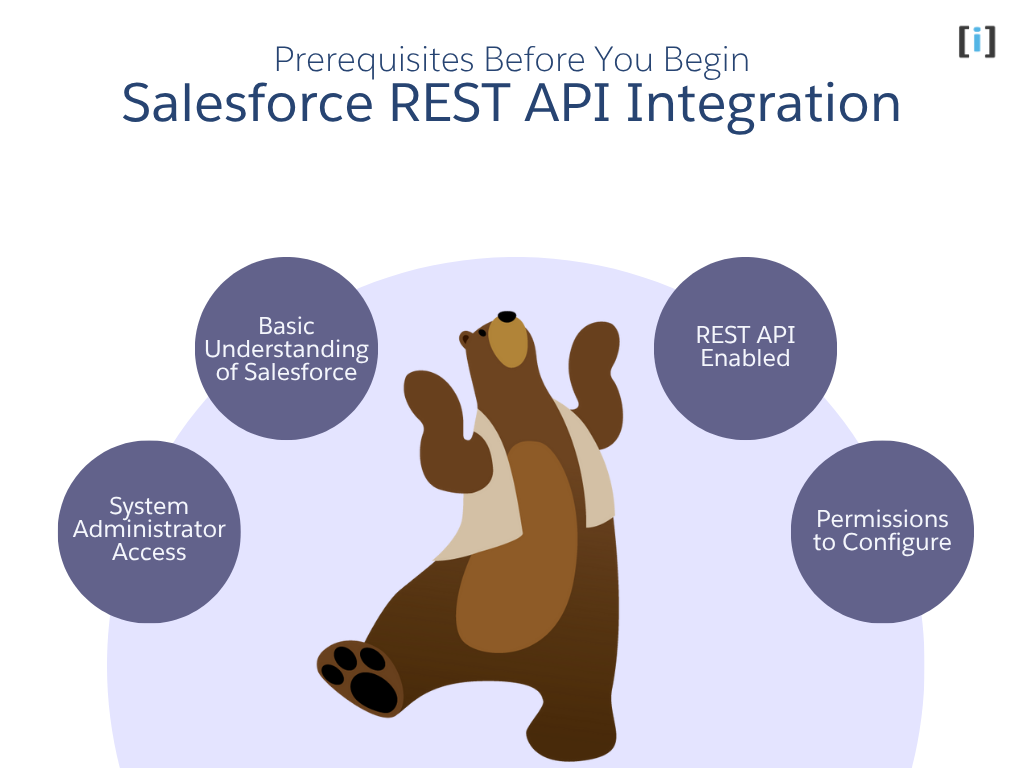
Before we start building the integration, let’s make sure we have everything in place. To connect two Salesforce orgs using REST API, you’ll need a few essential permissions and setup requirements.
System Administrator Access
Need full administrative access in both Org A and Org B to configure Connected Apps, Named Credentials, and Apex classes.
Basic Understanding of Salesforce
Don’t need to be a coding expert, just a basic idea of how Apex classes and triggers work, and how to navigate through Setup in Salesforce.
Learn more about Triggers in Salesforce.
REST API Enabled
Ensure that the API feature is enabled in both Salesforce orgs.
(In Enterprise, Unlimited, and Developer Editions, REST API is enabled by default.)
Permissions to Configure
Make sure your Salesforce profile or permission set allows you to:
- Create and manage Connected Apps
- Configure Named Credentials
- Write or deploy Apex code
Step-by-Step Integration Setup
Let’s build it step by step. We create two testing org to demonstrate this integration process which is :
Org A (source / Sales): arrify-mt

Org B (target / Service): puneet21
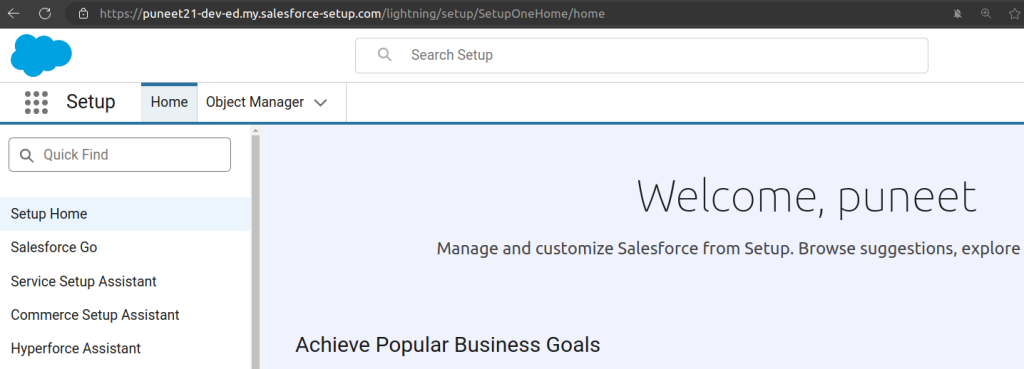
Goal: When an Account is created in Org A, it should automatically be created in Org B using REST API.
Here, illustrates the step-by-step process of connecting Org A and Org B using Salesforce REST API, Connected App, and Named Credential.
Total Time: 30 minutes
In Org B (puneet21)-> Turn on “Allow creation of connected apps“.
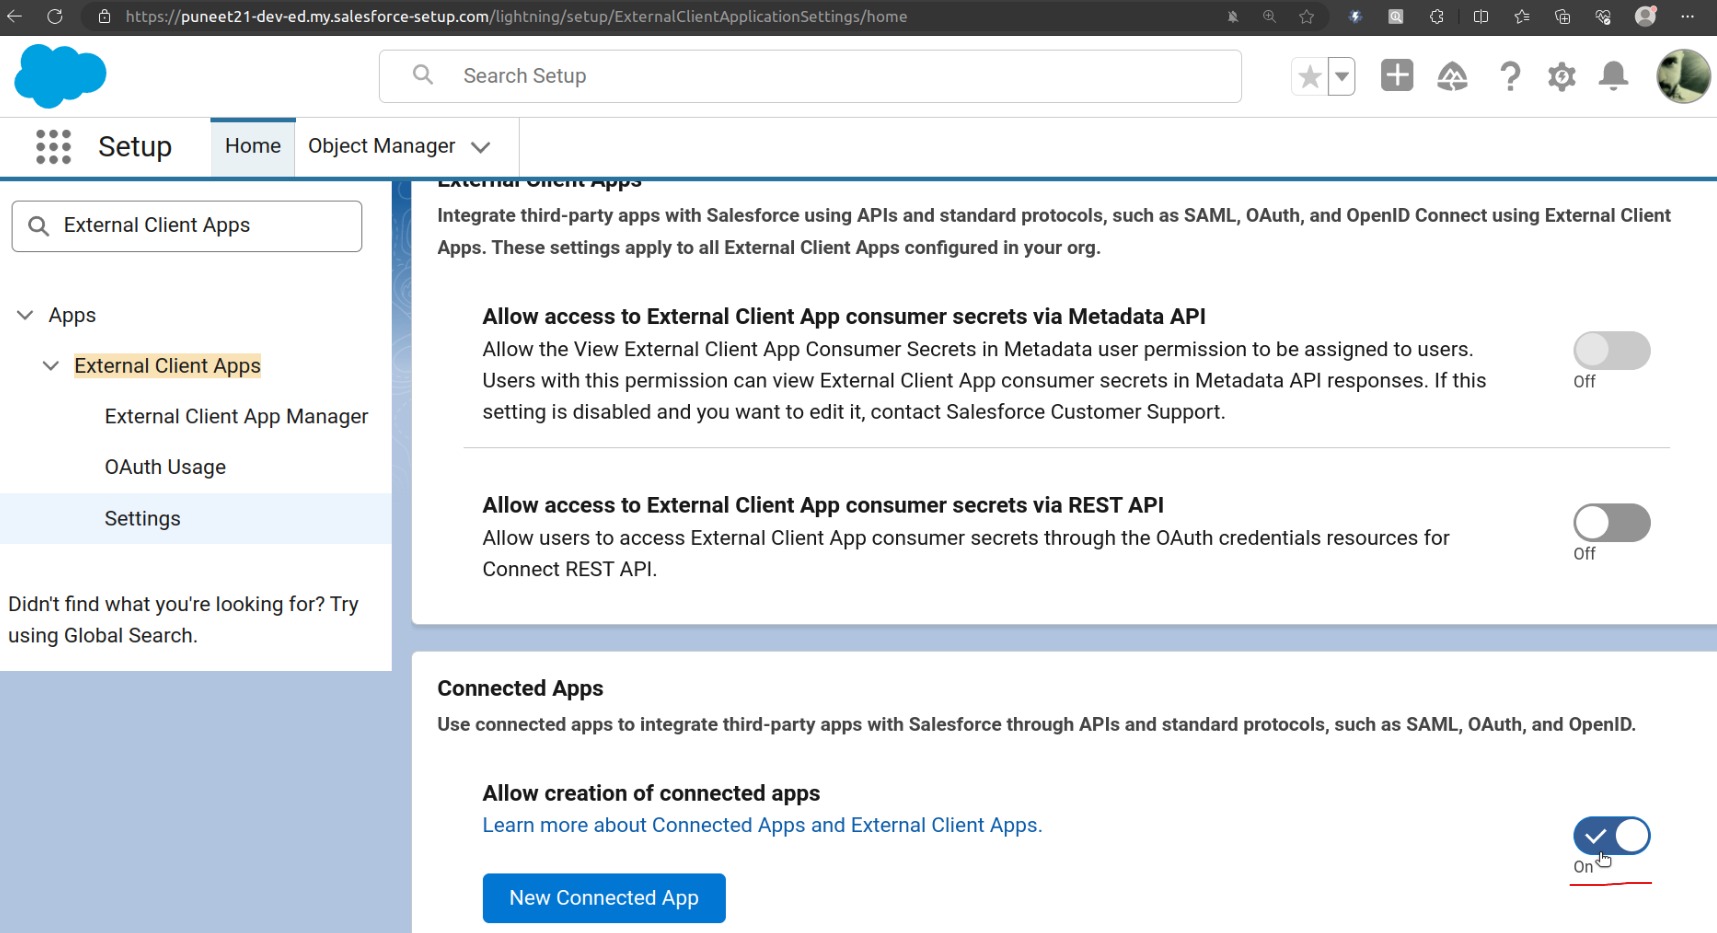
From Setup, enter “External Client Apps” in the Quick Find box, and then select External Client App Settings.
To create a connected app, Click on “New Connected App“.
In Org B (puneet21): Create a Connected App
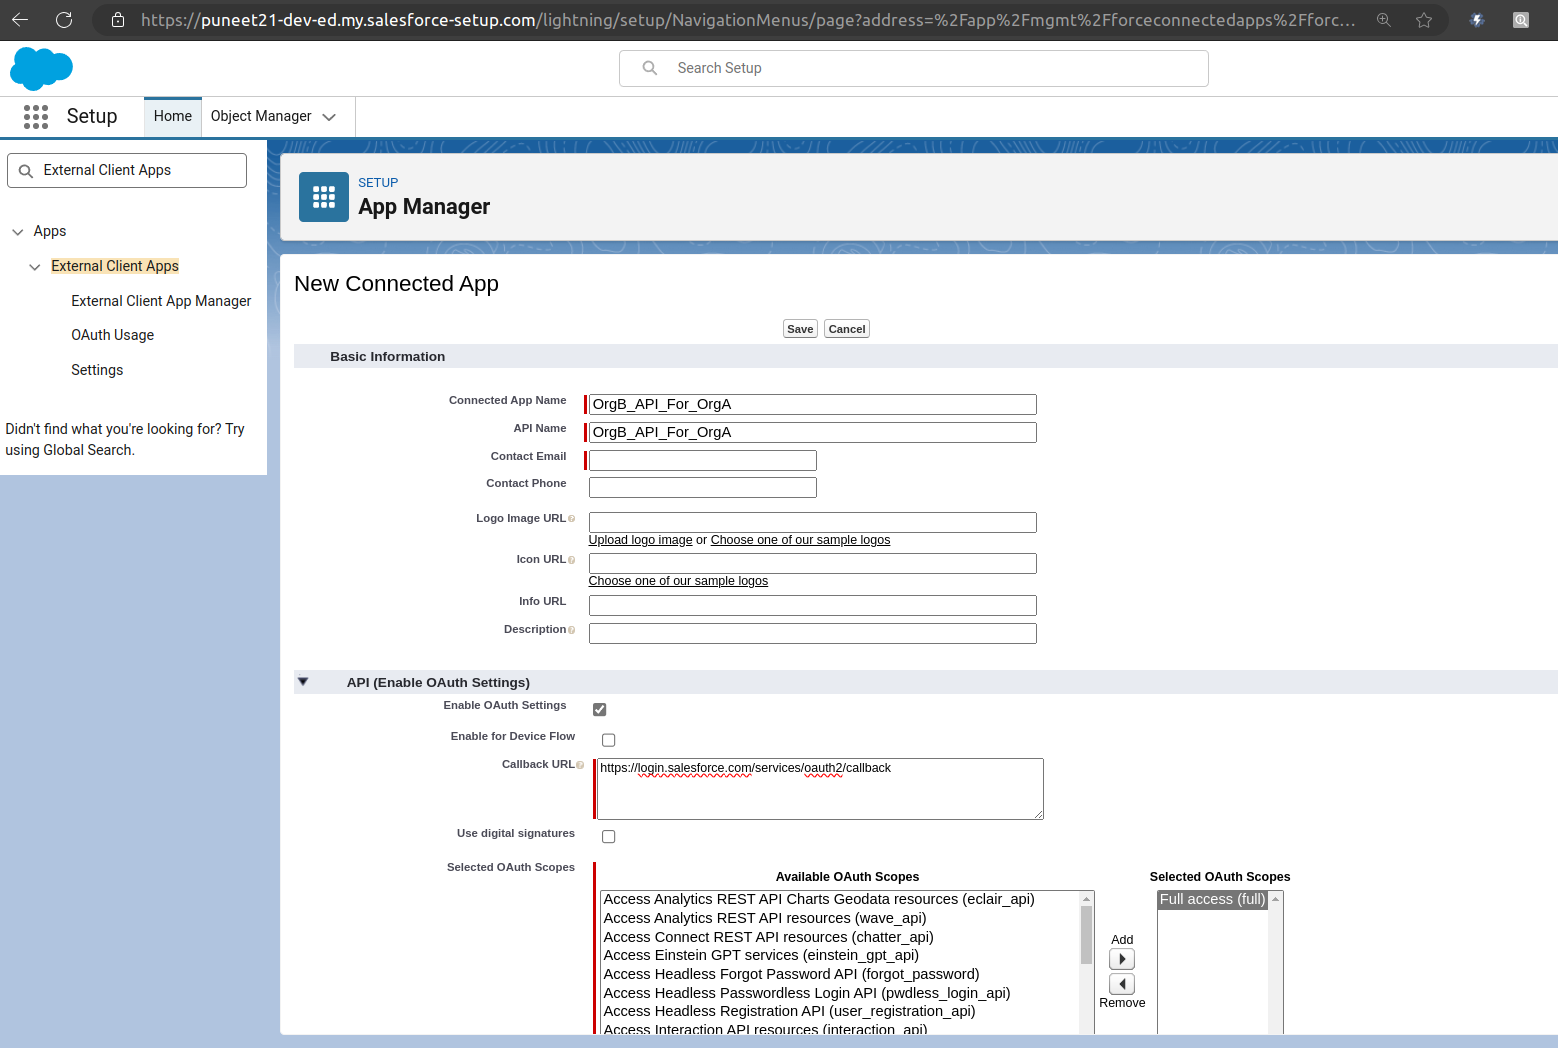
Fill Basic info.
Enable OAuth Settings.
Callback URL-> Enter callback url.
In the Callback URL field, enter any temporary URL for now. You can update this later after creating the Auth Provider in Org A (Sales Org).
Selected OAuth Scopes -> Full access (full) during testing.
Click on Save.
Manage Consumer Details
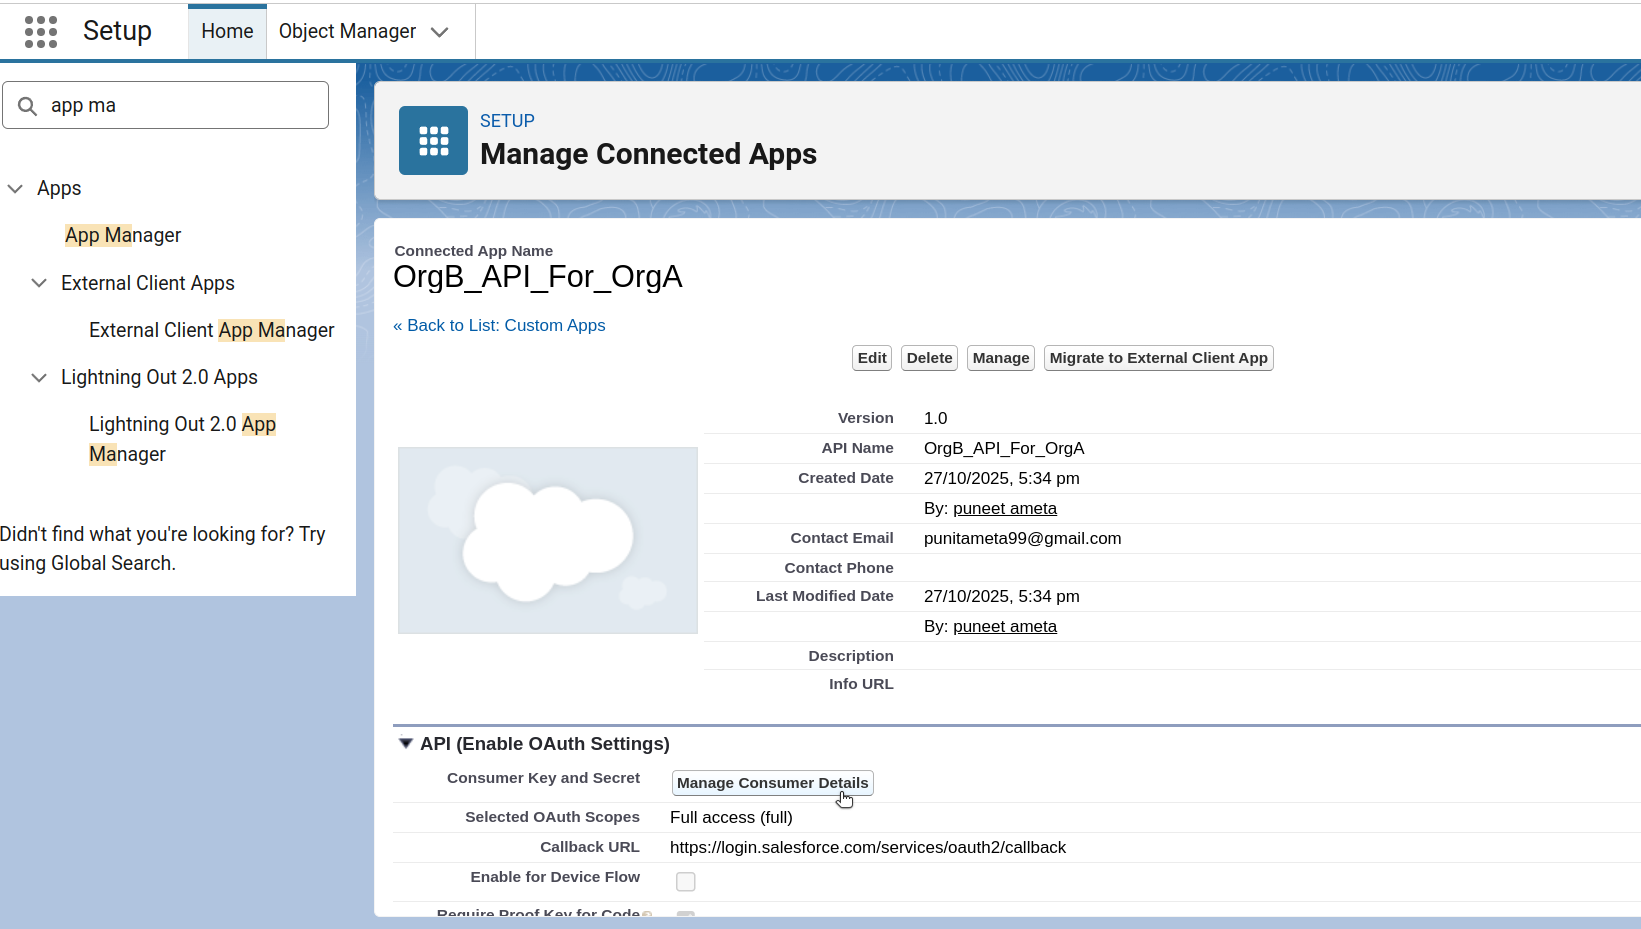
Once you save the Connected App, you’ll need to grab two important values: Consumer Key and Consumer Secret.
Click Manage on the Connected App, then click Manage Consumer Details to view them.
Salesforce will send a verification code to the email address you provided. Enter that code when prompted. After verification, you’ll be taken to the Consumer Details page where you can copy the Consumer Key and Consumer Secret.
Save these Consumer Key and Consumer Secret securely, you’ll need them later! (you’ll paste these into Org A’s Auth Provider).
In Org A (arrify-mt): Create Auth Provider
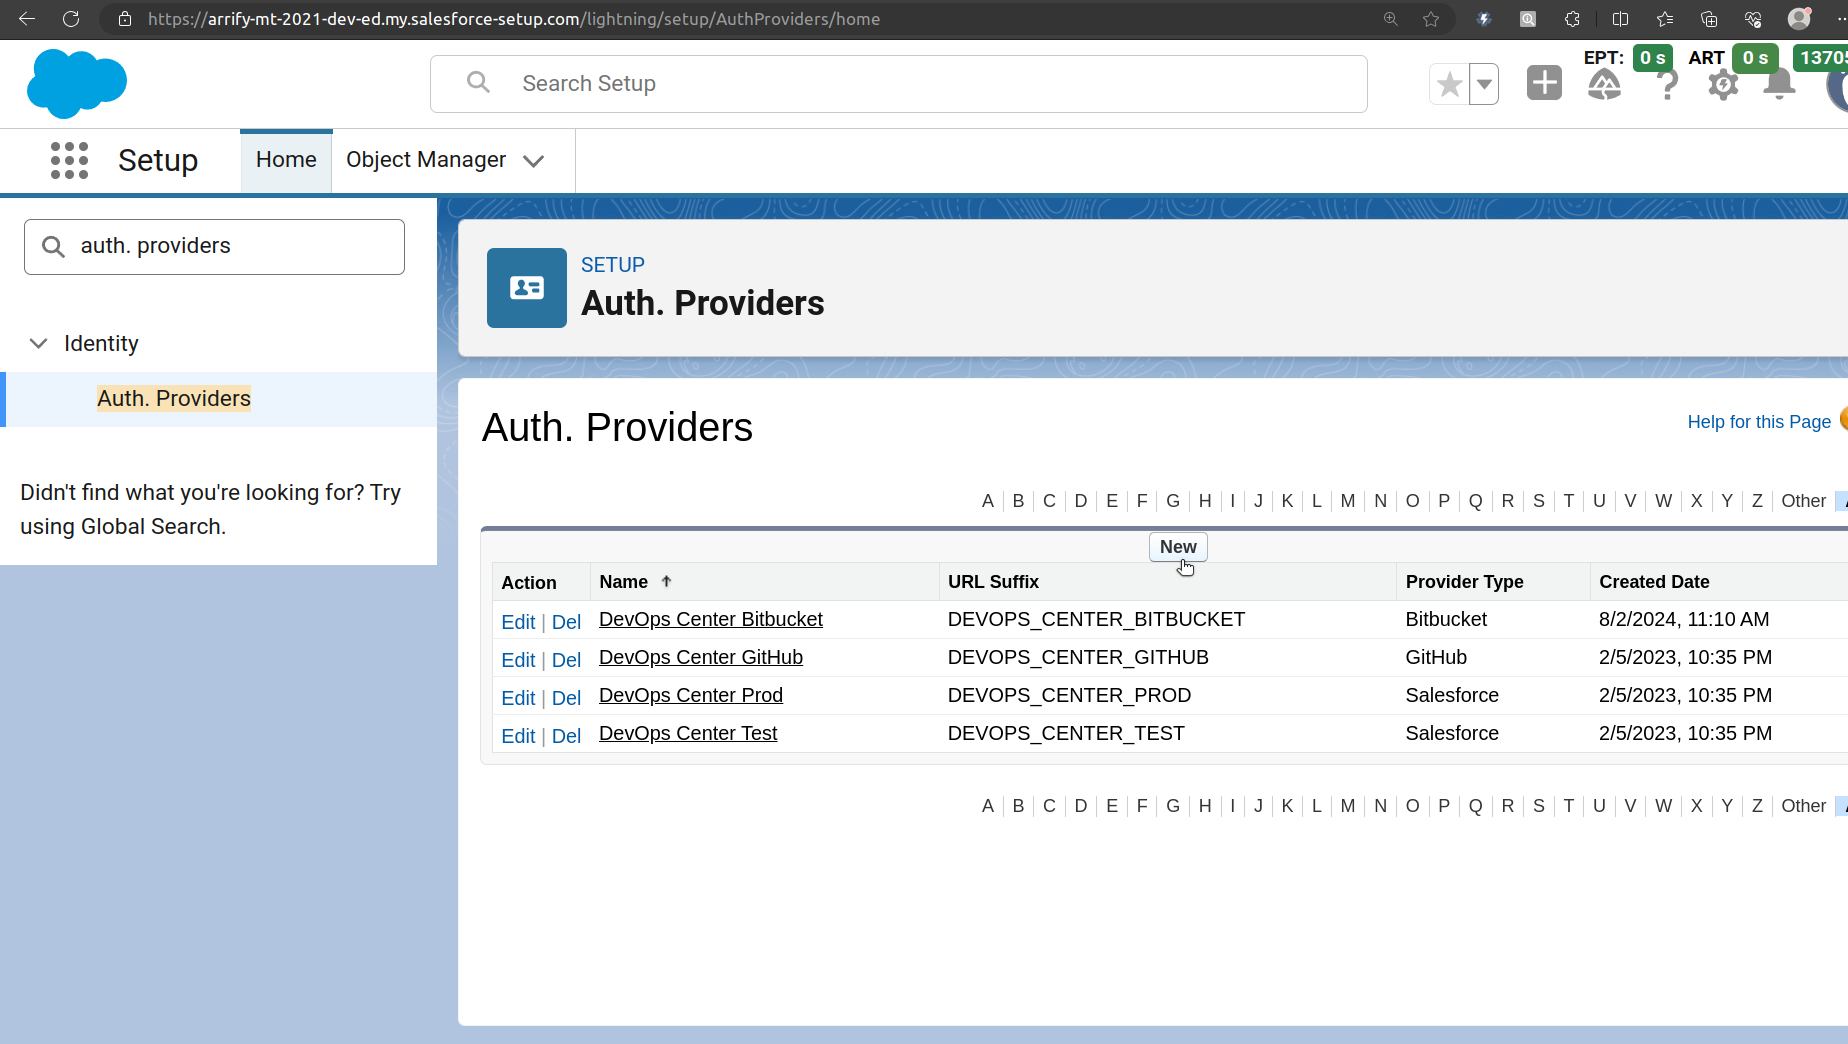
From Setup, enter “Auth. Providers” in the Quick Find box, and then select Auth. Providers.
Click on New.
Edit Auth Provider
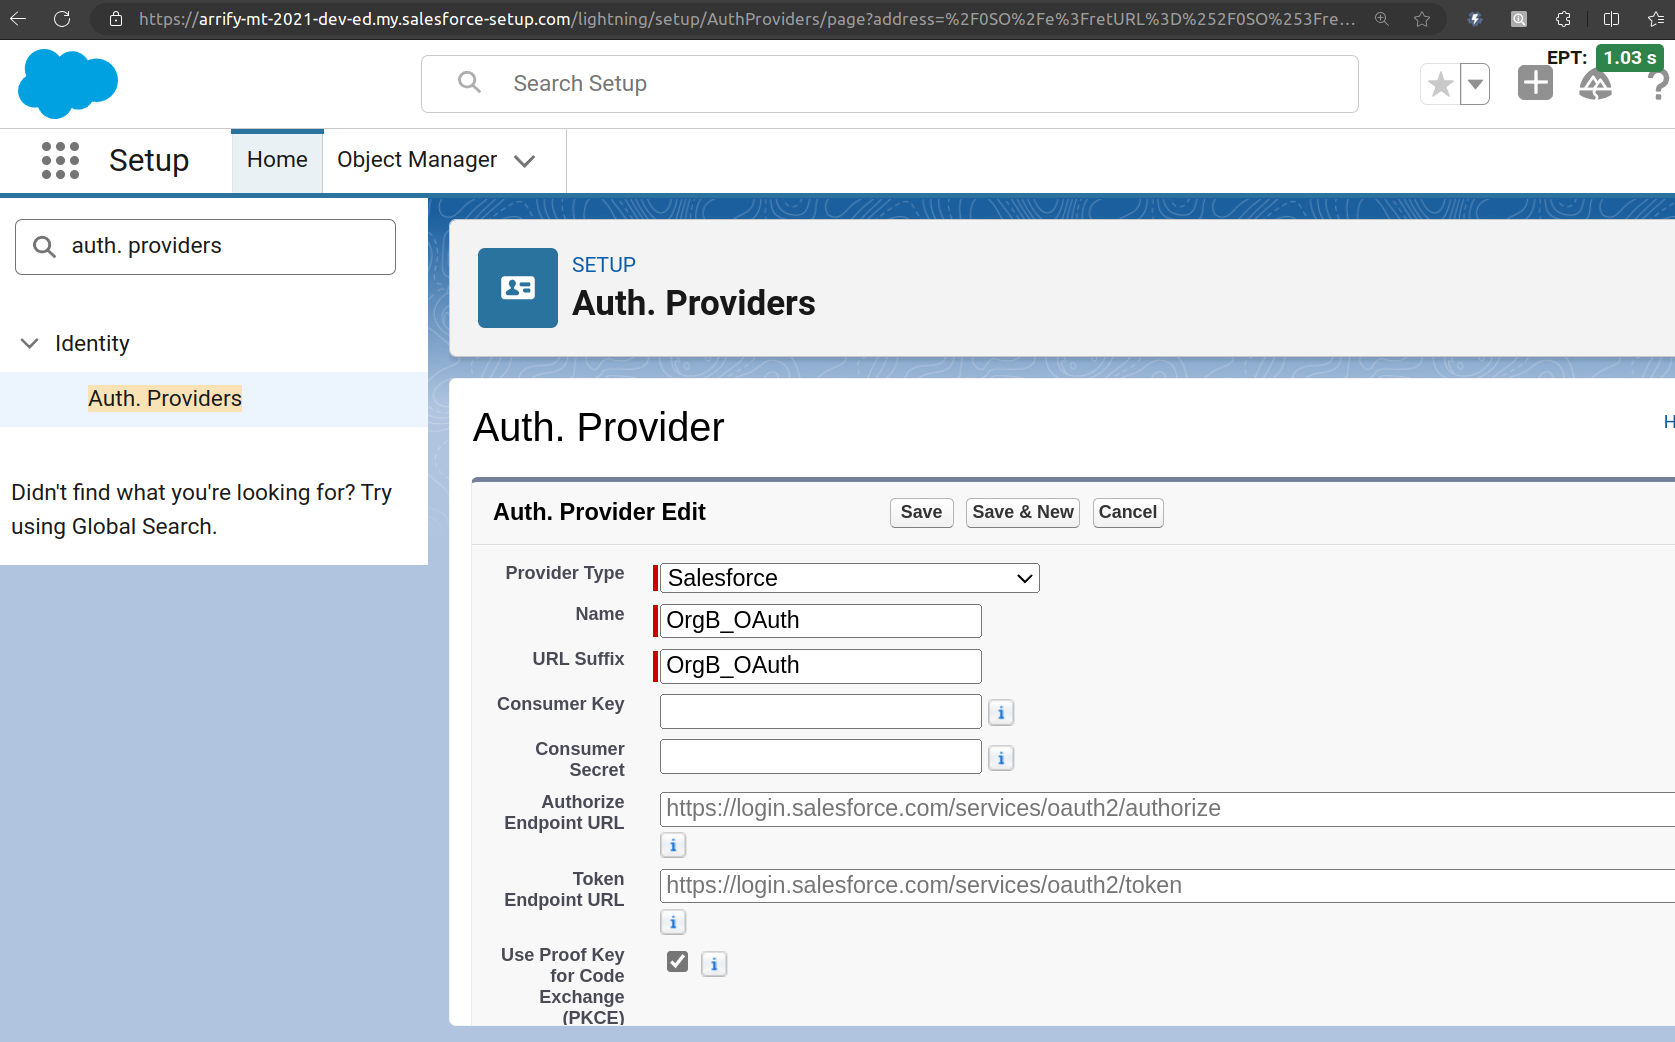
From the Provider Type dropdown, select Salesforce.
Fill in the required details:
Name: Enter a clear name, for example, OrgB_OAuth.
Consumer Key: Copy this from Org B’s Connected App.
Consumer Secret: Copy this from Org B’s Connected App as well.
Click Save.
After saving, Salesforce will automatically generate several URLs under the Salesforce Configuration section such as Authorize Endpoint URL, Token Endpoint URL, and Callback URL.
Important : Copy the Callback URL from this section and go back to Org B’s Connected App.
Edit the Connected App and paste this Callback URL into the Callback URL field there, then Save your changes
In Org A(arrify-mt): Create External Credential
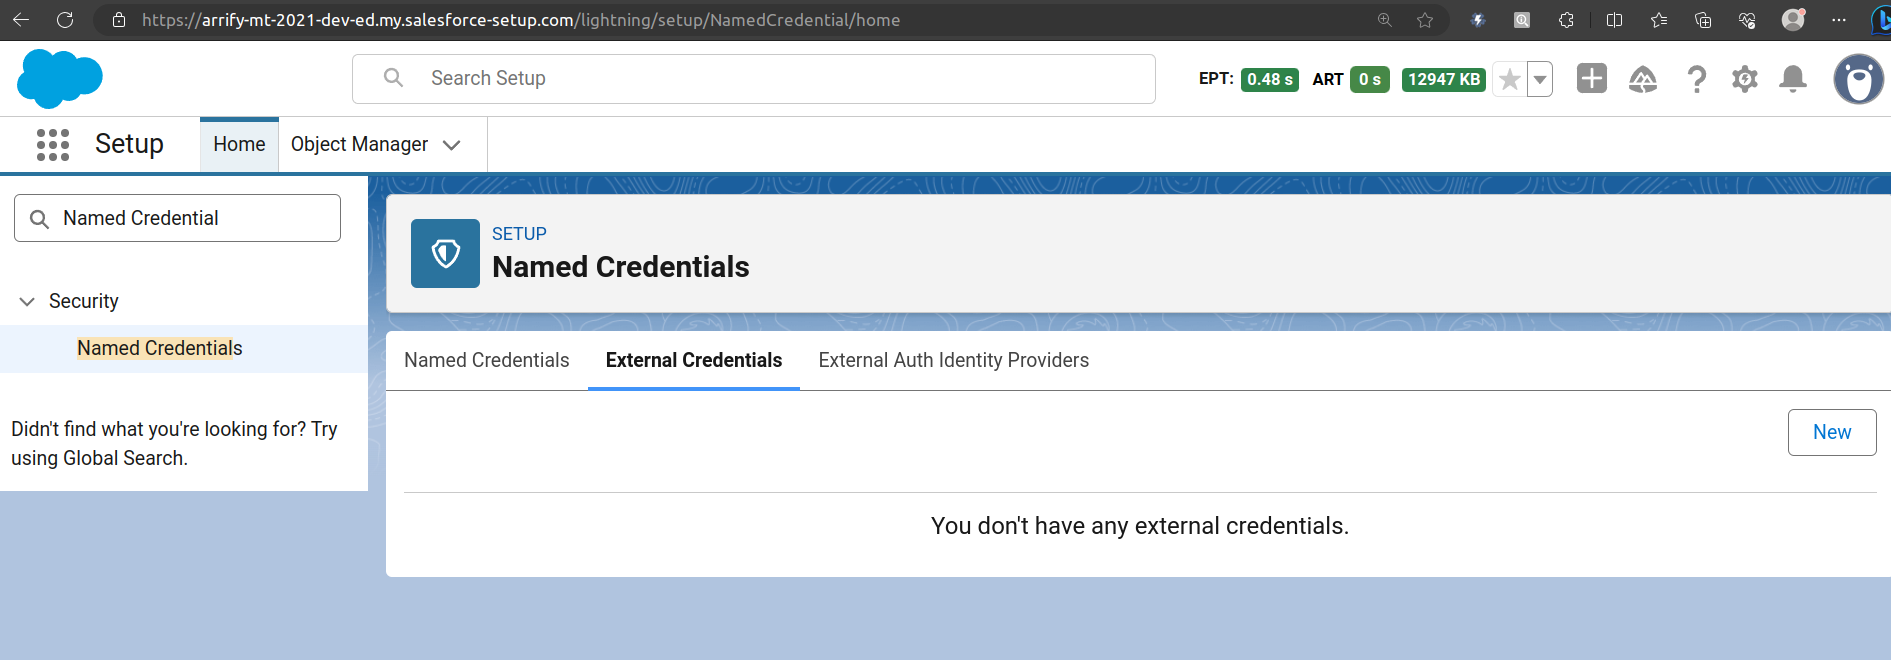
From Setup, enter “Named Credential” in the Quick Find box, and then select Named Credential.
Click the External Credential tab, and then click New.
Fill New External Credential
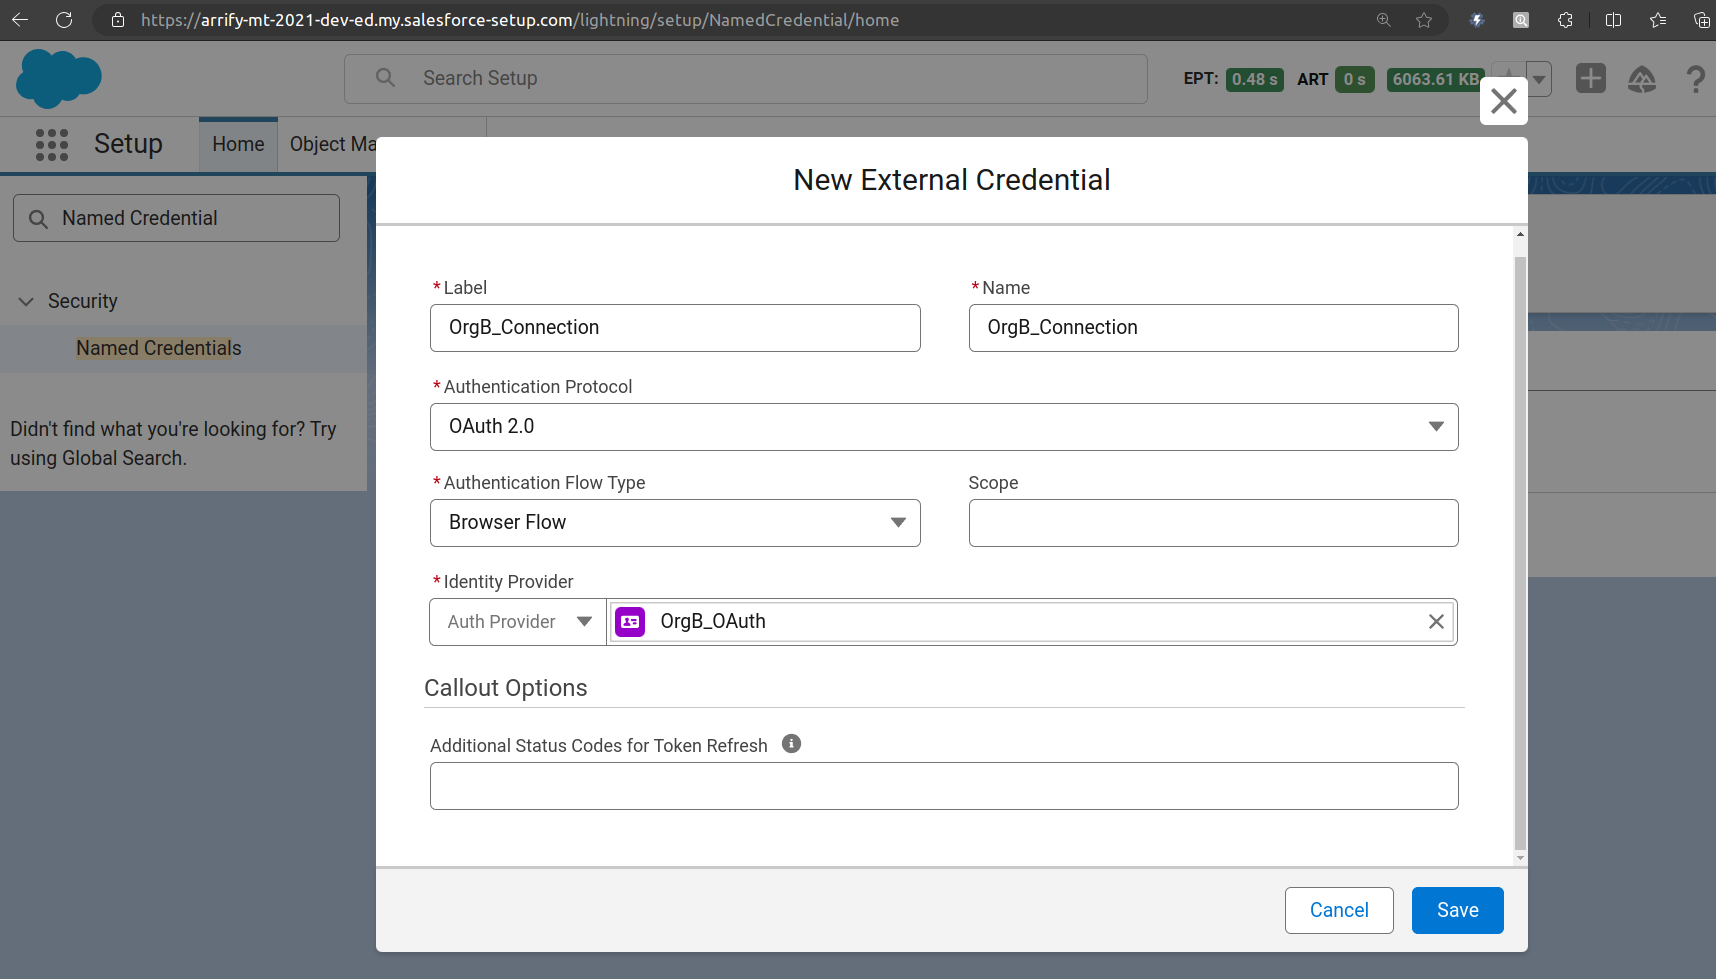
Fill up -> Label / Name
Identity Type -> Named Principal
Authentication Protocol -> OAuth 2.0
Authentication Flow Type -> Browser Flow
Identity Provider -> Auth Provider
Click on Save
In Org A(arrify-mt): Create Named Credential
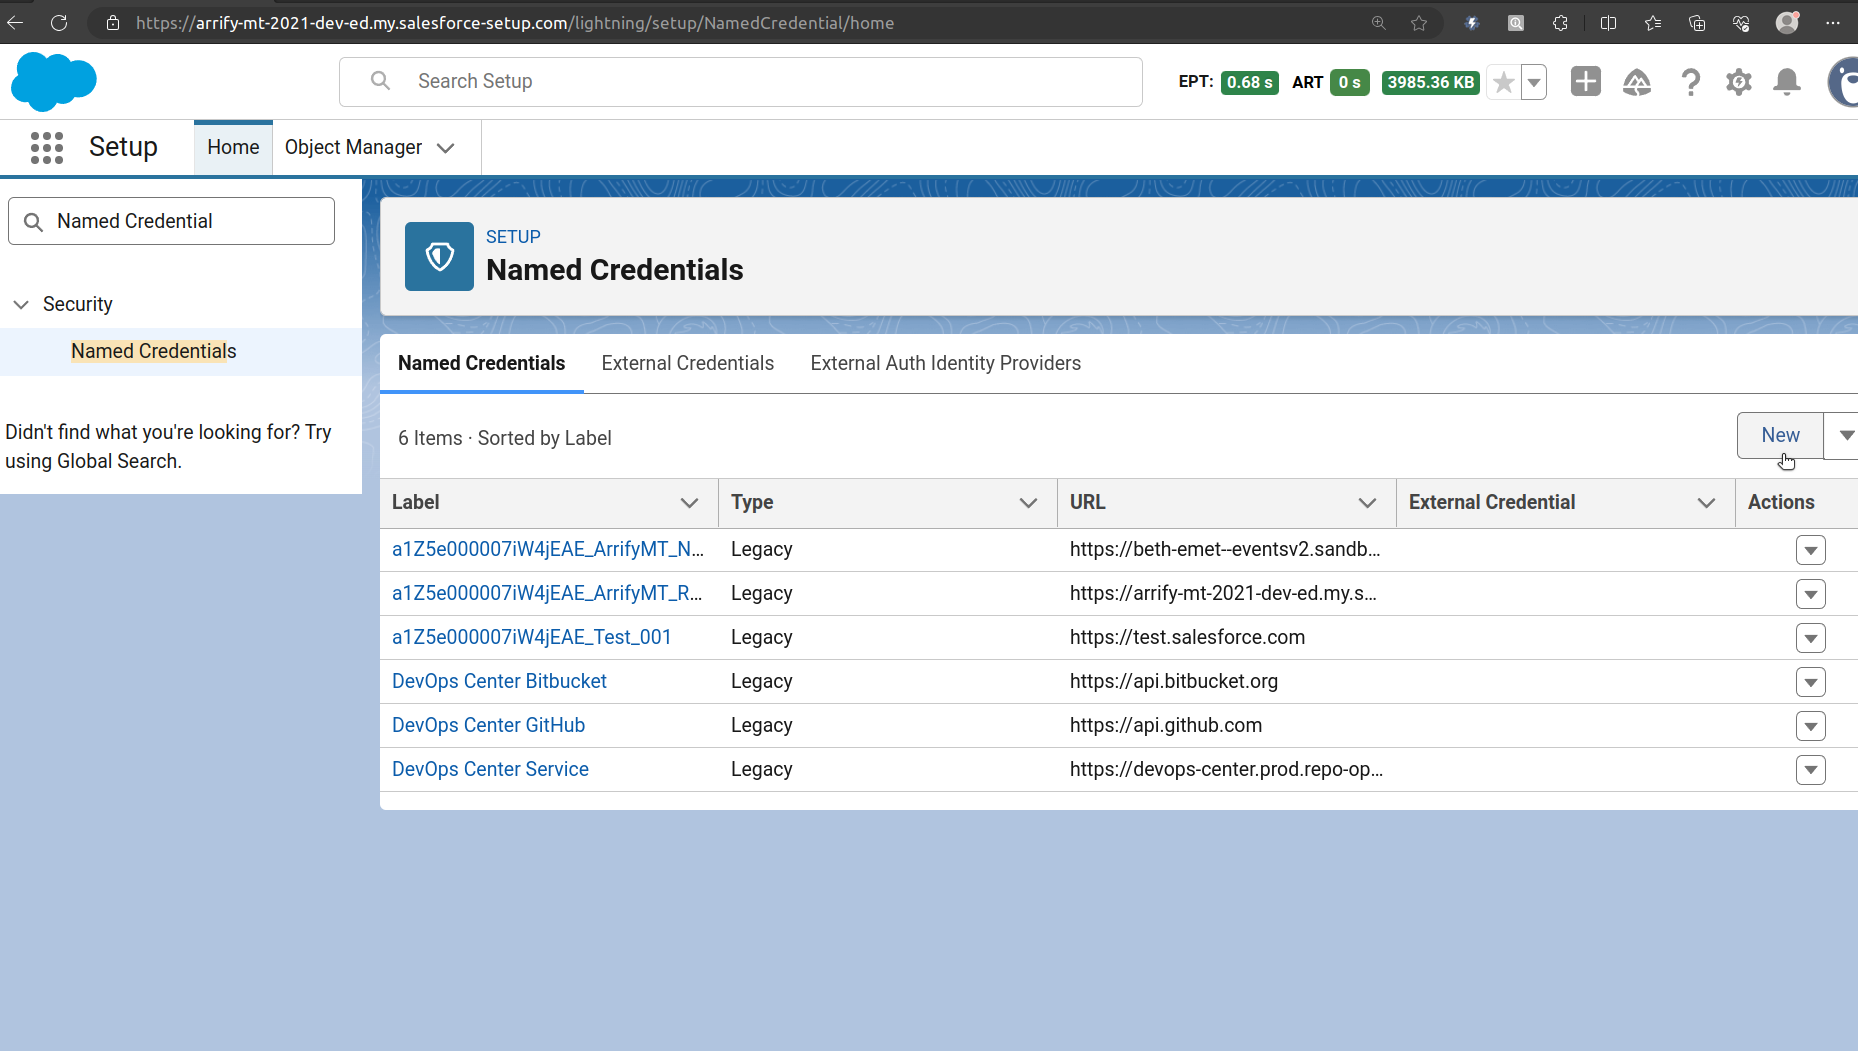
From Setup, enter “Named Credential” in the Quick Find box, and then Select Named Credential.
Click the Named Credential tab, and then click New.
Fill New Named Credential
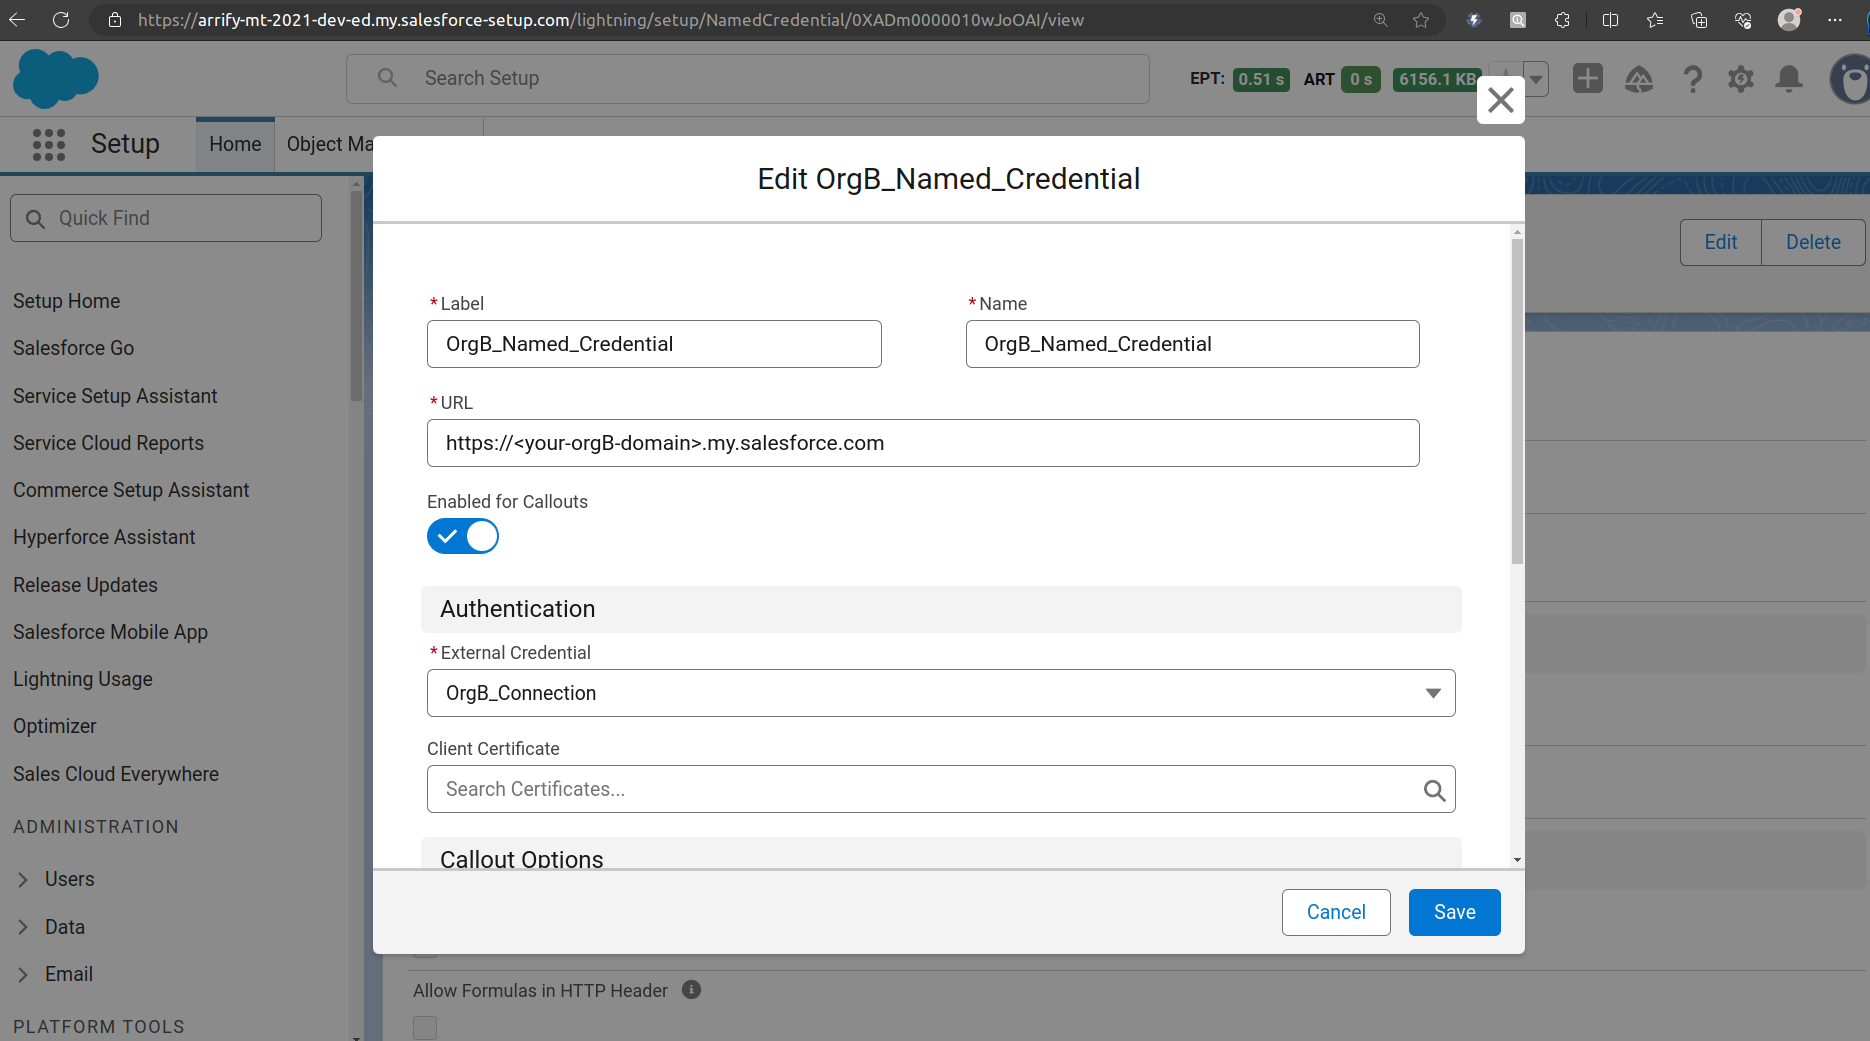
Fill up -> Label / Name
URL (Endpoint) -> https://<your-orgB-domain>.my.salesforce.com
Replace <your-orgB-domain> with your real My Domain (eg. puneet21-dev-ed).
External Credential -> Select previously created “OrgB_Connection” External Credential.
Click on Save.
Open External Credential to Setup Principals
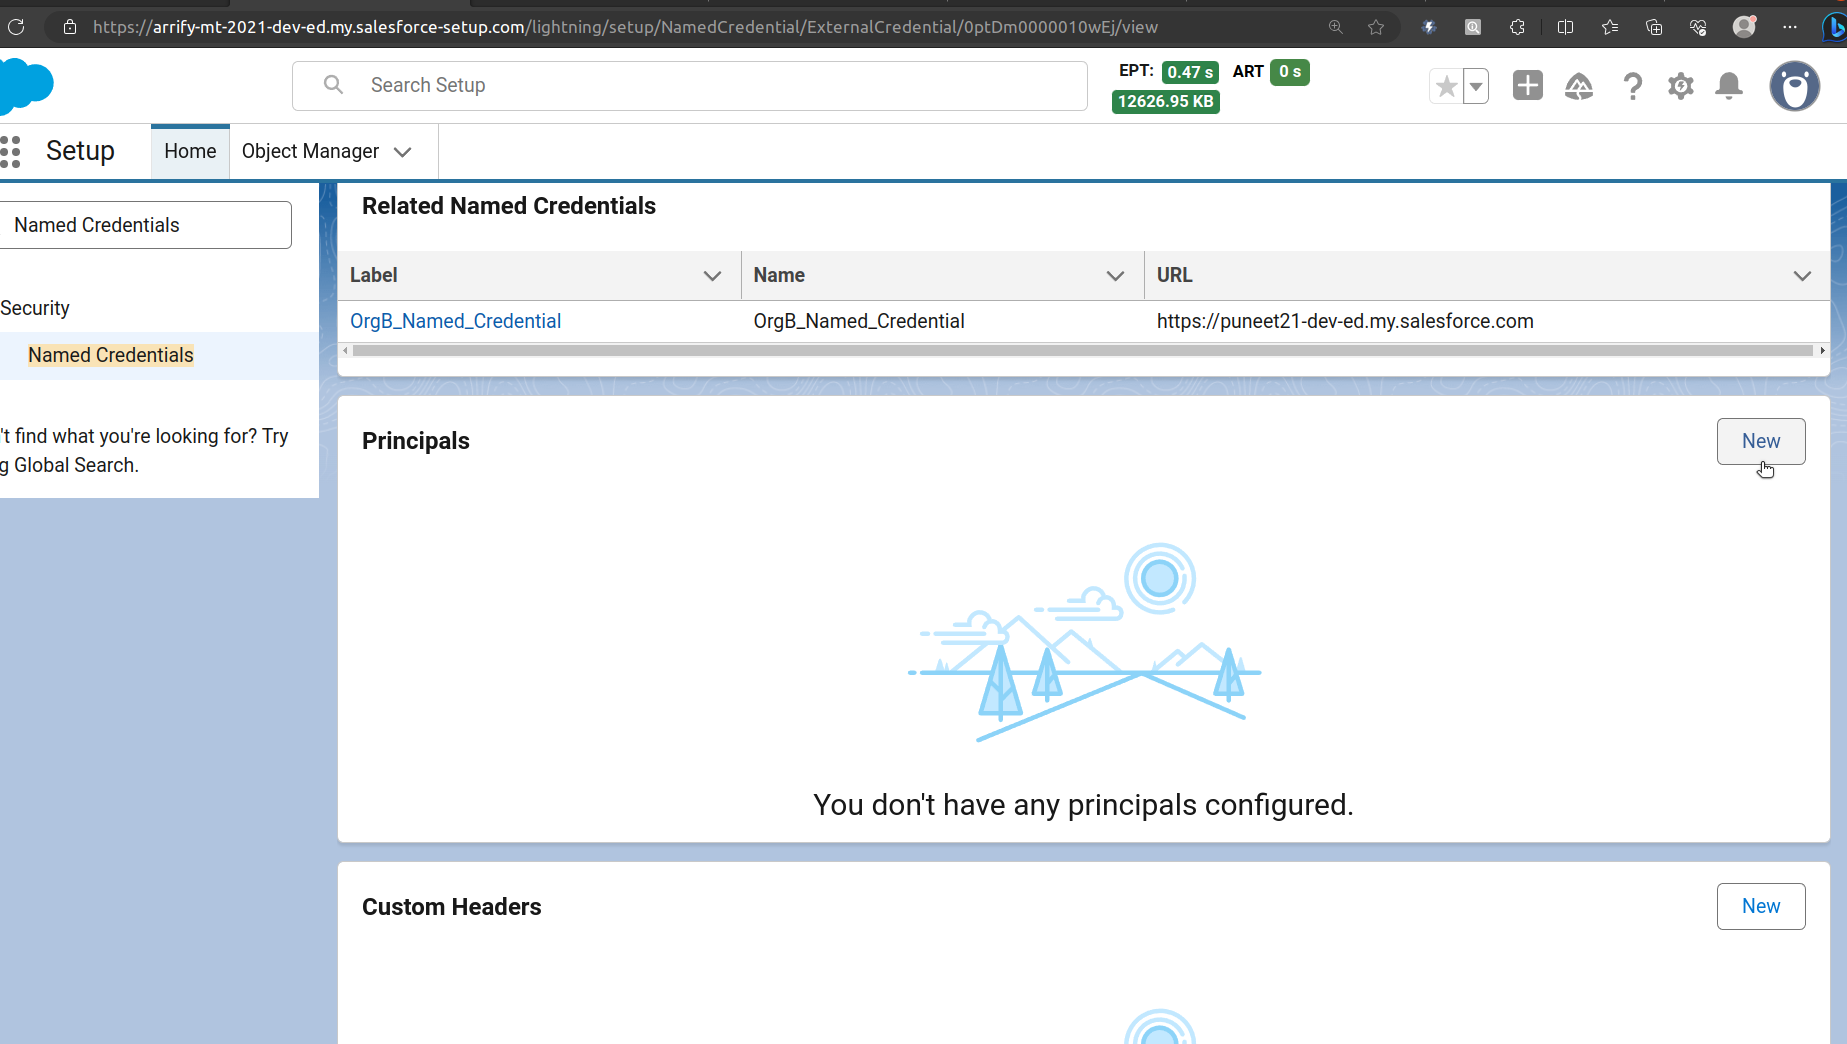
From Setup, enter “Named Credential” in the Quick Find box, and then select Named Credential.
Click the External Credential tab, and scroll to Principals section then click New.
Create Principals
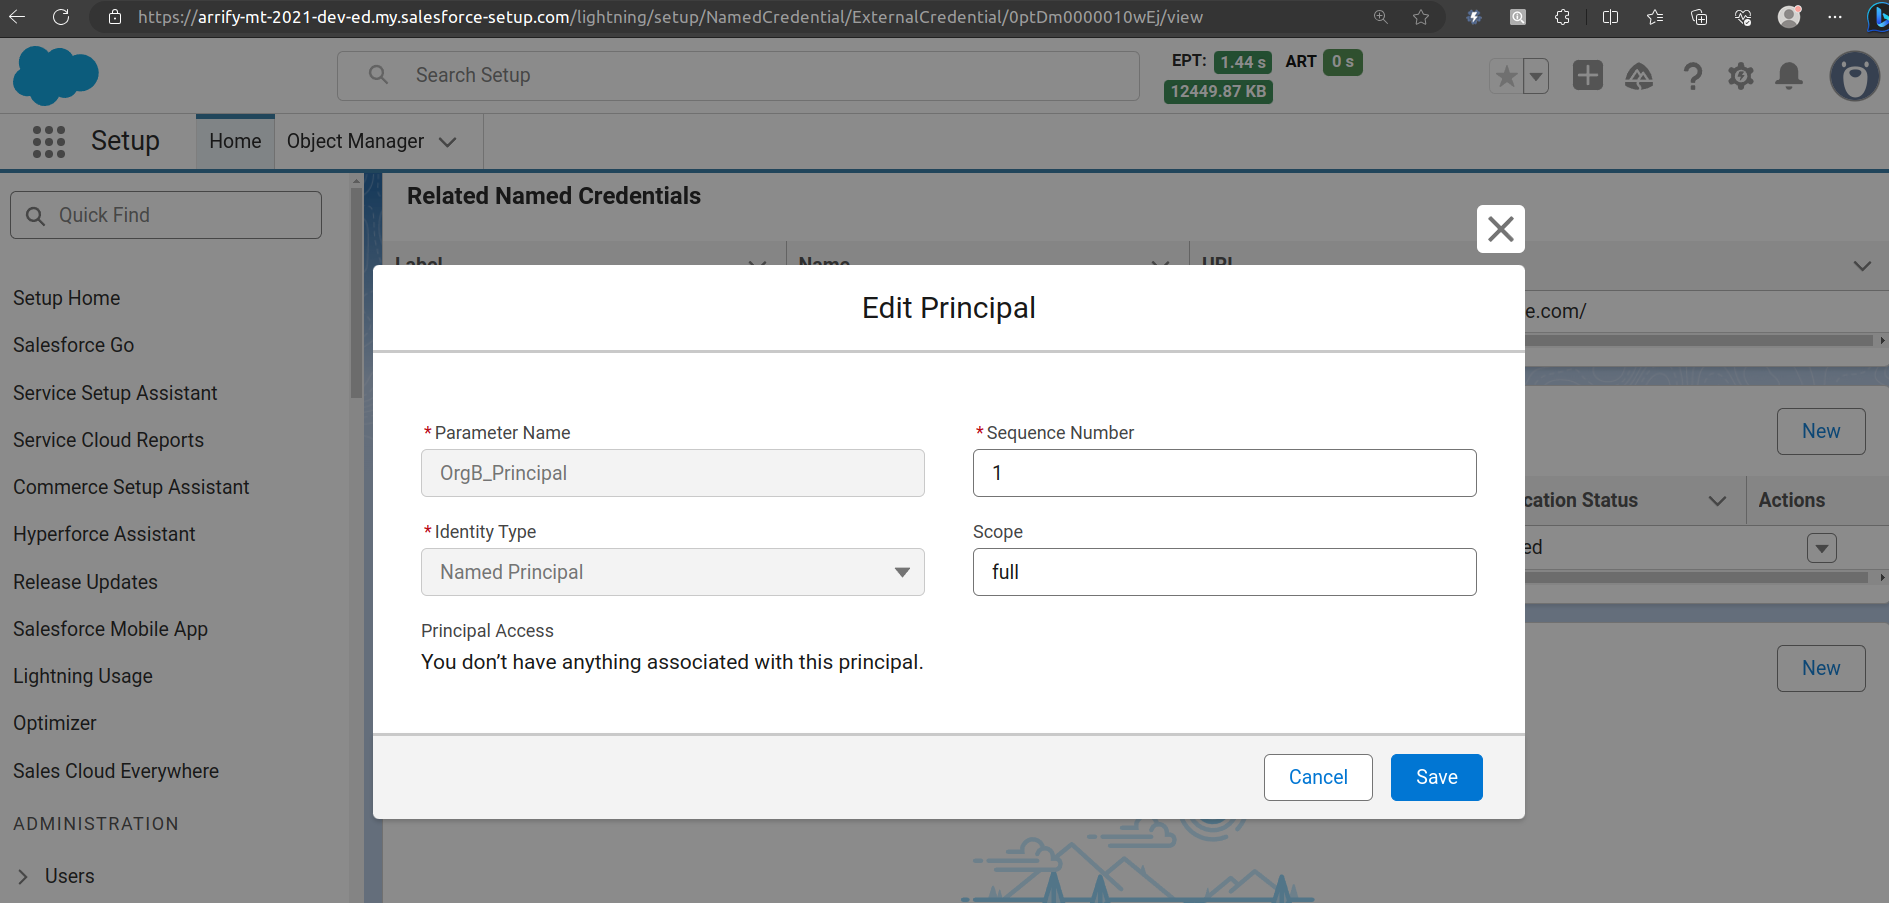
In Identity Type, there’s a Named Principal (for all users) or Per User (each must authenticate).
Click on Save.
Authenticate Principal
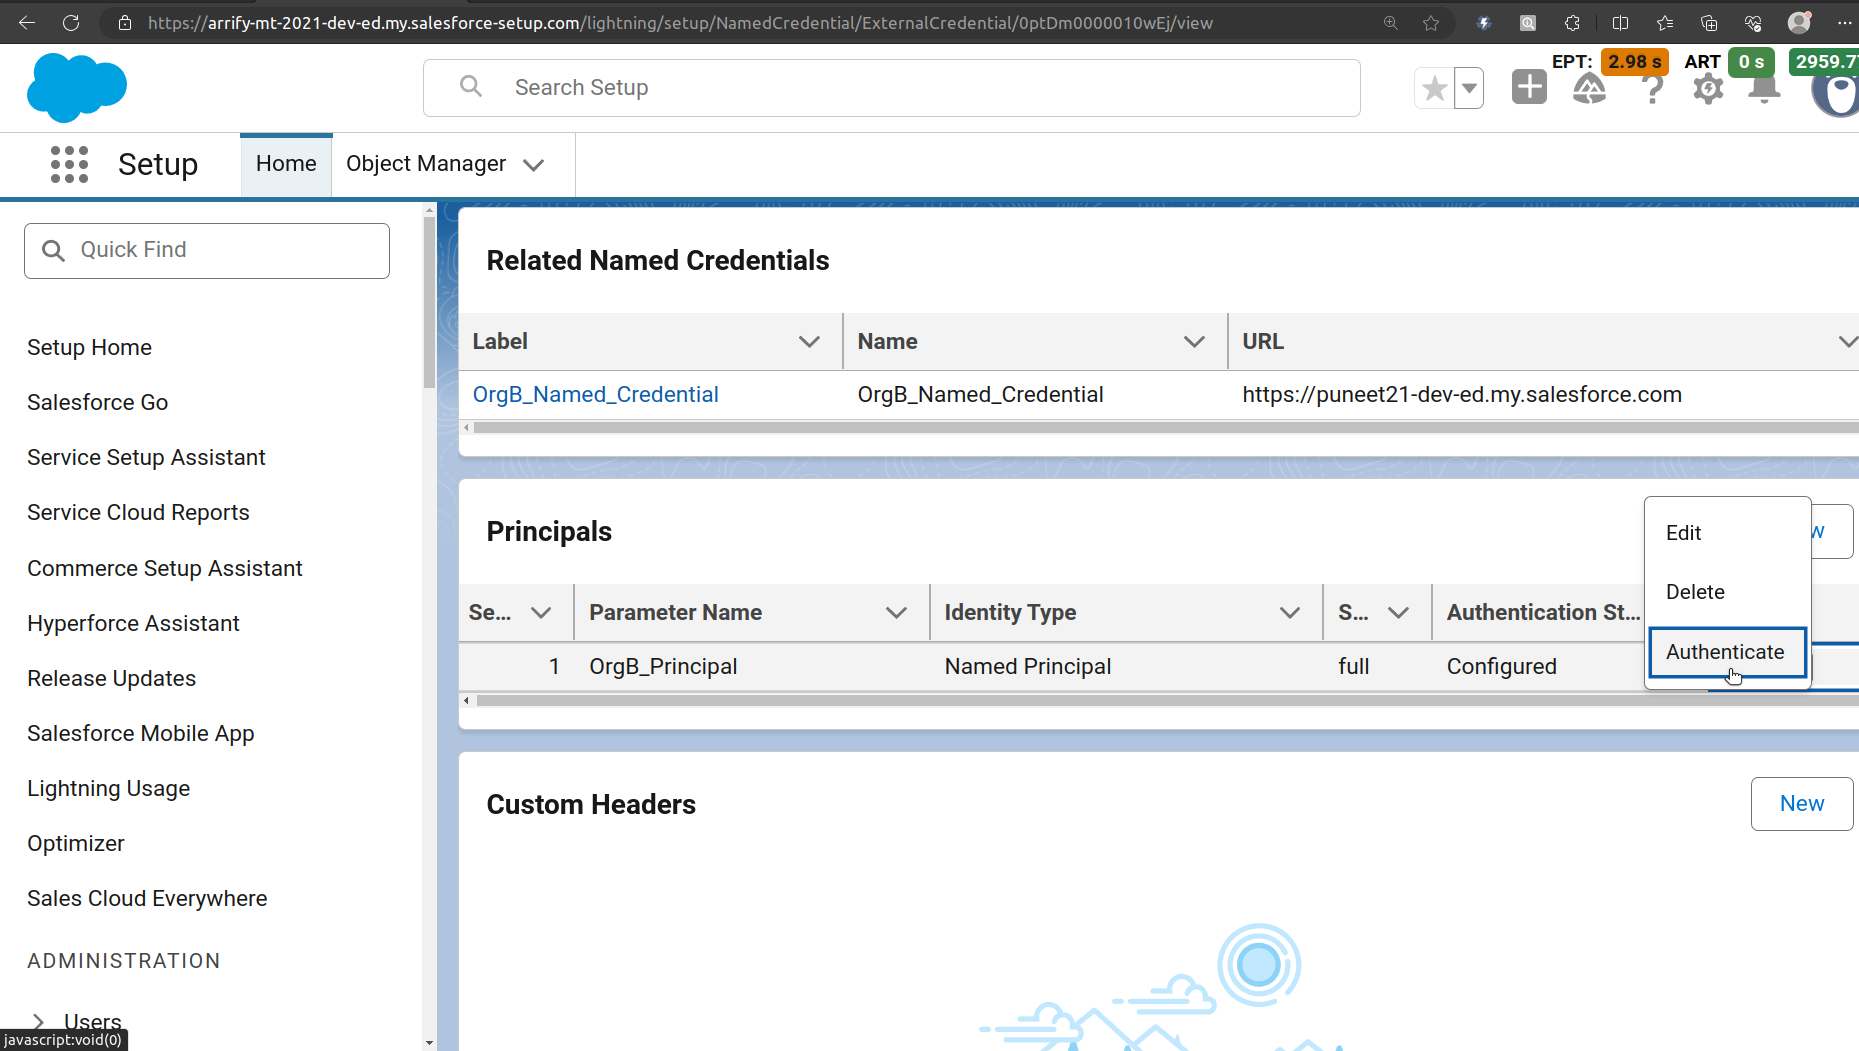
After you successfully authenticate the principal, the Authentication Status will change from “Not Configured” to “Configured.”
Re-authenticate Org B(puneet21)
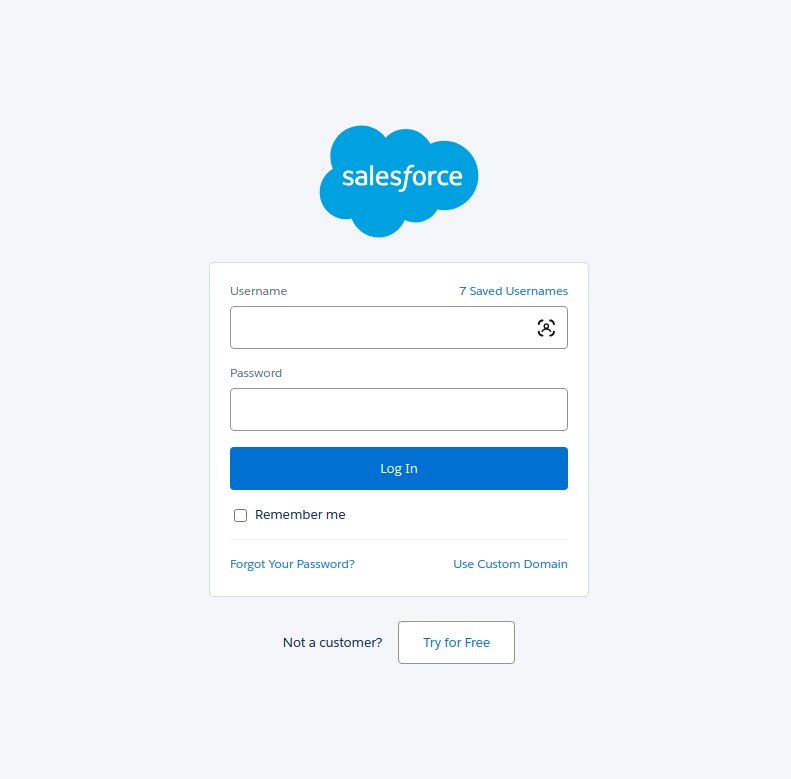
Enter username & password of target org such as “Org B(puneet21)” then → log in → click Allow.
Setup a Permission Set on Org A(arrify-mt)
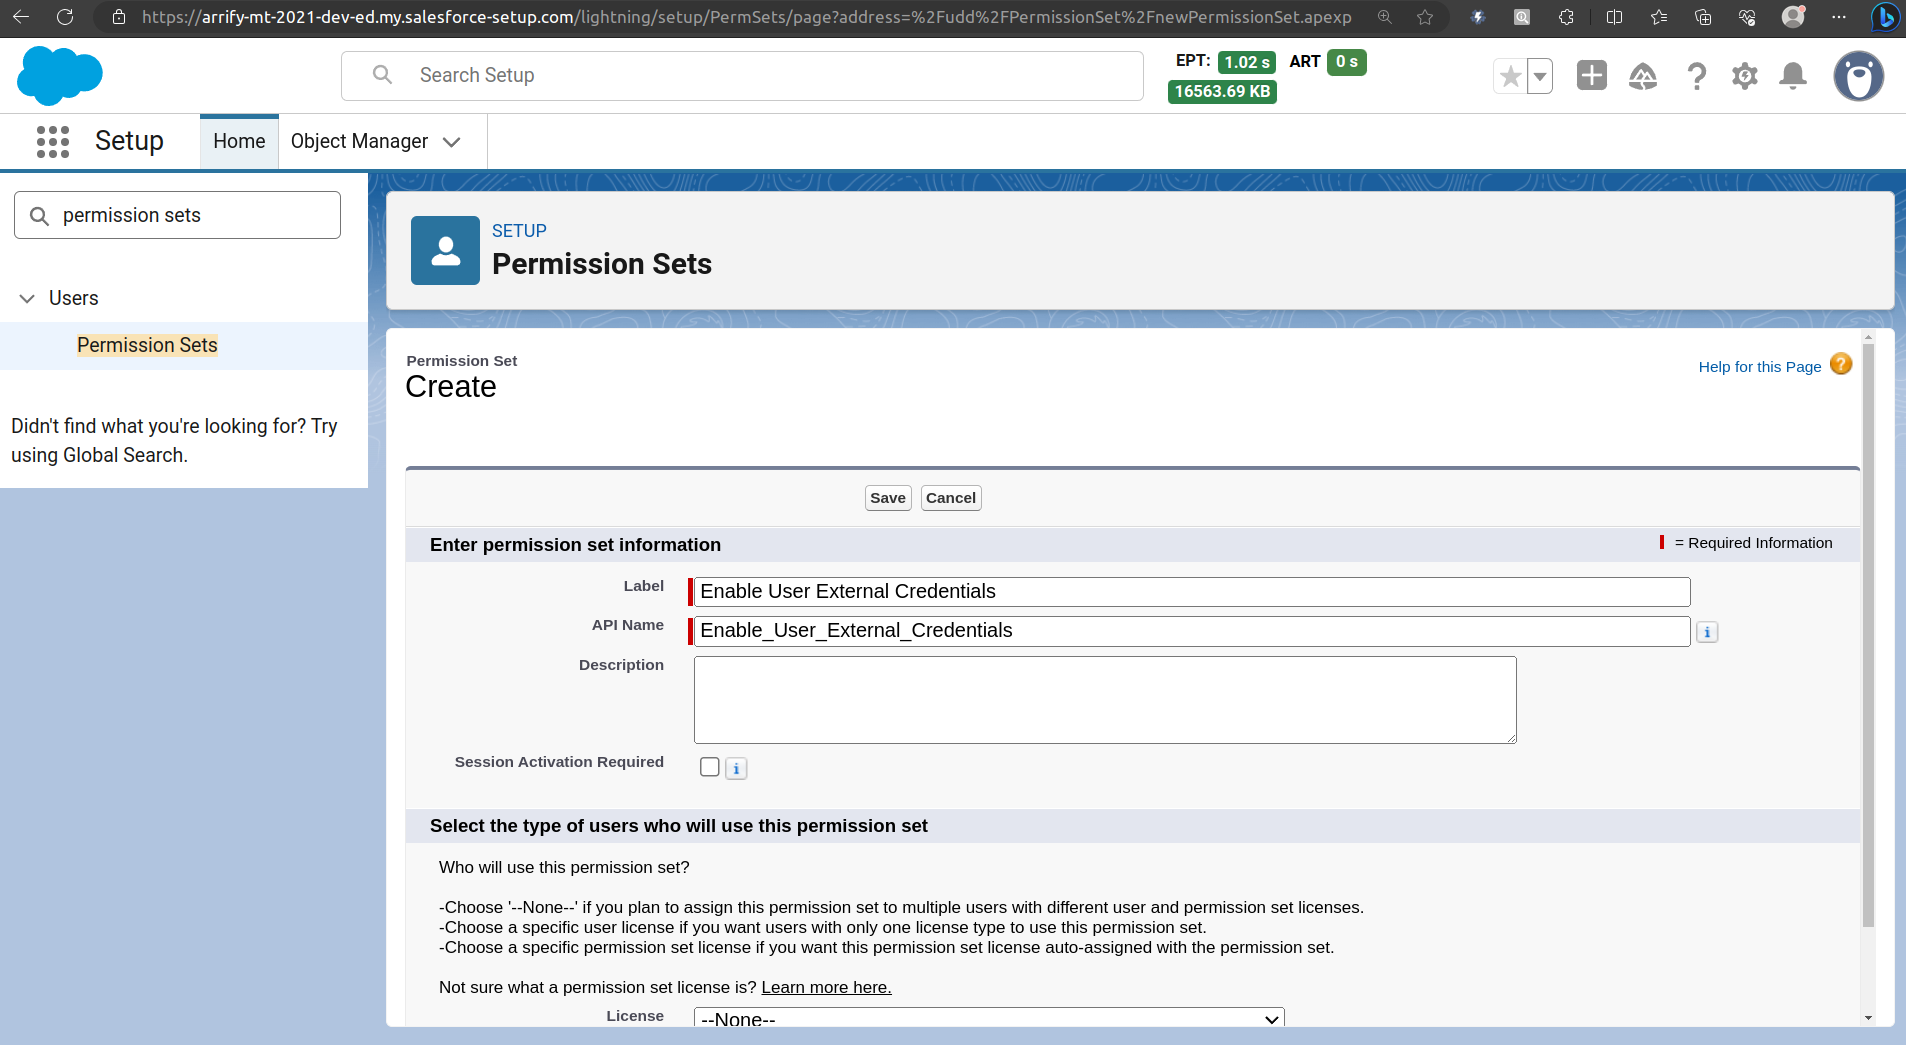
From Setup, enter “Permission Sets” in the Quick Find box, and then select Permission Sets.
Click New.
Configure External Credential Principal Access
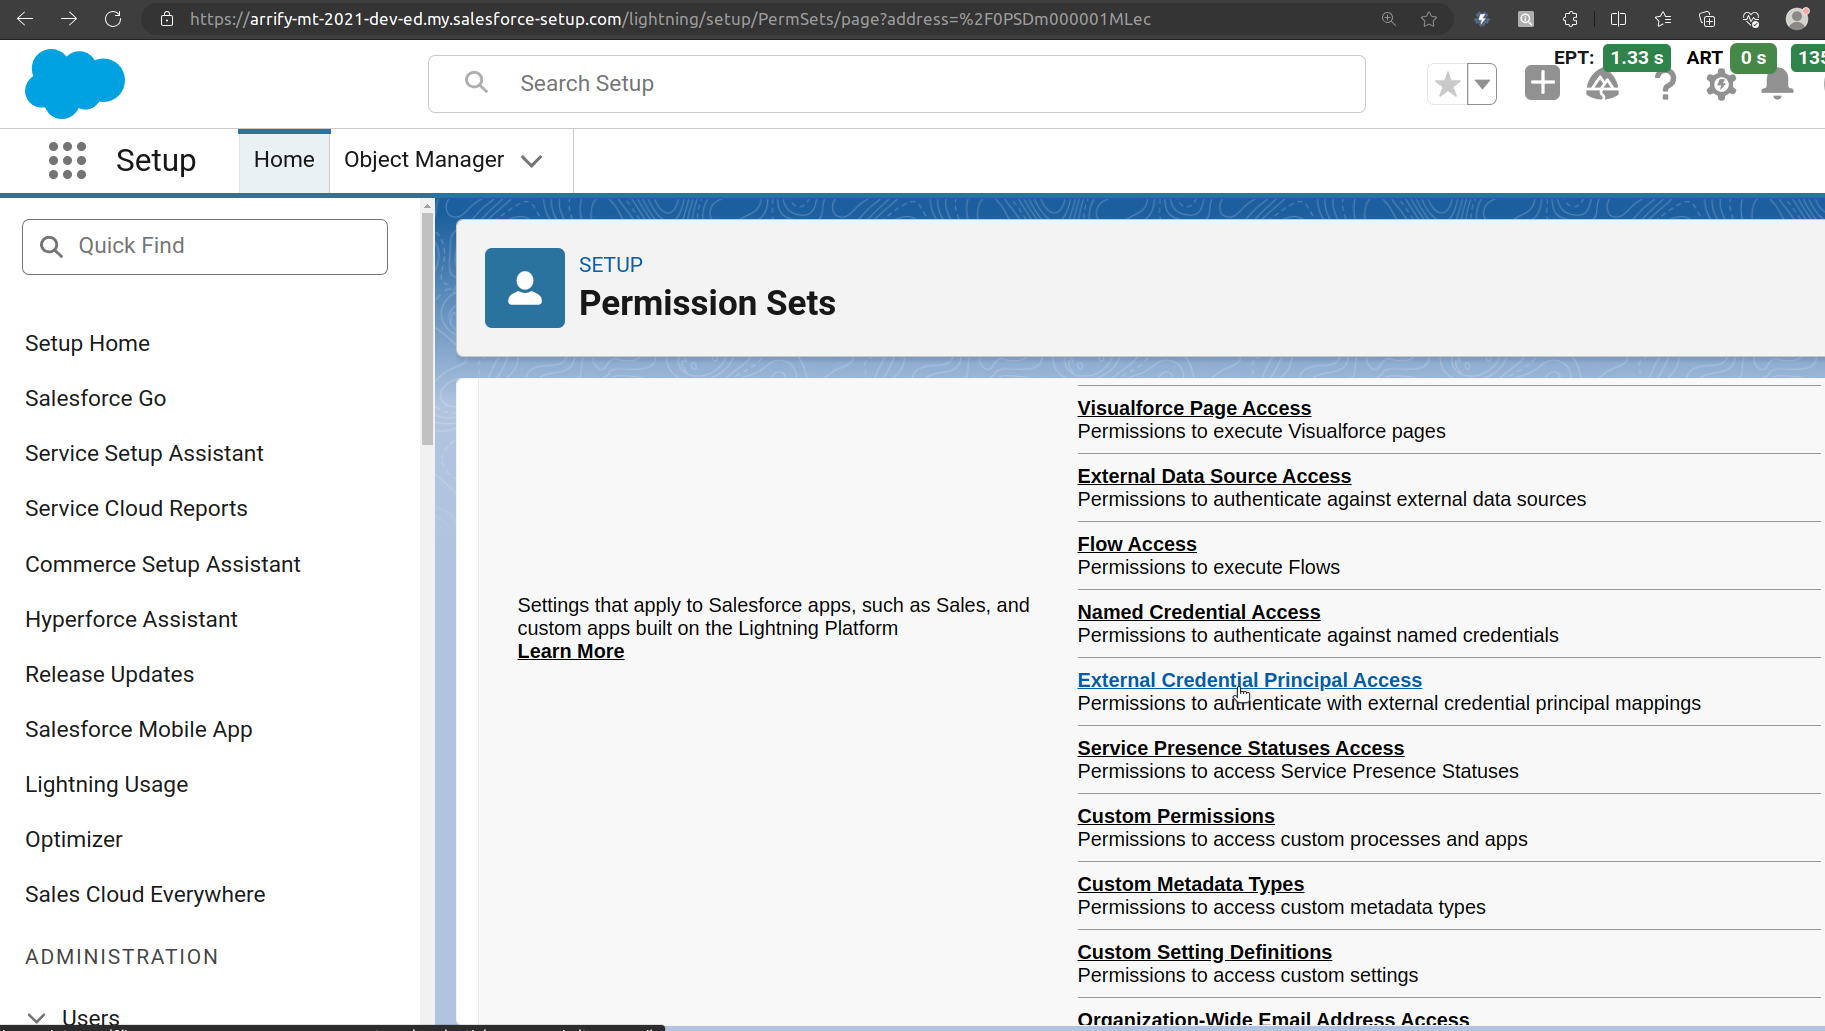
In the Apps section of the Permission Set, click External Credential Principal Access.
Click Edit.
If this permission is missing, you might encounter :
EXCEPTION: We couldn’t access the credential(s). You might not have the required permissions, or the external credential “<External Credential>” might not exist.
Give Access -> External Credential Principal Access
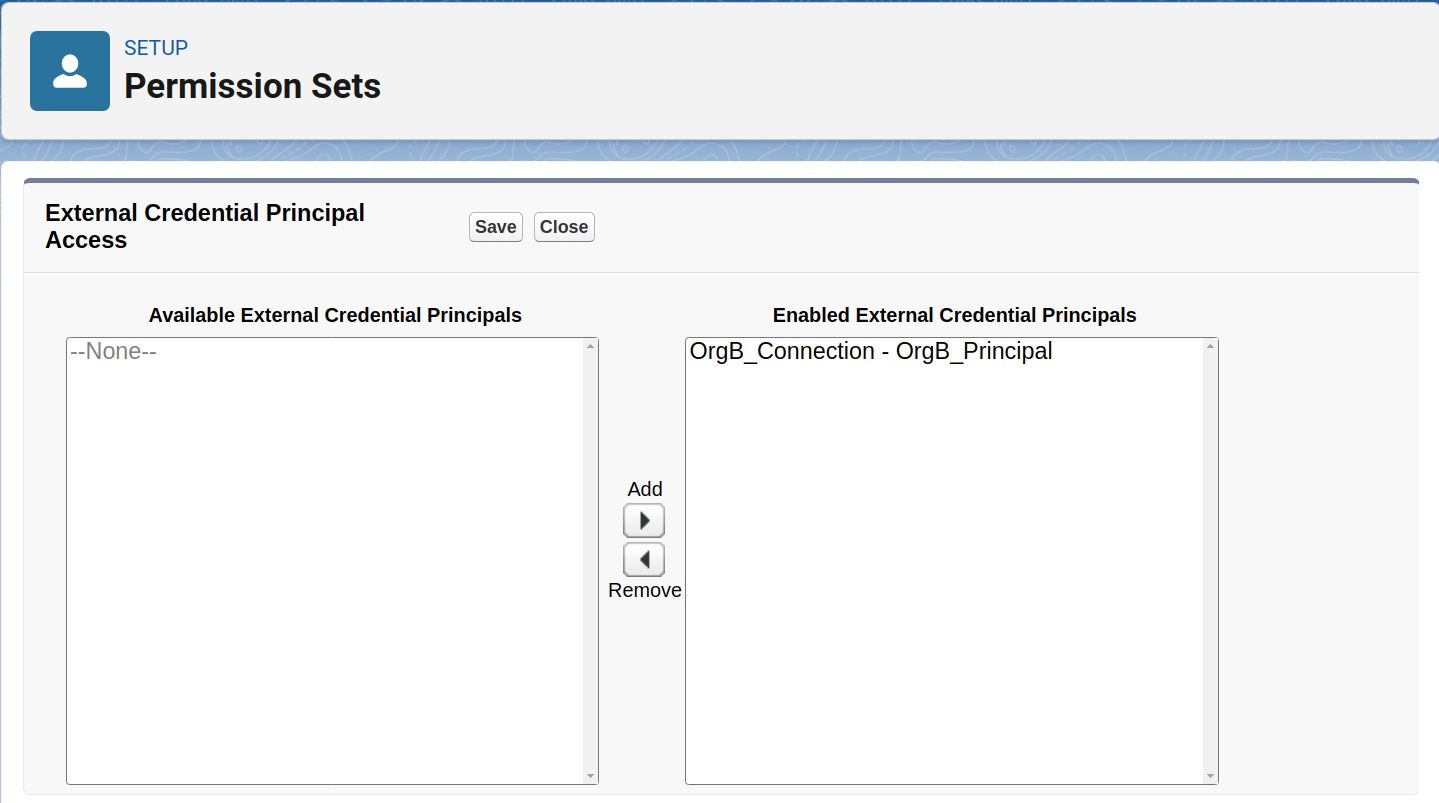
In the Available External Credential Principals box, find your newly created Principal.
Move it to the Enabled External Credential Principals box.
Click on Save
Assign Permission Set -> User
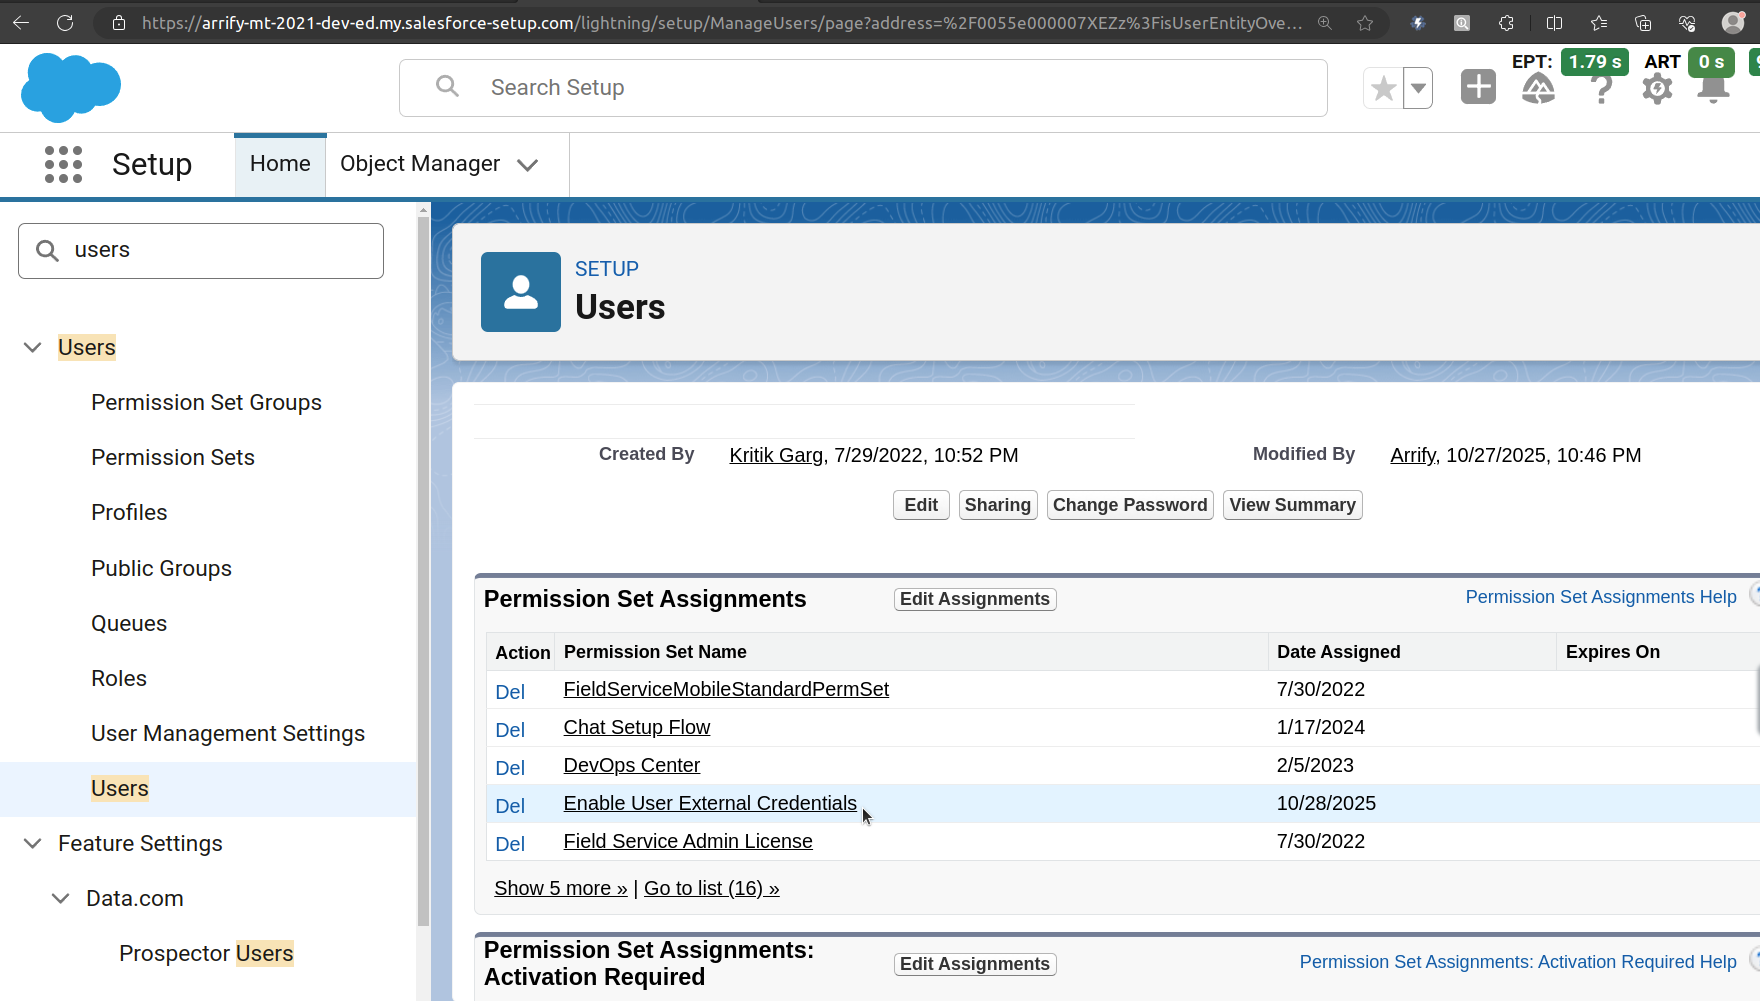
Go to Setup → Users → Users in Salesforce.
Scroll down to the Permission Set Assignments related list.
Click Edit Assignments.
From the Available Permission Sets, select the Permission Set you created earlier.
Move it to Enabled Permission Sets, then click Save.
On Org B (puneet21): Setup Custom REST Endpoint to Create Account
/**
 * ============================================================================
 * Apex REST API Endpoint - Org B (Target/Receiver)
 * ============================================================================
 * This class exposes a REST API endpoint that receives account data from Org A
 * and creates Account records in Org B (this org)
 *
 * Endpoint URL: /services/apexrest/arrify/v1/accounts
 * HTTP Method: POST
 * ============================================================================
 */

@RestResource(urlMapping='/arrify/v1/accounts')
global class ArrifyAccountsApi {
	/**
     * POST method to create a new Account in Org B
     *
     * @return Response with account creation status
     */
    @HttpPost
    global static ResponseWrapper createAccount() {
        ResponseWrapper response = new ResponseWrapper();

        try {
            // Step 1: Get the request body from Org A
            RestRequest request = RestContext.request;
            String requestBody = request.requestBody.toString();

            System.debug('Received Request Body: ' + requestBody);

            // Step 2: Parse the JSON request
            if (String.isBlank(requestBody)) {
                response.success = false;
                response.message = 'Request body is empty';
                RestContext.response.statusCode = 400; // Bad Request
                return response;
            }

            // Deserialize JSON to Map
            Map<String, Object> accountDataMap = (Map<String, Object>) JSON.deserializeUntyped(requestBody);

            // Step 3: Validate required fields
            if (!accountDataMap.containsKey('Name') || String.isBlank((String)accountDataMap.get('Name'))) {
                response.success = false;
                response.message = 'Account Name is required';
                RestContext.response.statusCode = 400; // Bad Request
                return response;
            }

            // Step 4: Create the Account record
            Account newAccount = new Account();
            newAccount.Name = (String) accountDataMap.get('Name');

            // Step 5: Insert the Account
            insert newAccount;

            System.debug('Account created successfully! ID: ' + newAccount.Id);

            // Step 6: Prepare success response
            response.success = true;
            response.accountId = newAccount.Id;
            response.accountName = newAccount.Name;
            response.message = 'Account created successfully';

            // Set HTTP status code to 201 (Created)
            RestContext.response.statusCode = 201;

            System.debug('Response: ' + JSON.serialize(response));
            System.debug('========== REQUEST PROCESSED SUCCESSFULLY ==========');

        }
        catch (DmlException e) {
            // Database operation failed
            response.success = false;
            response.message = 'Database error: ' + e.getDmlMessage(0);
            response.errorDetails = e.getStackTraceString();
            RestContext.response.statusCode = 500; // Internal Server Error

            System.debug('DML Exception: ' + e.getMessage());
            System.debug('Stack Trace: ' + e.getStackTraceString());
        }
        catch (Exception e) {
            // Unexpected error
            response.success = false;
            response.message = 'Unexpected error: ' + e.getMessage();
            response.errorDetails = e.getStackTraceString();
            RestContext.response.statusCode = 500; // Internal Server Error

            System.debug('Exception: ' + e.getMessage());
            System.debug('Stack Trace: ' + e.getStackTraceString());
        }
        return response;
    }

    /**
     * Response wrapper for POST, PATCH, DELETE operations
     */
    global class ResponseWrapper {
        public Boolean success;
        public String accountId;
        public String accountName;
        public String message;
        public String errorDetails;

        public ResponseWrapper() {
            this.success = false;
            this.message = '';
        }
    }
}
On Org A (arrify-mt): Create an HTTP Callout Class to Send Account Data to Org B
/**
 * ============================================================================
 * ArrifyOrgBClient - HTTP Callout Class for Org A (Source Org)
 * ============================================================================
 *
 * Purpose:
 * This class is deployed in Org A (Source Org) and is responsible for making
 * HTTP callouts to Org B's custom Apex REST API endpoint to create Account
 * records remotely.
 *
 * Key Components:
 * - Uses Named Credential for secure authentication
 * - Makes HTTP POST callout to custom Apex REST endpoint
 * - Runs asynchronously using @future to avoid blocking UI
 *
 * Endpoint Called:
 * POST /services/apexrest/arrify/v1/accounts
 * - arrify/v1/accounts : custom endpoint path
 * - /services/apexrest/ : standard Salesforce REST      service path
 *
 * Prerequisites:
 * 1. Named Credential "OrgB_Named_Credential" must be configured in Org A
 * 2. Connected App must be created in Org B
 * 3. ArrifyAccountsApi class must be deployed in Org B
 * 4. OAuth authentication must be completed between orgs
 * ============================================================================
 */

public class ArrifyOrgBClient {

    @future(callout=true)
    public static void createAccountInOrgB(String accountName) {
        try {
            // Step 1: Build the endpoint URL using Named Credential
            // 'callout:' tells Salesforce to use Named Credential
            String endpoint = 'callout:OrgB_Named_Credential/services/apexrest/arrify/v1/accounts';
            System.debug('endpoint: ' + endpoint);

            // Step 2: Prepare contact data in a Map
            Map<String, Object> accountData = new Map<String, Object>();
            accountData.put('Name', accountName);

            // Step 3: Convert Map to JSON format
            String jsonBody = JSON.serialize(accountData);
            System.debug('Sending data: ' + jsonBody);

            // Step 4: Create HTTP Request
            HttpRequest request = new HttpRequest();
            request.setEndpoint(endpoint);
            request.setMethod('POST'); // POST means "create new record"
            request.setHeader('Content-Type', 'application/json');
            request.setBody(jsonBody);

            // Step 5: Send the request to Org B
            Http http = new Http();
            HttpResponse response = http.send(request);

            // Step 6: Check the response and handle success/failure
            if (response.getStatusCode() == 201 || response.getStatusCode() == 200) {
                System.debug('SUCCESS! Account created in Org B');
                System.debug('Response: ' + response.getBody());
            } else {
                System.debug('ERROR! Status Code: ' + response.getStatusCode());
                System.debug('Error Message: ' + response.getBody());
            }
        } catch (Exception e) {
            System.debug('EXCEPTION: ' + e.getMessage());
        }
    }
}
On Org A (arrify-mt): Add an Account Trigger to Call ArrifyOrgBClient and Create the Same Account in Org B
/**
 * ============================================================================
 * Account Sync Trigger - Org A (Source)
 * ============================================================================
 * This trigger fires when a new Account is created in Org A
 * and automatically syncs it to Org B using the ArrifyOrgBClient class
 *
 * Trigger: after insert
 * Object: Account
 * ============================================================================
 */

trigger AccountSyncTrigger on Account (after insert) {

    System.debug('========== ACCOUNT SYNC TRIGGER FIRED ==========');
    System.debug('Number of new accounts: ' + Trigger.new.size());

    // Get the first account from the trigger
    Account acc = Trigger.new[0];

    // Only sync if account has a name (required field)
    if (String.isNotBlank(acc.Name)) {

        System.debug('Syncing Account to Org B');
        System.debug('Account Name: ' + acc.Name);
        System.debug('Account ID: ' + acc.Id);

        // Call the ArrifyOrgBClient to create account in Org B
        ArrifyOrgBClient.createAccountInOrgB(acc.Name);

        System.debug('Sync request sent to ArrifyOrgBClient');

    } else {
        System.debug('Skipping account sync - Name is blank');
    }

    System.debug('========== TRIGGER EXECUTION COMPLETED ==========');
}
Demonstrate the Testing Workflow
Setup a New Account Record in Org A (arrify-mt)
- Go to Org A.
- Navigate to the Accounts tab.
- Click New to create a new Account record.
- Enter the details.
- Click Save.
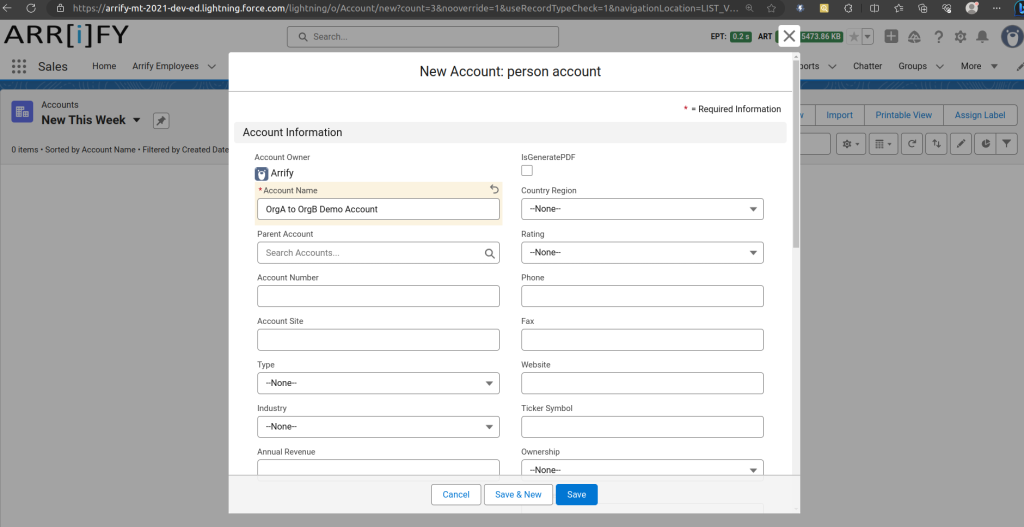
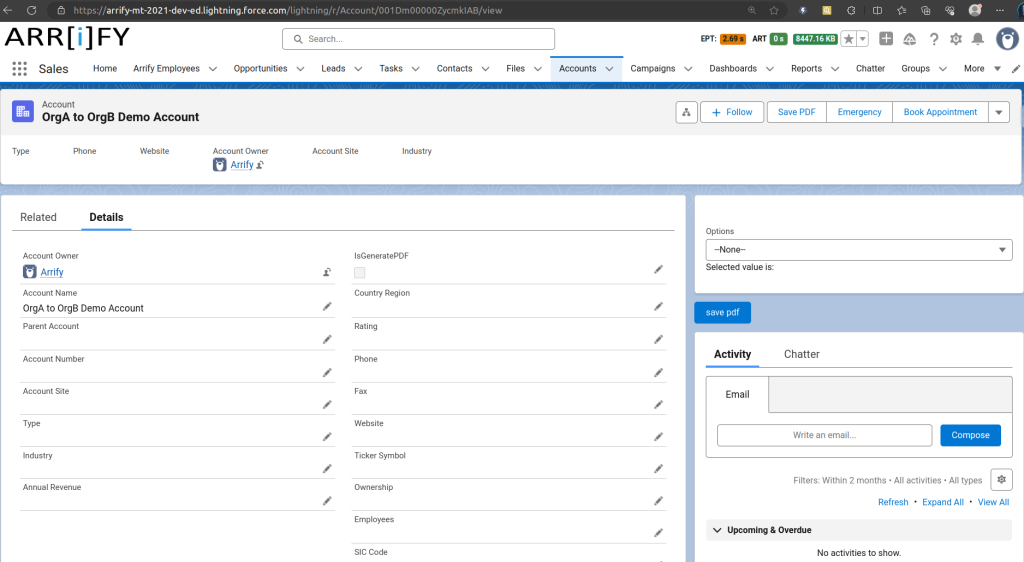
Verify Auto-Creation Account in Org B (puneet21)
- Go to the Accounts tab.
- Click New This Week and refresh the list.
- You should now see a new Account record with the same as in Org A.
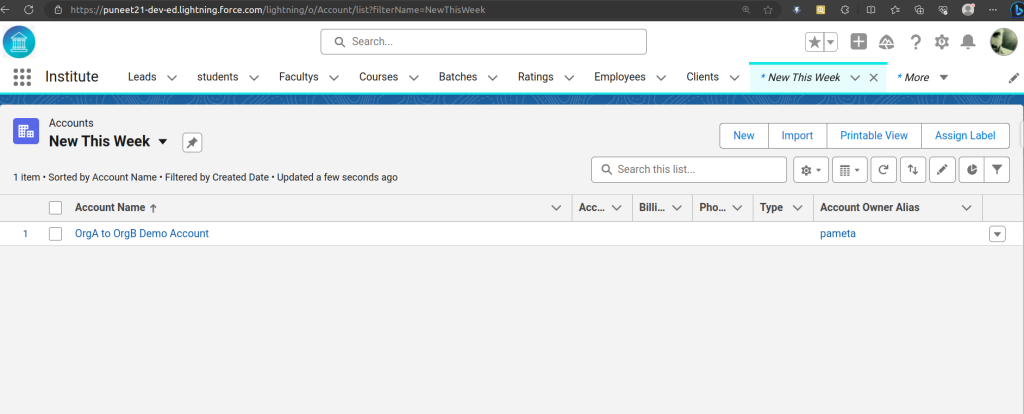
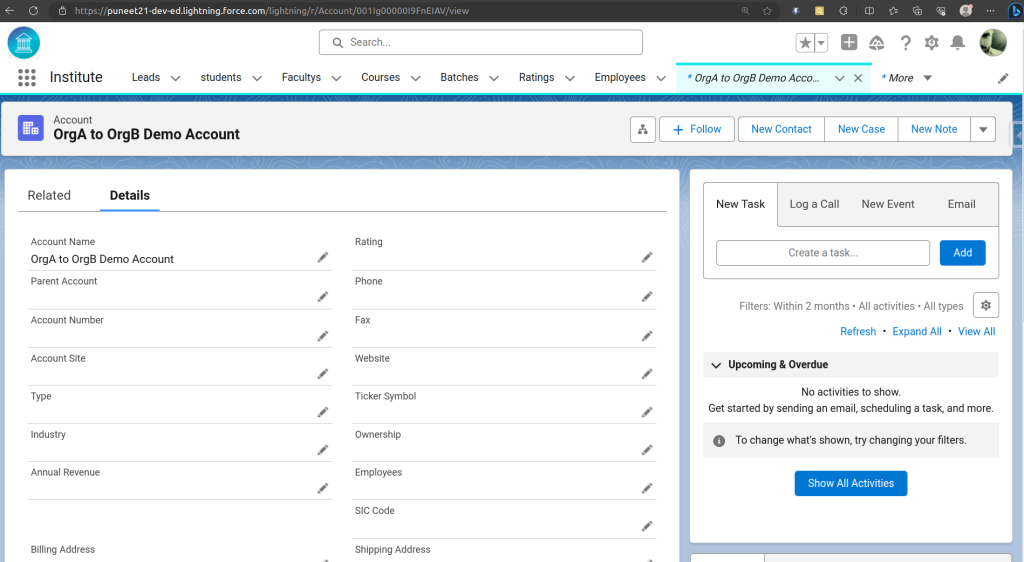
Congratulations! You’ve learned how to connect two Salesforce orgs using REST API endpoints, Connected Apps, and Named Credentials.
How the Integration Works Behind the Scenes
Now that we understand the concept, let’s look at what actually happens step by step when a new Account is created in Org A and automatically synced to Org B using the Salesforce REST API, Connected App, and Named Credential.
Trigger Activation
When a user in Org A (Sales Org) creates a new Account and clicks Save, Salesforce immediately fires an after insert trigger for that record.
Inside this trigger, we call an Apex method (usually marked with @future(callout=true)) to send the data to Org B.
This happens asynchronously, meaning it runs in the background so the user doesn’t have to wait, the Account saves instantly, and the integration continues silently.
Data Collection
Next, the trigger collects all the important Account details such as Name, Phone, Email, or any other fields you want to share.
These details are passed to an integration method, like sendAccountToOrgB().
That method prepares the data for sending, converting it into the right format and runs in a separate background thread for better speed and performance.
Named Credential Magic
When the Apex code makes the callout using something like:
req.setEndpoint('callout:OrgB_Connection/services/data/v61.0/sobjects/Account/');Salesforce automatically looks up your Named Credential called OrgB_Connection.
It then fetches all the saved connection details, including:
- The endpoint URL (like
https://yourOrgBInstance.salesforce.com) - The authentication protocol (OAuth 2.0)
- The saved OAuth tokens
This is where the real magic happens, you don’t need to manually manage authentication headers, tokens, or passwords. Salesforce takes care of it for you in a secure and reliable way.
Authentication Process (Happens Automatically)
Behind the scenes, Salesforce handles all the authentication between Org A and Org B using OAuth 2.0.
Here’s what happens in just a fraction of a second:
- Org A’s Named Credential sends the Consumer Key (from Org B’s Connected App).
- Org B verifies that Org A is authorized to connect.
- Both orgs exchange secure OAuth tokens to confirm the connection.
- If everything matches, access is granted; if not, the callout is denied.
All this happens automatically, the user never sees any of it.
Creating the HTTP Request
Once authentication is complete, Salesforce builds the HTTP request that will send the data to Org B. It specifies:
- Method:
POST(used to create a new record) - Endpoint:
/services/data/v61.0/sobjects/Account/ - Header:
Content-Type = application/json - Body: JSON data (Account information)
Here’s an example of what that JSON body might look like:
{
  "Name": "John Smith"
}
Salesforce then sends this request using the built-in HttpRequest and HttpResponse classes.
Record Creation in Org B
Once the request reaches Org B, Salesforce reads the JSON data, checks that all required fields are included, and then creates a new Account record in its database.
A new Record ID is generated for this Account, confirming successful creation.
Org B’s Salesforce REST API responds with a 201 (Created) status code to show that the record was successfully added.
Response Sent Back to Org A
Org B now sends a response back to Org A.
This response includes:
- HTTP Status Code:
201 (meaning “Created Successfully”) - Response Body: Details about the new record, such as its Salesforce Record ID.
Org A’s Apex code receives this response, logs it (for debugging or tracking), and confirms that the integration worked.
Best Practices for a Reliable Integration
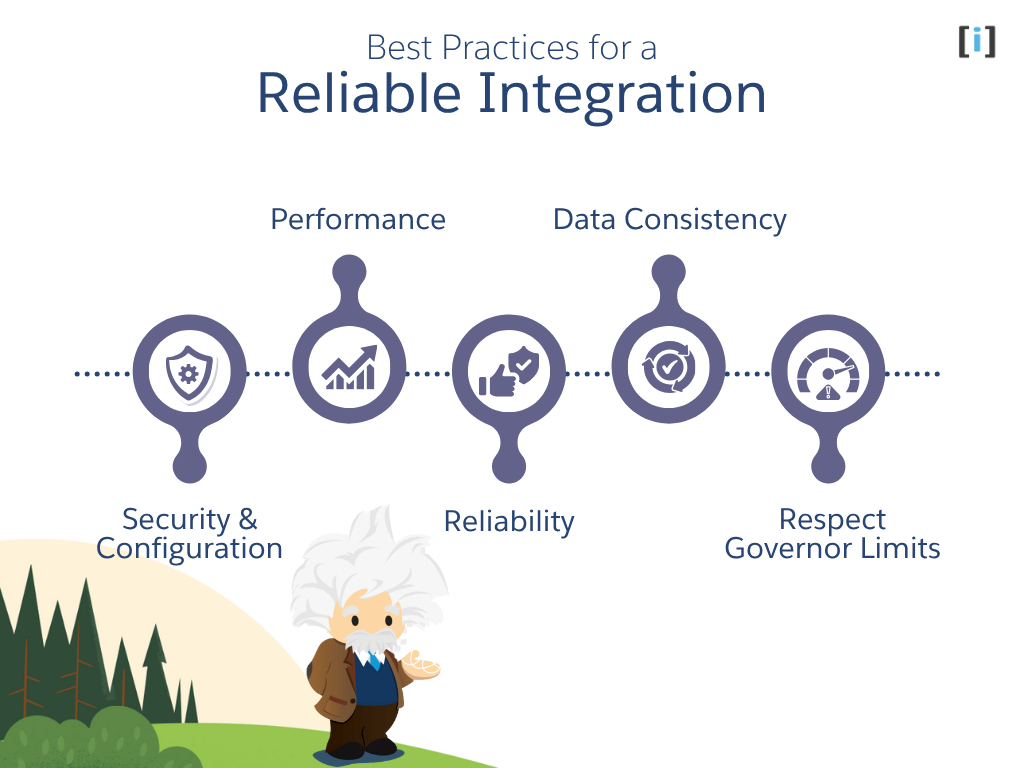
Here are some best practices to ensure your Salesforce integration runs efficiently, securely, and reliably.
Security & Configuration
Always use Named Credentials for all external callouts, never hardcode tokens, URLs, or credentials inside Apex code.
Keep your Connected App scopes minimal, and always use OAuth 2.0 for secure, token-based access instead of storing usernames or passwords.
Performance
To improve performance, batch API calls when possible so you send fewer requests over the network.
Use asynchronous processes like @future or Queueable Apex for tasks that don’t need to happen right away, this keeps the user experience fast and smooth.
Reliability
Add strong error handling and detailed logging to track any issues and avoid data loss.
If the network is temporarily unavailable, make sure your integration can retry failed requests automatically. This keeps your system stable and dependable.
Data Consistency
Before sending data, validate fields to ensure they are complete and accurate.
Also, make sure the same fields exist and match across both orgs to prevent failed inserts or mismatched records.
Respect Governor Limits
Finally, always remember Salesforce’s governor limits, like the maximum number of callouts per transaction or heap size restrictions.
Plan your integration for scalability, so it works smoothly even as your data and users grow.
Conclusion
Salesforce REST API endpoints make it possible to connect, integrate, and automate data flow between Salesforce orgs or external systems.
By using Connected Apps and Named Credentials, you can create secure, token-free, and maintainable integrations without complex code.
This approach is not just powerful but also scalable and secure, making it ideal for real-world Salesforce integrations.
FAQs
Which OAuth scopes are safe for this use case?
Start minimal. For testing, full works, but in production prefer api and, if you need long-lived access, refresh_token, offline_access.
Can I connect two Salesforce orgs without using a Connected App?
No. A Connected App is required in the target org to enable secure OAuth 2.0 authentication. It defines who can connect, what permissions they have, and how Salesforce issues access tokens. Without it, the source org has no way to get authorized API access.
What is the purpose of the Auth Provider in source Org?
The Auth Provider acts as the “bridge” for OAuth 2.0 authentication. It stores target Org’s authorization URL, token URL, Consumer Key, and Secret from the Connected App. When source Org initiates a callout, the Auth Provider handles the OAuth flow and gets the access token automatically.
I get “We couldn’t access the credential(s)” what now?
Grant External Credential Principal Access in a Permission Set, assign it to your user, and ensure the Principal is Configured (authenticated).
Can I restrict which users can use this integration?
Yes. Access is controlled through:
The Permission Set that grants access to the External Credential Principal.
The Connected App policy settings in the target org (you can limit access to specific profiles, IP ranges, or users).
